


1 Press the POWER BUTTON (5) to turn the unit
on.
2 Turn the FUNCTION SWITCH (8) to the Radio
position.
3 Turn the AM/FM SWITCH (7) to the desired
tuning band.
4 Rotate the TUNING KNOB (6) to tune in the
desired station. When tuning in FM stations,
the FM STEREO INDICATOR (3) will appear
the brightest when the station has reached its
strongest frequency.
5 Rotate the VOLUME KNOB (9) to set the
desired volume level.
FM – Make sure the FM WIRE ANTENNA (24) is
fully extended in a straight line.
AM – This radio is equipped with an internal AM
antenna. Try rotating the unit slightly to one
side or the other to improve AM reception.
Repeat Repeat all Random Normal
AM/FM Tuning
RADIO OperationGetting Started
1 Press the POWER BUTTON (5) to turn the unit
on.
2 Turn the FUNCTION SWITCH (8) to the CD
position.
3 Press the CD DOOR OPEN BUTTON (23) to
open the CD DOOR.
4 Load the desired CD into the player with the
labeled side of the CD facing up and close the
CD DOOR.
5 The LED DISPLAY (2) will flash ( - - ) for a second
and then display the total number of tracks on
the CD.
Note: The display will read “no” if there is no
disc in the unit or the disc cannot be read.
6 Press the PLAY/PAUSE BUTTON
(21) to
begin playing the CD.
7 To skip to a different track, press the FORWARD
SKIP
(16) or BACKWARD SKIP (17)
button until you reach the desired track number.
Pressing the FORWARD SKIP
(16) button
will advance forward from track to track. Pressing
the BACKWARD SKIP
(17) will skip
backwards from track to track.
8 To fast forward through part of a particular track,
press and hold the FORWARD SKIP
(16)
button. Playback will resume at the point that
you release the button. To reverse playback,
press and hold the BACKWARD SKIP
(17)
button.
9 To pause during playback, press the
PLAY/PAUSE BUTTON
(21). To resume play,
press the button again.
10To Stop playback, press the STOP BUTTON
(20).
1 There are four modes in which you can listen to
your CD :
Normal, Repeat 1, Repeat all, and Random.
2 To change between these options, press the CD
MODE (18) button. The play mode will change
in the following sequence.
3 In Normal mode, the CD will play from track 1 or
the first selected track till the end of the CD and
stop.
4 When in Repeat 1, the repeat light will flash and
only the selected song will be repeated. You can
select the song to repeat before you press play
or during playback.
5 When in Repeat all, the repeat light will stay on
continuously. In this mode, once the CD is
finished, it will start over from the beginning.
6 When in Random mode, the random light will
stay on continuously. When Random mode, the
CD player will randomly play tracks in no particular
order.
7 Pushing STOP (20) will clear the Random and
Repeat functions and the unit will return to Normal
Mode.
You can program up to 20 tracks that will play in the
order that you program them.
1 In CD Mode with a CD inserted and play stopped,
press the PROGRAM BUTTON (15)
2 Select a track you would like to program in
memory by using the Forward or Backward skip
buttons.
3 Once you have selected a track, press the
PROGRAM BUTTON (15) again. That track is
now stored.
4 Repeat steps 2-3 to store up to 20 tracks.
5 When all desired tracks are programmed, press
the PLAY/PAUSE BUTTON (21) to begin playback
of the selected tracks. The tracks will play in the
order in which they were programmed.
6 To clear programming, press the stop button.
Programmed tracks will also be cleared if the
CD Door is opened or the power is disconnected.
Play Mode
Hints For Better Reception
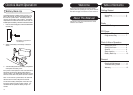
AC
Polarized Plug
6
7
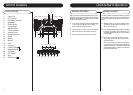
Unpacking
Set Up
CD Player
Playing a CD
Programmed Play
1 Pull the packing materials off the unit.
2 Remove the plastic bag covering the radio.
3 Press OPEN (23) to open the CD DOOR.
4 Remove the cardboard shipping card from the
CD Player.
5 Unwind FM Antenna (24) and allow it to hang
straight down.
6 Remove plastic bag covering the AC Power Cord
(26).
Note: Save all packing materials.
1 Untie the AC Power Cord (26) at the back of the
unit.
2 Remove Plug safety cover on the prongs of the
plug.
3 Plug the AC cord into an appropriate outlet.
4 This product is equipped with a polarized
alternating current line plug (a plug having one
blade wider than the other). This plug will fit into
the power outlet only one way. This is a safety
feature. If you are unable to insert the plug fully
into the outlet, try reversing the plug. If the plug
should still fail to fit, contact your electrician to
replace your obsolete outlet. Do not defeat the
purpose of the polarized plug.
5 Install 9V battery in the Battery Compartment (25)
if you wish to use the battery backup. See page
10 for instructions on installing the battery.