


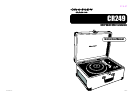

4
5
1 Untie the wire on the AC ADAPTER (16).
2 Plug the AC ADAPTER into appropriate wall
outlet.
3 Plug the small end of the adapter into the
ADAPTER JACK (12) on the back of the unit.
Getting Started
Unpacking
1 Remove packing materials from unit.
Note: Save all packing materials.
2 Remove plastic bag covering radio.
3 Remove AC ADAPTER from packing.
4 Remove tie from A/C ADAPTER.
5 Open lid and remove styrofoam shipping
material from turntable.
6 Remove black tie-wrap from under the tone
arm.
7 Remove white protective needle cover by gently
pulling towards the front of the unit.
8 Turn the TURNTABLE SUSPENSION SCREW
(31) clockwise until it is all the way down.Do
not force or over tighten it. This allows the
turntable to float on its shock absorbers.
9 Release tone arm hold down clip by gently
pushing to the right. This will unlock tone arm
from its arm rest. Re-lock the hold down clip
when moving the unit to another location.
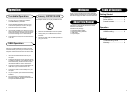
Power Source
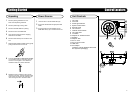
1. Tone Arm
2. Cue lever
3. Power light indicator
4. Speed control switch
5. Security Hook
6. Tone Control
7. ON/OFF Volume Knob
8. Tone Arm Rest
9. Turntable
10. Adapter for 45 RPM records
11. Speaker
12. Adapter Jack
13. Aux In Jack
14. Aux In Phono on/off
15. USB Jack
16. AC Adapter
(placed in a white cardboard box inside
the styrofoam packaging)
10
11
11
16
13
15
12 14
Control Locators
Unit Controls
1
3
4
5
6
7
8
9
2