


DESTINY RDS FM/AM TUNER OPERATING INSTRUCTIONS
BAND
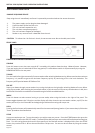
Press to toggle through FM auto/stereo, FM mono, and AM bands. FM auto/stereo is shown by the appearance Auto
and Stereo at the top of the display. Auto will disappear and Mono will change to Stereo when a station is tuned in
stereo and the signal strength is great enough to support it, noise free.
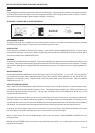
REAR PANEL - CONNECTING TO OTHER EQUIPMENT
INTERCONNECT CABLES
To connect the tuner to an amplifier an interconnect cable is required. Any cable of reasonable quality terminated
with RCA plugs will be suitable. Please consult your dealer if you are unsure.
AUDIO OUTPUT
These outputs are located on the back of the Destiny Tuner and are labelled ANALOGUE OUTPUT. Connect these
outputs to the amplifier's tuner input. Match the Red interconnect lead to the R-ANALOGUE OUTPUT and the White
interconnect lead to the L-ANALOGUE OUTPUT.
ANTENNA
One FM and one AM antenna are supplied. Connect the AM (two wire loop) antenna to the AM antenna clips on the
rear panel. Connect the FM antenna (single piece of wire) to the FM 75 Ohm connection on the rear panel. To obtain
the best FM or AM signal use a high quality directional external antenna. If in doubt consult your supplying dealer for
advice.
MAINS CONNECTION
Check that the MAINS POWER switch on the back of the unit is in the off position. 1 = on 0 = off. Push the plug (IEC
line socket) of the power cable supplied with the Destiny Tuner into the socket (MAINS IN) on the rear of the unit.
Make sure it is pressed in firmly. Plug the other end of the power cable into an AC wall outlet. Switch the MAINS
POWER switch to on – 1.
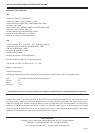
USING THE REMOTE CONTROL
Note: Install the two AAA batteries supplied with the remote control. The SRC2 handset is a system remote control
and therefore not all buttons control the Destiny Tuner. Some buttons have multiple uses. (Refer to the Destiny CD
manual for CD player button descriptions). Do not place anything in front of the display area of the unit, or the
remote control may not work.
The green coloured buttons allow you to clearly find the features for your Destiny tuner - blue buttons operate the
Destiny CD player, ivory buttons operate the amplifier. The dark grey buttons are multi purpose. For example, to use
any of those with your tuner, first press the TUNER product button located above the circle of buttons in the middle of
the handset. The remote will then be programmed to ensure the dark grey buttons work for that device only.
If you wish your tuner to go to a particular pre-set station, first press the Green Tuner button followed by the stored
pre-set number. To choose a subsequent pre-set it is not necessary to press tuner again.
When in tuner mode, the UP and DOWN buttons refer to pre-set stations, SCAN FORWARD and BACK will scan
through stations.
Waking up from STANDBY requires a button to be pressed for each product - e.g. to wake up the tuner, press any of
the green tuner buttons.
Page Three