GX-40C+/40D Amplifier
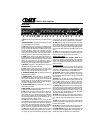
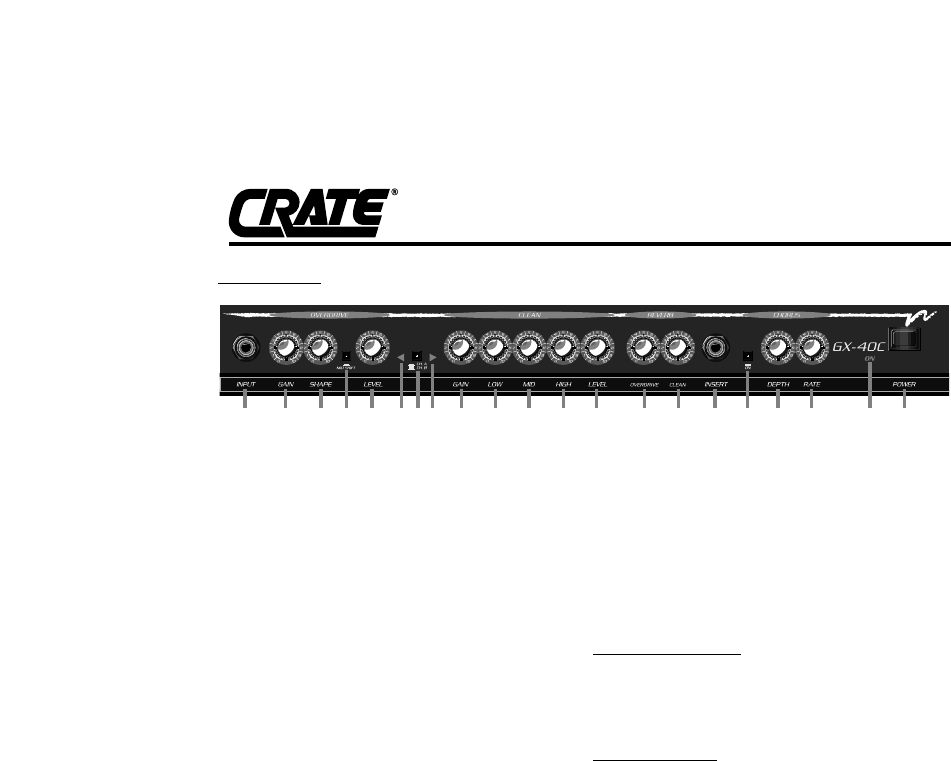
1 2 3 4 98 105 6 7 11 12 13 14 1615 17 18 19 20 21
1: INPUT: Connect your guitar here using a shielded instrument
cable.
OVERDRIVE CHANNEL: A high gain channel giving you sounds
from a slight edge to serious overdrive.
2: GAIN: Sets the amount of compression and distortion for the
Overdrive channel with this control. Rotating the control towards
the right increases the intensity of overdrive distortion.Crate’s
exclusive “Flex-Wave” circuitry uses Sequential Cascading
Gains to deliver distortion which is rich in harmonics and respon-
sive to your touch. Use the Gain control along with the Shape
and Level (#3 and 5) to create a wide variety of lead sounds.
3: SHAPE: Quickly “dial in” just right lead sounds with this con-
trol which adjusts the “shape” of the distortion wave, producing a
wide variety of tone combinations. Basically, rotating the control
towards the left enhances the mid frequencies; rotating it
towards the right enhances more of the low and high frequencies
simultaneously, with a myriad of tonal variations in between.
4: MID SHIFT: Engaging this switch deepens the notch at the
clockwise position of the Shape control (#3).
5: LEVEL: Sets the output volume for the Overdrive channel
with this control: in the far-left position there is no output; as you
rotate the control to the right the output level increases.
6. OVERDRIVE CHANNEL LED: This LED glows red when the
Overdrive channel is selected.
7: CHANNEL SELECT: Press this switch IN to activate the
Overdrive channel; press it again to the OUT position for the
Clean channel. This switch can also be used in conjunction with
the DSP section (#14 and 15, GX-40D only) to change your dig-
ital reverb mode (see “The DSP Section” on the far right panel).
A footswitch (see #26) overrides this control.
8. CLEAN CHANNEL LED: This LED glows green when the
Clean channel is selected.
CLEAN CHANNEL: A normal gain channel designed to give you
crystal clear sounds to medium distortion.
9: GAIN: Set the amount of overdrive to the Clean channel with
this control. At lower settings the sound will be crystal clear.
Rotate towards the right to increase the amount of distortion,
with a fat, bluesy sound in the full clockwise position. Use the
Gain control along with the Tone and Level controls (#10 thru 13)
to create a wide variety of rhythm sounds.
10: LOW: Adjust the low frequency output level of the Clean
channel with this control: turning the control to the left reduces the
low frequency output; turning it to the right increase the low fre-
quency output. The Low control allows a total range of ±22dB of
boost or cut at 80Hz. Due to the large amounts of low end avail-
able, you may want to roll off the bass at high volume levels.
11: MID: Adjust the mid frequency output level of the Clean
channel with this control: the center position is “flat” (no boost or
cut). Turning the control to the left reduces the midrange output;
turning it to the right increases the midrange output. The Mid
control allows a total range of ±14dB of boost or cut at 800Hz.
12: HIGH: Adjust the high frequency output level of the Clean
channel with this control: the center position is “flat” (no boost or
cut). Turning the control to the left reduces the high frequency
output; turning it to the right increases the high frequency output.
The High control allows a total range of ±20dB of boost or cut at
8kHz.
13. LEVEL: Set the output volume for the Rhythm channel with
this control: in the far-left position there will be no output; as you
rotate the control to the right the output level increases.
GX-40C+ (shown above):
14, 15: REVERB, OVERDRIVE / REVERB, CLEAN: Set the
amount of reverberation for the appropriate channel with these
controls: in the far left position the signal will be “dry” (without any
reverb). As you rotate the control to the right the amount of rever-
beration increases.
GX-40D (not shown):
14: DSP MODE: Select the type of digital sound processing
effect with this control. Each channel and chorus setting will
“remember” its effect, allowing you to switch between channels
and chorus on/off without having to reset the Mode control.
15: DSP LEVEL: Adjust the amount of digital signal processing
effect with this control: in the full-left position the signal is “dry”
(no reverb/effect); rotating the control to the right increases the
amount of effect.
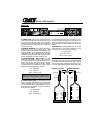
16: INSERT: This jack allows you to add a footpedal or mono
effect into the amp loop, after the tone controls, prior to the cho-
rus and amplifier sections. The jack is a stereo 1/4” phone jack,
wired as follows: Tip = signal out, ring = signal in, sleeve = com-
mon ground. (Refer to the illustration on the panel to the right.)
17: CHORUS ON: Activate the Stereo Chorus section by press-
ing this switch IN; press it again to release it to the OUT position
to turn the Chorus effect off. This switch can also be used in con-
junction with the DSP section (GX-40D only) to change your dig-
ital reverb mode (see “The DSP Section” on the far right panel).
A footswitch (see #26) overrides this control.
18: DEPTH: Set the intensity of the Stereo Chorus effect with
this control: in the far left position there will be almost no chorus;
as you rotate the control to the right the amount of effect increas-
es.
19: RATE: Set the speed of the Stereo Chorus effect with this
control: to the left for slow, smooth “phasing” sounds, to the right
for faster “vibrato” sounds.
20: ON LED: The word “ON” glows red when you turn the ampli-
fier on, showing you that it is powered up and ready to play.
21: POWER SWITCH: This heavy-duty rocker-type switch turns
the amplifier ON in the left position, OFF in the right position. The
ON LED (#20) works with this switch as a visual indicator.
FRONT PANEL:


