Profiler Model 5 Compact Stereo Guitar Amplifier with DSP
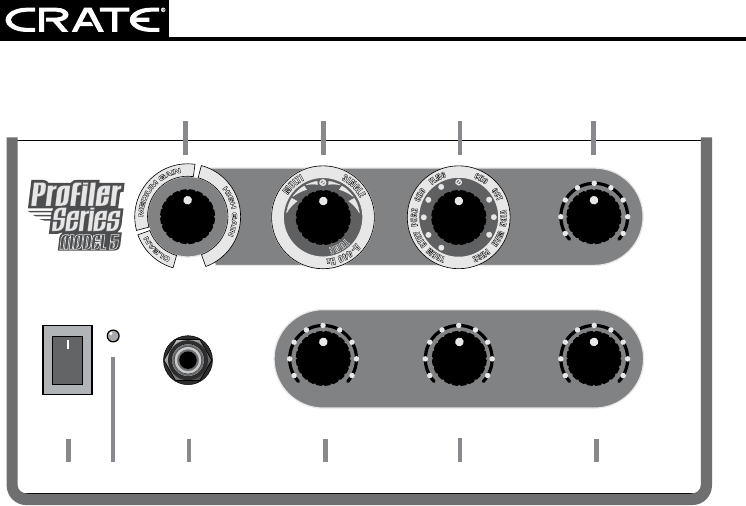
The Top Panel
5
INPUT
POWER
TONEGAIN MASTER
0 10 0 10 0 10
MODEL 5
PROFILES
DELAY
EFFECTS
REVERB
0 10
1
2
1
2
3
4
1
2
3
4
5
1
2
1
2
3
4
1
2
3
4
5
C
L
E
A
N
M
E
D
I
U
M
G
A
I
N
H
I
G
H
G
A
I
N
P
H
S
R
W
A
H
C
H
O
O
C
T
V
I
B
R
W
A
H
P
H
S
R
T
R
E
M
R
T
R
Y
P
H
S
R
C
H
O
F
L
N
G
M
U
L
T
I
S
I
N
G
L
E
A
-
4
4
0
H
z
T
U
N
E
1 2 3 4 5 6
7 8 9 10
1. POWER: Use this switch to turn the
amplifier on (top of the switch depressed)
and off (bottom of the switch depressed).
2. POWER LED: This LED illuminates when
the POWER switch is on and the amplifier
has power provided from either the supplied
AC adapter or the battery pack.
3. INPUT: Use this jack to connect your
guitar to the amplifier by means of a shield
-
ed instrument cable.
4. GAIN: Use this control to adjust the amount
of gain for the Medium Gain and High Gain
profiles. The amount of gain varies, depend
-
ing on the profile selected. The more gain,
the more distortion. The Gain control has no
effect when a Clean profile is selected.
5. TONE: Use this control to “dial in” the
tone. Rotating this control counter-clockwise
results in a darker sound, while rotating it
clockwise will give you a brighter sound.
6. MASTER:
Use this control to adjust the
overall output level of the amplifier.
7. PROFILES: Use this switch
to select
one of 11 different amplifier profiles. These
profiles simulate the sound of 11 popular
amplifiers. There are two clean profiles, four
medium gain profiles, and five high gain pro
-
files. More information about these profiles is
provided on page 7.
8. DELAY: Use this control to select the
type of digital delay effect. When the control
is straight up (12 o’clock), the delay effect
is bypassed. Turning the control to the
left (counterclockwise) provides five differ
-
ent presets of multi-repeat delay settings.
Turning the control to the right (clockwise)
results in four different presets of single-
repeat delay settings. The last position in the
clockwise direction turns on the A-440 Hz
tuner. It provides a repeating 440 Hz tuning
fork tone as a tuning reference.
9. EFFECTS: Use this control to select
one of ten digital modulation effects. When
the control is straight up (12 o’clock), the
modulation effects are bypassed. More
information about these effects is provided
on page 8.
10. REVERB: Use this control to adjust
the amount of digital reverb effect. In its
fully counterclockwise position, the signal
will be “dry” (without reverb). As you rotate
this control clockwise, the amount of reverb
increases.


