


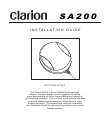


SA200
3
INSTALLATION GUIDE
Installation Temperature
To achieve the best adhesion, a heat gun can used to warm up the double-sided tape on the SA200 and
surface of the vehicle. With these surfaces warmed up, the adhesion of the antenna to the vehicle will be
more secure. The heat gun can also be used to warm up the rubber moldings surrounding the rear window,
allowing the routing of the antenna cable to be easier. Be careful not to damage the paint or melting the
rubber molding.
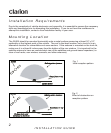
Sedan Vehicle Installation
The SA200 should be located along the centerline of the roof, at least 4 inches from the rear window. The
antenna cable can be tucked and routed underneath the rubber molding around the rear window and into
the trunk.
1. Clean the general area where the antenna is going to be mounted and the rubber molding.
2. Identify and mark the precise location where the antenna is going to be mounted.
3. Peel off the protective cover from the double-sided tape.
4. Set the tail end of the antenna at the predetermined location, and work back toward the antenna head
applying pressure throughout the application. (Maximum adhesion occurs within 72 hours of application,
during which time the vehicle should not be washed and contact with the antenna should be avoided.)
5. Carefully tuck the antenna cable under the rubber molding, working from the tail of the antenna around
the window. (Using a flat-tip dental pick or plastic knife insulated with black tape can be used to lift the
rubber molding and tuck in the antenna cable.)
It is important that the coaxial cable is not damaged or kinked during the installation procedure.
6. Route the cable from the lowest point of the rear window into the trunk area. Try to use any existing
cable channel or wiring conduit. (It might be necessary to remove the plastic housing from the antenna
connector in order to feed the cables through narrow openings.)
7. Route the cable through the interior trim to where the receiver is located.