


14 DAH923
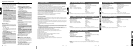
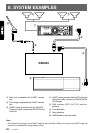
1 CeNET input/output terminal
Connect to the main unit or CD/MD changer
using the CeNET cable 5.
∗ Equipment to this terminal is not specified.
2 Cable clip insertion holes
Insert the cable clip 4 in this hole and fix the
digital optical fibre cable.
3 RDI-OUTPUT terminal
Connect the unit to the data decoder using
the digital optical fibre cable (sold separately).
4 RDI ON/OFF switch
When connecting the unit to the data decoder,
set the ON/OFF switch to ON.
∗ The factory default setting is OFF.
∗ Use a plastic rod, etc., to switch on/off the RDI
ON/OFF switch.
5 RESET switch
When no sound is heard, press and hold this
switch.
∗ Pressing the reset switch performs the system
check.
6 DAB antenna input terminal (SMB)
Connect to the DAB-ANTENNA (sold sepa-
rately).
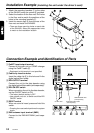
Connection Example and Identification of Parts
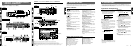
Installation Example (Installing the unit under the driver’s seat)
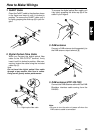
1.
Attach the mounting brackets 1 to the sides
of the DAH923 using the screws 2 provided.
2. Select the location on the floor mat. Drill holes
in the floor mat to match the positions of the
holes in the mounting brackets 1.
3. Insert the canoe clips 3 from the rear of the
floor mat and install the DAH923.
∗ There are three mounting holes on each side
of the DAH923. Select the appropriate holes
to match to the installation location.
DAB ANTENNA cable
(sold separately)
Digital optical fibre cable
(sold separately)
Ce NET cable