


1
E N G L I S H
%'$' )$ #()!!)$#
Carefully unpack your speaker, saving the box and all of the packing material; at some point you may
need to transport, ship, or move your speaker. Before continuing with the installation, please make
sure your A/V receiver, processor, preamplifier, or amplifier’s power switch is turned “OFF.”
#()!!)$#
Please read the following to determine which installation procedure is best for your audio/video
system. For additional hook-up connections, you may want to refer to your A/V receiver, processor,
preamplifier, or amplifier’s manual. $.<>;.=8;.*-*7-8+<.;?.=1.W#*/.=B7<=;>,=287<X879;.,.-270
9*0.+./8;.<=*;=270=1.27<=*55*=287
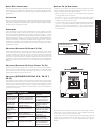
$##)$#(
As mentioned earlier, all connections should be made with the equipment turned off. Use high
quality speaker wire (16-gauge or heavier) to connect your speakers to your A/V receiver, processor,
preamplifier, or amplifier. Connect the positive terminal on the speaker (marked "+" and colored
red) to the positive terminal on the A/V receiver, processor, preamplifier, or amplifier and connect
the negative terminal on the speaker (marked "-" and colored black) to the negative terminal on the
A/V receiver, processor, preamplifier, or amplifier. In any case, make sure that the wiring polarity
remains consistent throughout the system in order to maintain correct polarity (<../20>;.). Failure
to observe correct polarity will result in poor sound balance, decreased imaging, and worst of all,
decreased bass response. "./.;=8=1.8@7.;Y<6*7>*59;8?2-.-+BB8>;;.,.2?.;9;.*699;8,.<<8;6*7>/*,=>;.;
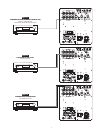
%!"#) +"$$ (! (% '(
For left and right channels, place the speakers so that the tweeters are at ear level
(i.e., normal seated position) and are on either side of the video receiver or monitor
(see Figure 2). You can place the speakers on bookshelves or use speaker stands, which are readily
available from your local home audio retailer. For use as a rear channel surround speaker, avoid
corners of the room and experiment with different locations until you find a pleasing effect.
"./.;=8=1.8@7.;Y<6*7>*59;8?2-.-+BB8>;;.,.2?.;9;.*699;8,.<<8;6*7>/*,=>;.;/8;<9.*4.;95*,.6.7=@1.7
><270-2//.;.7=<>;;8>7-.//.,=<2.85+B202=*5$#
%!"#) +#)' ##! (% '(
Ideally, the Center Channel Speaker should be in the middle between the front left and right main
speakers and face toward the viewing area (see Figure 2). The tweeter should be at ear level (i.e.,
normal seated position). If possible, position the speaker and (left/right) bookshelf speakers to
form a straight line.
%!"#) +++!$$'()##
(% '(
Use figure 2 as an initial guide for speaker placement, keeping in mind that most rooms are far from
ideal and different speaker locations produce different sounds. If the bass is too prominent, try
moving the speakers away from the walls. If you need more bass, move the speakers closer to the
rear walls. Keep the speakers about 1 1/2 feet (45 cm) away from the sidewalls and 1 foot (30 cm)
out from the rear wall and about 6 feet (2 meters) from each other.
'$$" $*()(
A room’s size, shape, and furnishings will greatly influence the overall sound of an
Audio/Video Sound System. However, you can optimize the sound potential of your A/V
system in the following ways:
• Keep the path from the speakers to the viewing area free from obstructions
(e.g., furniture, potted plants, etc.).
• If the room is ”live” (e.g., plaster walls, wood floors, glass windows, etc.) and produces
echoes, try closing the drapes, adding a throw rug, or consider using sound-absorbing
panels.
• Cerwin-Vega! Audio/Video systems can produce intense low frequencies, so don’t
be surprised to initially hear rattles and buzzes coming from furniture and other
objects; try repositioning or removing offending suspects (e.g., vase on mantle) or
placing felt pads under vibrating items.
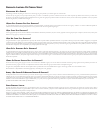
)'$*!($$)#
'12-02'-,5'2&4-*3+#
!-,20-*-,0#!#'4#0
+.*'$'#0,#0
+6'+3+
'12-02'-,5'2&4-*3+#
!-,20-*,#0+','+3+
'12-02'-,-,+31'!
.#)1-01-3,"
#$$#!21
388&3+-0!0!)*#
5&#,!-,,#!2',%
5'0#1
388-0&3+5&#,
1712#+'1-,
-1-3,"$2#0
*'12#,',%2&'%&*#4#*1
,"#0.-5#0#"
0#!#'4#0+.*'$'#0!*'.13"'-
1'%,*1
-,#!-,20-*10#1#22--&'%&
#$#!2'4#0#!#'4#0-0
.0#+.*'$'#01&-02#"1.#)#0
5'0#1
7,+'!1-3,"20!)#%
#6.*-1'-,1
-,,#!2',%5'0#15'2&.-5#0
-,!31#120,1'#,21'%,*
1.')#1
0-3,"',%.0- *#+-0%0-3,"
*--.
+.*'$'#0L12�+*.0-2#!2'-,'1
-,
30,"-5,4-*3+#!-,20-*-,
0#!#'4#0+.*'$'#0
#2 11$*231#!-,20-*1
1.0',%*7
#.'0"#$#!2'4#0#!#'4#0
.0#+.*'$'#0-00#.*!#
1.#)#05'0#1
30,"-5,4-*3+#!-,20-*2-
*-5#0-4#0**0,%#31#
+-0#.-5#0$3*
0#!#'4#0+.*'$'#0
-,,#!25'0#1-,*75&#,
3"'-1712#+.-5#0'1-$$
&#!)0#!#'4#0-0
.0#+.*'$'#0+,3*$-0
%0-3,"*--.#*'+',2'-,
30,"-5,4-*3+#!-,20-*
,"**-5+.*'$'#02-!--*
"-5,1-3,"1&-3*"0#13+#
32-+2'!**7
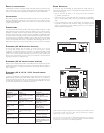
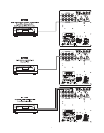
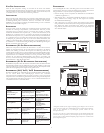
SPEAKER IN
Figure 1
A/V Receiver/Processor/Preamplifier
Speaker Inputs
+
-
+
-
POLARITY
*>=287$12<9;8->,=2<-.<207.-/8;<9.,2/2,95*,.6.7=878=<><9.7-1*708;@*5568>7=*7&
8;&@2=1 *7B+;*,4.=< ,*+5.<,1*27<8;1884< 5*,. =1.<.,86987.7=<875B87+884<1.5?.<
*99;89;2*=.<=*7-<8;87=898/ *=.5.?2<2876872=8;
$1.&&*7-&<9.*4.;<*;.27=.7-.-/8;/588;95*,.6.7=875B878=95*,.1.*?B
8+3.,=<8/ *7B=B9.<>,1*<=.5.?2<287<87=898/ *7B.;@27&.0*<9.*4.;>75.<<8=1.;@2<.;.,866.7-.-
+B.;@27&.0*&#.;2.<<9.*4.;<*;./8;;.<2-.7=2*5*9952,*=287<875B
%$!').
(% '%!"#)