


2
3. With the door panel held in place at the approximate speaker location, study the door struc-
ture to see if the sheet metal or door braces will interfere with the installation site.
4. Hold the speaker in place and operate the window to check for interference with the window
or the internal lock linkages. Decide if the speakers are to be mounted to the door metal
structure or to the interior door panel, and if the supplied grilles or the factory grilles will be
used to conceal speakers.
If you plan to use the supplied grilles, make sure the grille locations will not interfere with
the door panel contours, window cranks, or electrical switches. If there is sheet metal behind
the speaker location, decide if trimming some away will affect the strength of the door or
vehicle. NOTE: The HED-5.0 includes a gasket with pressure-sensitive adhesive on one side.
The gasket can be applied to the back of the frame if additional rear clearance is required.
CAUTION: Always remove as little sheet metal as possible to accommodate installation.
5. Use the enclosed template to trace the speaker openings and mark the mounting holes. Drill
mounting holes and cut away each speaker opening from the trim pad and substructure.
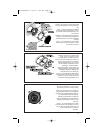
6. Attach speaker wire to the terminals (see Electrical Installation), and install each multi-element
speaker, using self-threading screws and tinnerman nuts (see Figures 1 and 2, inside back
cover).
Additional Notes
• When using stock speaker locations, modify mounting holes to accept the multi-element
drivers, and screw into place. Then adapt the stock grilles to fit over the speaker. Be sure
there is ample clearance for speaker cone excursion or movement. If the opening is too small,
or the fabric directly in front of the speaker is too close, the cone will vibrate against the fab-
ric or door panel.
Distortion and damage to the speaker may result.
• In custom enclosure applications where multi-element drivers are in the same box as large
woofers, always isolate them in separate enclosures (100-300 cubic inches). If they are not
isolated, distortion will be higher, power handling will be lower, and damage may result. For
best response, loosely pack fiberglass or equivalent sound-absorbing material in the multi-
element driver enclosure.
Electrical Installation
Wiring Precautions
Whenever you run wires through sheet metal, use grommets to properly insulate the metal
edges from cable jackets. This technique prevents chafing and possible short circuits that could
damage an amplifier or other system electronics.
Note: We recommend using crimp-type terminals when connecting speakers. Soldering to the
terminals can detach the internal lead wire from the terminal, causing the speaker to fail.
General Notes
Although the speaker has a polypropylene cone, excessive exposure to moisture can damage
the cone or terminal connections. Always reseal the plastic liner inside the door. If the liner is
damaged, it can be repaired with a few pieces of clear tape. If no liner was installed by the man-
ufacturer, then purchase standard plastic deflector cups and install them over the rear of the
speaker. Keep in mind that constant door slamming can loosen the speaker from its installation
site.
System Wiring and Test
Connect the loudspeaker to your vehicle’s mobile amplifier. When making connections, be
sure to observe correct polarity (+ to + and – to –). After all connections have been made, turn on
the audio system power and slowly increase the volume while playing a favorite music track. If
you don’t hear anything, turn off the power, check all connections, and reapply power. If the
problem persists, contact your Cerwin-Vega dealer for additional help.
ED40_69manual 6/27/05 9:25 AM Page 4