7
OPERATION ________________________________________________________
Signal input connection is made via the input jacks on the rear of the CAD 300 SEI located next to the
output binding posts. The interconnect cables from the output of the preamplifier can be any convenient
length your set-up requires. The choice of a high quality interconnect cable is important. Once again, your
audio dealer will have the proper cables in stock for this purpose.
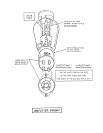
Your new CAD 300 SEI is ready for operation after the speaker, interconnect cables, and the tubes have
been installed. Refer to the tube placement sheet at the end of this manual for proper installation.
AC On Power Switch
Simply push the AC rocker switch on the ON position. Observe that the blue LED lights and all tubes are lit
(filaments).
Break-In Period
The tubes, capacitors and output transformers take approximately 100 hours of music playing to fully
settle in for peak performance. The CAD 300 SEI will sound good right out of the box and will improve
with use. After the first couple of hours you will notice increased depth and tighter bass. This break-in
period is true with vacuum tube based audio amplifiers.
Bias Adjustment Procedures
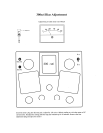
Look to the left rear corner of the CAD 300 SEI. You will notice a slotted screwdriver adjustment control.
This is the bias adjust potentiometer. Also located in line with this control is a ¼” headphone style jack.
This will accept the included orange/black test cable. These two leads will hook to a DC current meter or
digital multimeter.
1. Make sure the CAD 300 SEI is in the off position with all the tubes inserted into the proper sockets.
2. Plug in the two-conductor test cable into the ¼” jack. Clip the black alligator clip to the black
negative lead on your multimeter. Hook the red alligator clip to the red positive lead from the
multimeter.
3. Place the multimeter range selector in the DC current range. This may say 0 – 300 mA. Just make
sure you are reading DC current. Never select the DV voltage position. Only the DC current scale.
4. Locate a proper flat blade screwdriver that fits the slot on the bias adjustment control.
5. With your CAD 300 SEI plugged into the house AC mains wall socket turn on the AC power switch.
Immediately observe the DC current reading. The proper value will be 150 to 160 mA.
6. If the value is low, turn the bias control clockwise (right) a small amount. If the current reads
higher than 160 mA. Turn the bias adjustment control counter clockwise (left).
7. After the 300 SEI has been on for about ten minutes recheck the bias and reset to 150 to 160 mA
Range. This completes the bias setting. You may wish to check this setting every six months or so.
Please note that the bias will vary as your AC line voltage moves up and down in your home. This
is normal. The amplifier will operate in a broad range of 120 mA to 180 mA of current. The value
of 150 to 160 is the ideal point.
8. Turn off your CAD 300 SEI and remove the test cable and store this cable in a convenient location
in your listening room.
WARNING
MAKE SURE AMPLIFIER IS UNPLUGGED FROM AC MAINS BEFORE SERVICING.


