


5. No utilice hojas desafiladas ni
dañadas. Las hojas desafiladas o en
mal estado producen que la entalla
se angoste causando fricción
excesiva, atascamiento de la hoja
y contragolpe.
6. La profundidad de la hoja y las
palancas que bloquean el ajuste del
corte en diagonal deben estar
ajustadas y seguras antes de hacer
el corte. Si el ajuste de la hoja se
mueve durante el corte, puede
provocar atascamiento y
contragolpe.
7. Tenga extremo cuidado al hacer
un “Corte en bolsillo” en paredes
existentes u otras áreas ciegas.
La hoja que sobresale puede cortar
objetos que pueden causar
contragolpe.
8. Tenga cuidado con los materiales
inclinados, enredados, húmedos
o deformados. Es muy probable que
estos materiales creen condiciones
de mordida y posiblemente
contragolpe.
Ensamblaje
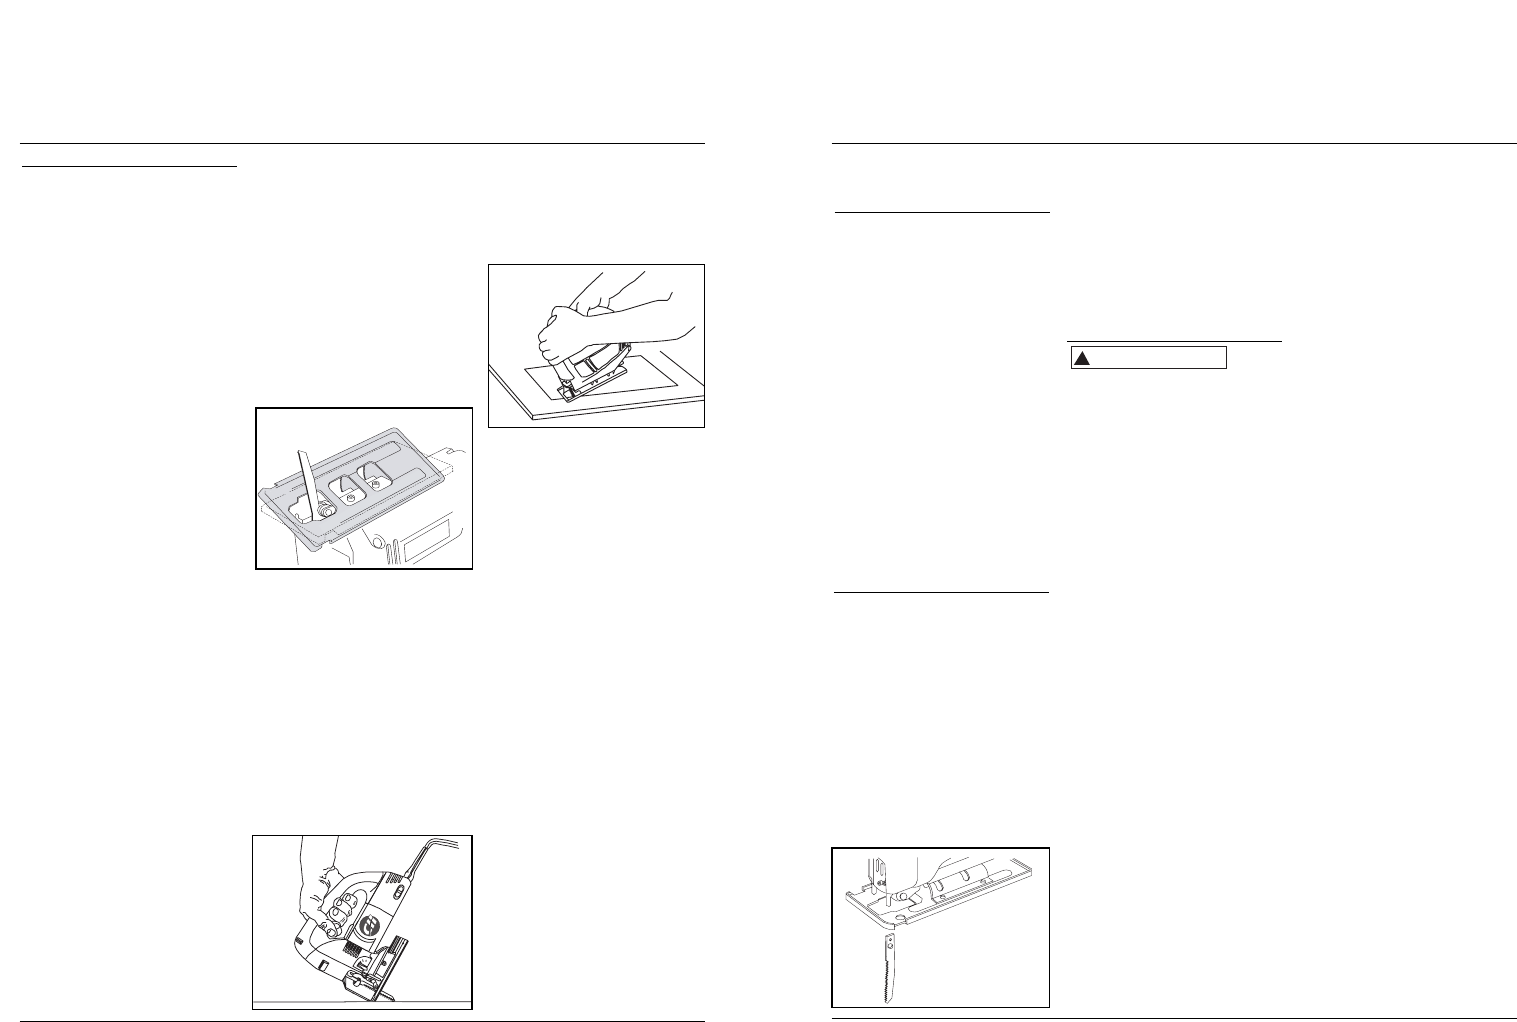
CÓMO COLOCAR LA HOJA
Siempre desconecte la herramienta
y deje el interruptor en la posición de
bloqueo o de apagado antes de hacer
cualquier armado, ajuste o de cambiar
accesorios. Dichas medidas de
seguridad preventivas reducen el riesgo
de que la herramienta se active por
accidente.
1. Usando la llave hexagonal que se
proporciona, afloje los dos pernos
de bloqueo de la hoja para poder
retirar o introducir una hoja.
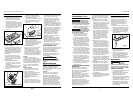
2. Introduzca la hoja en la ranura con
los dientes hacia adelante (Figura 1).
La parte superior de la hoja se debe
introducir lo suficiente hasta que
toque el sujetador de la hoja.
3. Mientras la hoja está en la ranura de
calce y tocando el sujetador superior
de la hoja, apriete con seguridad los
pernos de bloqueo de la hoja.
4. Pruebe la hoja en una dirección
segura, lejos de las demás personas,
antes de comenzar a usar la nueva
hoja. Una hoja mal asegurada
arriesga la posibilidad de
desprenderse durante el
funcionamiento lo que podría
resultar en lesiones graves.
Funcionamiento
Use equipo de seguridad. Siempre use
protección para los ojos. Se debe usar
máscara para polvo, calzado de
seguridad antideslizante, o protección
de audición para la condición adecuada.
FUNCIONAMIENTO GENERAL
• Siempre sujete la pieza de trabajo
en forma segura en un caballete de
aserrar o banco.
• Antes de cortar, asegúrese de que el
espacio debajo del material a cortar
sea más profundo que la hoja de la
sierra.
• Si usa un delimitador o guía,
asegúrese de que esté fijada con
seguridad y que cumpla con las
instrucciones del fabricante.
• Ciertas hojas son útiles para
diferentes tipos de cortes y
materiales. Asegúrese de que la hoja
en uso esté aprobada por el
fabricante para la operación que se
está llevando a cabo.
• Mida todos los cortes a realizar para
asegurarse de que están claramente
marcados.
• Encienda la sierra y deje que alcance
el valor de velocidad establecido
antes de tocar el material.
• Cuando haya completado el corte,
deje que la sierra se detenga por
completo antes de retirarla del
material de trabajo.
CONTROL DE VELOCIDAD
VARIABLE
El control de velocidad es un
interruptor de disco de velocidad
de 6posiciones ubicado en el frente
superior del mango. Al girar el
interruptor de 1 a 6, la velocidad
de lahoja se puede fijar entre 500
y 3,000RPM. Se debe fijar la velocidad
de recorrido para el material específico
a cortar. Las velocidades menores se
usan para comenzar los cortes.
Las velocidades medias son ideales para
!
ADVERTENCIA
cortar materiales duros como metales
y plásticos. Las velocidades altas se
deben usar para materiales más
blandos como la madera. Los metales
blandos como el aluminio pueden
requerir altas velocidades de corte.
Ajuste las velocidades acorde a esto.
BLOQUEO DEL INTERRUPTOR
DE ENCENDIDO/APAGADO
Al presionar el interruptor de
encendido/apagado y usar el botón
de “bloqueo”, se puede usar la sierra
vertical de forma continua. El botón
de bloqueo se puede desbloquear de
inmediato simplemente presionando
una vez más el botón de
encendido/apagado.
ACCIÓN ORBITAL
El selector de modo de corte se puede
ajustar para seleccionar el modo de
corte recto o el modo de corte orbital.
Esta sierra tiene 4 valores de posición.
El valor marcado con 0 es para cortes
rectos y los valores marcados I, II y III
son para cortes orbitales.
Corte de paneles y tablas
Los paneles grandes y las tablas largas
se curvan o doblan si no están sujetados
correctamente. Si intenta cortar sin
nivelar ni sujetar la pieza de trabajo
correctamente, la hoja tenderá a
atascarse, provocando un contragolpe.
Sujete los paneles grandes. Asegúrese
de definir la profundidad del corte para
que solamente pueda cortar a través de
la pieza de trabajo, no a través de los
soportes.
TIPOS DE CORTE
Cortes rectos
Se puede lograr un corte recto
fácilmente sin usar un delimitador
de corte o una guía. Sujete con
abrazaderas un borde recto o una
pieza de madera pareja sobre la pieza
de trabajo y guíe el borde de la sierra
contra éste. Complete el corte sólo en
una dirección.
CORTES EN DIRECCIÓN DE LA VETA
Serrar es cortar a lo largo siguiendo
la veta. Seleccione la hoja adecuada
para su trabajo. Use una guía de
corte para cortes a lo largo de
4" deancho o menos.
CORTES CRUZADOS
Cortar cruzado es cortar
transversalmente a la veta. Seleccione
la hoja adecuada para su trabajo.
Avance con la sierra lentamente para
evitar astillar la madera.
17 Sp
DG460500CK
Informaciones
Generales de
Seguridad (Continuación)
• Measure all cuts to be made and
make sure they are marked clearly.
• Start saw and allow it to reach speed
setting before touching it to the
material.
• When cut is completed, allow saw to
come to a complete stop before
removing from work material.
VARIABLE SPEED CONTROL
The speed control is a 6-position speed
dial switch located on the top front of
the handle. By rotating the switch
from 1 to 6, the blade speed can be set
from 500 to 3,000 RPM. Stroke rate
should be set for specific material
being cut. The lower speeds are used
to start cuts. The medium speeds are
ideal for cutting hard materials such as
metals and plastics. The higher speeds
should be used for softer materials
such as wood. Soft metals like
aluminum may require high speeds for
cutting. Adjust speeds accordingly.
LOCK ON/OFF SWITCH
Pressing the ON/OFF switch and using
the “lock” button, the jig saw can be
used continually. The lock button can
be unlocked immediately by simply
pressing the on/ off button again.
ORBITAL ACTION
The cutting mode selector can be
adjusted to select the straight cutting
mode or orbital cutting mode. This saw
has 4 position settings. The setting
marked 0 is for straight cutting and
the settings marked I, II, and III are for
orbital cutting.
CUTTING PANELS AND BOARDS
Large panels and long boards sag or
bend if they are not correctly
supported. If you attempt to cut
without leveling and properly
supporting the workpiece, the blade
will tend to bind, causing kickback.
Support large panels. Be sure to set the
depth of the cut so that you only cut
through the workpiece, not through
the supports.
TYPES OF CUTTING
Straight Cuts
Without the use of a rip-fence or
guide, a straight cut can very easily be
made. Clamp a straight edge or even a
piece of wood to the workpiece and
guide the edge of the saw against it.
Complete the cut in one direction only.
RIP-CUTTING
Ripping is cutting length wise with
the grain. Select the proper blade
for your job. Use a rip fence for rips
4" wide or less.
CROSS-CUTTING
Cross-cutting is cutting across the
grain. Select the proper blade for
your job. Advance the saw slowly to
avoid splintering the wood.
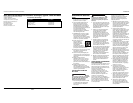
BEVEL/ ANGLE CUTTING
• Make sure the saw is unplugged
from the power source before
making adjustments to the cutting
angles
• The base plate can be tilted 45° in
both directions to perform angle
cuts. There are settings for 45° and
for 90° against the workpiece. For
other angles use a protractor to
measure (Figure 2).
Hole Cutting
POCKET CUTS
Pocket cuts are made in the middle of
the workpiece when it cannot be cut
from an edge. They can start at a pre-
drilled hole or the jig saw can create
the starting point (plunge cut).
Plunge cutting is not recommended
for harder materials like steel and
scroll blades should not be used for
plunging.
PLUNGE CUTS
1.If the pocket cut is straight-lined,
a pre-drilled hole is not necessary.
2.Touch the toe of the saw to the
workpiece leaving the blade well
above the material (Figure 3).
3.Make sure the orbital setting is on
0 then turn ON the saw.
4.Once the saw reaches maximum
speed, lower it slowly into the
workpiece.
5.Keep both hands on the saw while
cutting (Figure 4).
6. For 90° or other sharp corners, cut
up to the corner then back out
before rounding the corner off.
Once opening the pocket,
approach the corner from the
opposite direction to square it off.
CIRCLE CUTS
A circle cutting guide can help assist
in the sawing of circles. The cut
should be prepared by a pre-drilled
hole or a slight plunge cut near the
cutting line. If using a guide, make
sure it complies with the jig saw and
the manufacturer’s instructions.
Scroll Cutting
Intricate work can be performed by a
jig saw using a scrolling blade. Make
sure that the blade being used
according to the manufacture’s
instructions. For best control, use the
saw on setting I with the scroll blade.
This provides easier cutting and
maneuvering.
Metal Cutting
• Before beginning a metal cut, place
orbital setting accordingly to 0 or I.
• When cutting metal workpieces,
clamp the material down and saw
close to the clamping point to
reduce bending and vibration.
• If the blade begins to vibrate or
chatter excessively, replace blade
with a metal cutting blade with finer
teeth.
• For soft metals the blade can
become clogged so use a blade with
coarser teeth.
• Conduit, angle iron, or pipe should
be clamped in a vice and cut as close
to the clamp as possible
4
www.chpower.com
Operating Instructions and Parts Manual
Operation (cont.)
0
I
II
I
I
I
Figure 3
Figure 2
Figure 4
Figura 1