10. Pressing during playback will take you back to the ‘Program Mode’
stage. Pressing again at this point deletes the program.
Note:
– During programmed playback, it is possible to use the ‘Remain’
function only to show the time remaining on the track playing. You
can not view the time remaining on the disc.
– Only the ‘Repeat All’ feature can be used during Program mode. You
are not able to repeat specific tracks in the program.
Using the set-up menu
The 350C allow the setting of some options related to Auto Play and Auto
Power Down.
1. Press and hold Stop for five seconds to open the set-up menu.
2. Scroll through the menu (shown below) using the Skip/Scan
<>
buttons.
3. Play/Pause selects a sub-menu. Scroll through sub-menu options
with the Skip/Scan <> buttons. The default setting is indicated by
the symbol .
4. Select an option by pressing Play/Pause.
5. Return to the sub-menu or exit the options menu by pressing the Stop
button.
Note:
– It is not possible to access the set-up menu during disc playback.
– The Stop button on the remote control cannot be used to open the
set-up menu. Once you have accessed the menu, however, the
remote control can be used to scroll through and select sub-menu
options.
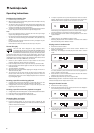
Press Stop for 5 seconds
Auto Play Auto Power Down
Off On
Off 5min 10min 15min
Auto Play Setting
If required the 350C can automatically play disks inserted into the drawer
without the Playbutton having to be pressed. Auto Play is simply enabled
in the menu when desired. The default setting for Auto Play is ‘Off’.
Auto Power Down Setting
If desired the 350C can shut itself down if not used for a period of time.
Power down after an inactive period (no disk playback or any functions of
the player used) of 5, 10 or 15 minutes can be selected. The default
setting for Auto Power Down is ‘Off’ (i.e. disabled).
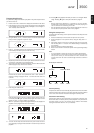
Programming disc play
It is possible to program the 350C to play back in any order only the tracks
you wish to listen to.
1. Ensure that a disc is loaded. The display should show the TOC data.
2. Press Programon the remote control. The Program set-up will appear
in the display (as long as the display backlight is set to ‘Bright’ or
‘Dim’ modes). ‘ST:01’ will flash.
3. Using the
,0-9 or -/-- buttons, skip to or enter the track number
that you want to program as your first track.
4. Press . The desired track is now programmed. The program number
automatically increases by one for the next entry.
5. Repeat steps three and four until all your desired tracks are entered.
A maximum of 30 tracks can be programmed.
6. To go back and change a programmed track, press to locate the
desired program step. ‘ST:0-’ does not flash.
Press to choose the replacement track. ‘ST:0-’ flashes to
indicate a change of program. Press to select the new track and
continue.
7. Press Program or to exit.
Press Program again to return to program editing. At this point you
can either press again to delete the program and return to TOC
display, or press to start playing your selection.
8. When is pressed, ‘Program Play’ appears briefly on the display and
playback of the programmed tracks commences.
9. You can use the skip and scan functions on your remote control to
move through your programmed selection in the same way as normal
playback.
9
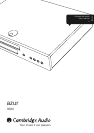
350Cazur
ENGLISH