1) Using the included Mini Audio Cable, connect one end
to your portable playerʼs headphone jack and the
opposite end to the “AUX” jack on the back of the
CC GOZO.
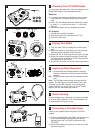
2) Select AUX using the far right knob on the front of the
radio (see Figure 2).
Volume +
Tone Control
FM
AM
AUX
OFF
Powering Your CC GOZO Radio
You can power this radio with 6 “AA” size batteries or the
included AC Adapter, using household current.
Batteries
1) Loosen the two screws on the battery cover until the
cover detaches. This takes about two full rotations
e
ach.
2) Insert “AA” size Alkaline batteries, following the polar-
ity guide (+ – + on the top row and – + – on the bot-
tom row).
3) Replace the battery cover and tighten the screws.
Playing Your Radio
Improving Radio Reception
1) Turn your radio “ON” by rotating the red knob clock-
wise.
2) Adjust the volume by continuing to turn the red knob
clockwise until the desired level is reached.
3) Select AM, FM, or AUX using the knob on the far right.
4) Select your desired frequency using the Tuning Dial.
The upper portion of the dial is for FM Tuning and the
lower portion is for AM Tuning
5) Set the Tone Control knob to your listening preference.
FM — Lift and rotate the FM Whip Antenna. Normally,
the best orientation is vertical but each location is
different.
AM — Rotate the entire radio until the reception sounds
best.
Note: The FM Whip Antenna does not improve AM re-
ception. The AM Antenna is located inside of the radio.
To further improve AM reception, use an external an-
tenna, such as the C. Crane Twin Coil Ferrite
®
AM An-
tenna or the Terk AM Advantage Antenna.
Quiet Listening
Connect Headphones or Earbuds to the jack on the back
of the radio that is labeled ]. The external speaker will
be disabled while this jack is in use.
Connecting a Portable Player
Listen to your portable player using the CC GOZOʼs
speaker.
AC Adapter
1) Unwrap the included AC Adapter.
2) Insert the plug into the Jack labeled “DC 12V”.
3) Plug into a wall outlet.
1
2
3
4
5
1
2
3
4
5