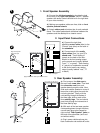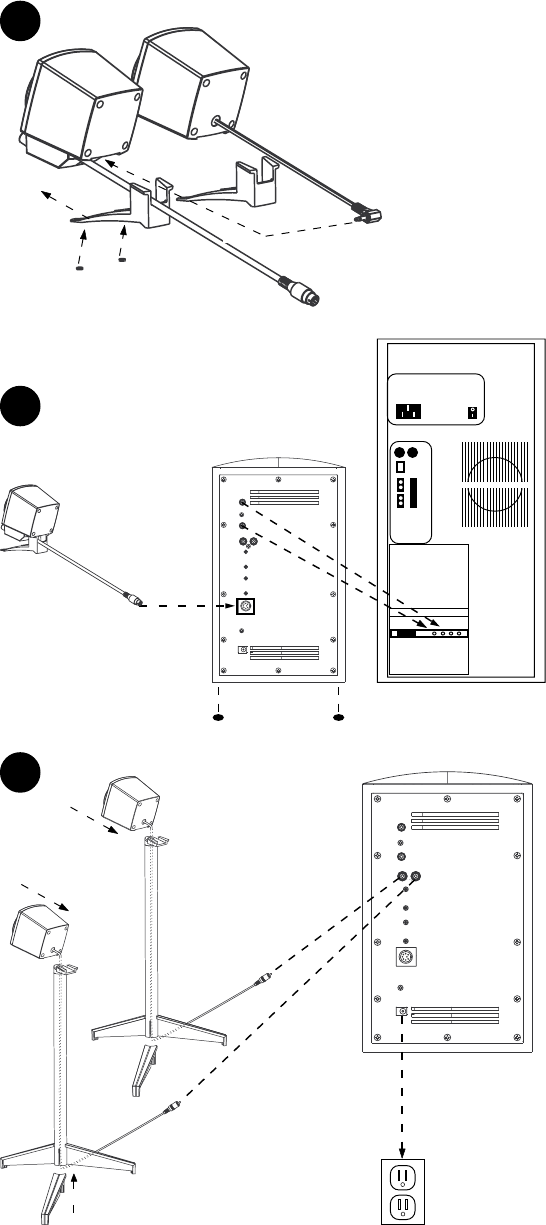
1. Front Speaker Assembly
a
) Connect the left front speaker's plug into the jack
on the rear of the right front speaker, (NOTE: satellite
speaker with audio controls should be on the right side
of your video monitor).
b
) Making sure speaker cables are free, slide on front
speaker pedestal stands.
c
) Attach rubber pads to bottom tips of each pedestal
stand. The rubber pads absorb vibrations between the
speakers and the desktop for a cleaner sound.
2. Input Panel Connections
a
) Connect the right front
satellite's control cable (blue) to the
"Control" jack (blue) on the back of
the subwoofer.
b
) Connect each of the audio
input cables (2 ea.) to your PC's
sound card. "Front Analog in"
(green) on the back of the sub-
woofer to the front analog output
on the sound card (usually labeled
"front", "1" or green). "Rear Analog
in" (purple) on subwoofer connects
to the sound card's rear analog
output (usually labeled "rear", "2"
or black).
3. Rear Speaker Assembly
a
) First, snap on the slide caps to
the top of each tower tube. Then feed
the connection cord from each
speaker down through the tube. Next,
slide each satellite speaker on to top of
tower tube, making sure the cords are
not being pinched. Finally, with the
cord passing through the bottom of
the tower tube, slide on each of the
three stability legs. The cord should
pass freely through the intersection of
the three stability legs.
b
) With each of the two tower speaker
cords passing down through the tubes,
connect each plug to the respective
right and left "Rear Speaker" jacks on
the back of the subwoofer (red to red
and white to white).
c
) Plug in power cable/transformer into
back of subwoofer and available AC outlet.
3
21
b
a
c
1
SCALE 0.500
a
b
Tower tube
Connection cords
Stability legs
c
Back of subwoofer
SCALE 0.500
a
b
Right front speaker
with control pod
Back of subwoofer
Back of computer
Apply subwoofer's rubber pads to each corner
Control cable
2


