


INSTALLATION
Note: The HAA20 is not compatible with a
telephone that has the keypad located in handset.
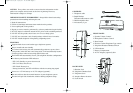
1. Disconnect the telephone handset cable from the
telephone and plug it into the handset jack (#10)
indicated by the handset symbol.
2. Connect one end of the supplied telephone cable
to the telephone jack (#11) indicated by the
telephone symbol. Connect the other end
to the handset jack on your telephone.
3. Connect the Rapid Headset
Disconnect/Reconnect cable (supplied with
the headset) to the headset jack (#9) indicated
by the headset symbol. Connect the Rapid Headset Disconnect/Reconnect
end of the cable to the actual headset.
4. Install the batteries or optional AC/DC adapter. Route cables to the rear
of the HAA20 under the cable retention tangs.
TELEPHONE HANDSET PROGRAMMING
Please perform the following procedure to configure the HAA20 for your
particular telephone.
1. Set the Telephone Type switch (#4) on the front panel to the 'C' position
and determine if the system performance is acceptable by making
a call to another party.
Note: If the LED is illuminated, switch the Mute Switch to the Mouth
symbol for conversation.
If performance is acceptable, skip the remaining steps in this section.
If performance is not acceptable, follow these steps for the HAA20 to
optimize its setup for your particular telephone.
2. Set the Telephone Type switch (#4) on the front panel to the “E” position.
3. Set the Mute switch (#3) to the mouth position.
4. Set the Telephone Handset/Headset switch (#5) on the front panel to the
headset position.
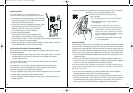
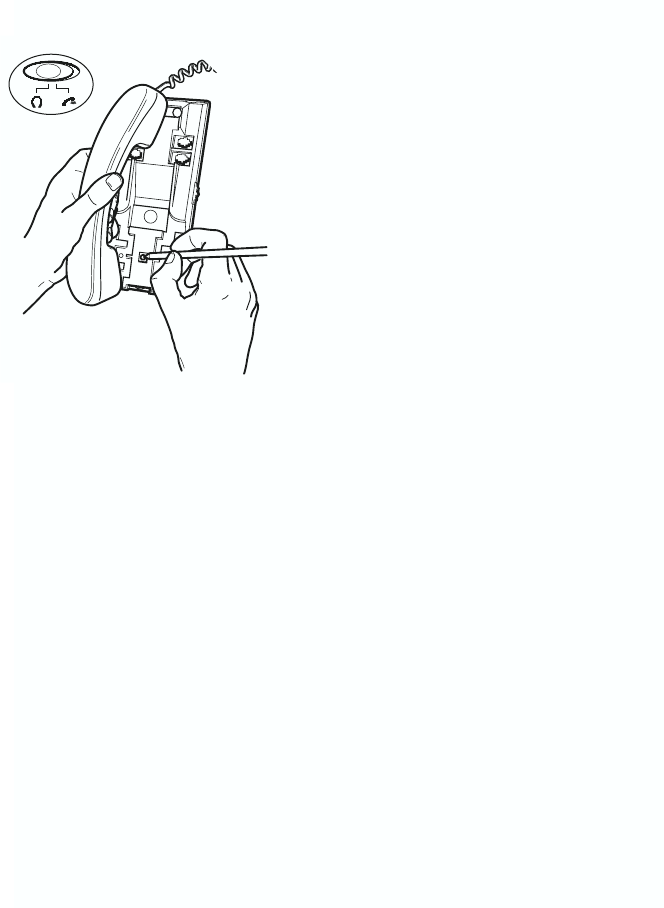
5. Turn the HAA20 over and place the microphone portion of the telephone
handset over the area labeled Buzzer (#12).
6. Push the Scan switch (#13) for no more
than 1 second.
Note: You should hear tones from the HAA20.
7. When the tones stop, setup procedure
is completed.
Note: If the tones continue for more than 30
seconds, stop the process by pressing the Scan
switch again. Then try the procedure
again from step 5. If the tones continue
for more than 30 seconds again, contact
Bogen for technical assistance.
8. Place the handset back on the cradle
of your telephone.
MANUAL MODE
The HAA20 also allows users to manually step through the different configu-
ration settings. Following the steps below, the user can select the optimum
configuration. Typically this would only be done if either the Auto Learn was
unable to select the optimum configuration setting or if many HAA20 ampli-
fiers were to be set to the same configuration as in a call center application.
1. Set the Telephone Handset/Headset switch (#5) on the front panel to the
Handset position.
2. Remove the telephone handset from its cradle and dial the number of a
person to assist you in configuring the HAA20 by listening to the quality of
your voice as you go through the seven different settings.
Note: Each of the seven configuration settings is accessed using the scan
switch and is identified by its own unique tone. The tones sound like Do,
Re, Mi, Fa, So, La, Ti.
3. Once the call is established, put on the headset and set the Telephone
Handset/Headset switch (#5) to the Headset position.
4. Press and hold the Scan switch (#13) for approximately 3 seconds until
the first tone is heard. You will have 12 seconds to test the unit's perform-
ance using this setting. If the performance is acceptable, then wait for 2
short beeps from the HAA20 and the configuration will be stored.
4 5
Bogen 130% 9/26 10/5/01 11:08 AM Page 5