Page 9
Before doing anything, ensure that the power switch on the amplifier’s front panel
is in the ‘off’ position. Again, it is recommended that you locate a separate AC
power outlet for the amplifier, one that is shared by any other audio
component in the system or any other house hold component. This will eliminate
the possibility of the amplifier ‘modulating’ the power being supplied to the
component and compromising the signal originating from that component.
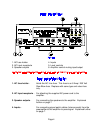
Locate the AC power cord provided with the amplifier and plug it into the power
input receptacle in the rear panel.
Connect the audio cables from your preamplifier’s output to the corresponding
input connector on the amplifier.
Connect the wires from your speakers to the appropriate output on the amplifier.
It is absolutely essential that you observe correct polarity in these connections.
Double check all connections.
Plug the amplifier’s power cord into the AC power source. Turn the amplifier’s
power switch ‘on’. The panel light should be illuminated. Leave the preamplifier
turned off. Before proceeding to the next step turn the amplifier off and wait 30
seconds for the amplifier to discharge. Both the preamplifier and amplifier
should be off.
Connect a playback unit (CD, VLD, Tuner, etc...) to the preamplifier. Turn the
volume on the preamplifier to minimum. Turn on the preamplifier, then the
amplifier (in that order). Set source on the preamplifier to the playback unit
you’ve just connected. Turn volume up slowly and music should be heard from
all channels. If this is not the case, double check your installation.
Should you encounter any problems that cannot be traced to the source or the
material being played, consult the “TROUBLESHOOTING” section on
page
10.


