


15 Setting Up Your Projector
Setting Up Your Projector
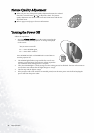
Preparations
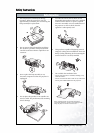
1. Remove the lens cap.
2. Turn all of the connected quipment on.
3. Plug the supplied power cord into the AC inlet on the rear of
this unit.
4. Plug the power cord into a wall socket and turn the wall
switch on.
5. Turn on the main power switch at the rear of this unit (next to
the AC inlet). The POWER light will light up in orange. Press
POWER ON/OFF key on the remote control or STANDBY/
ON key on the projector for ONE second to turn the
projector on.
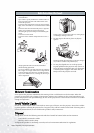
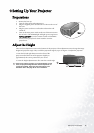
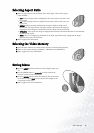
Adjust the Height
There are four adjustment screws on the bottom of the projector. These adjustment screws change the image
height and projection angle. They can lift the projection angle by up to 15 degrees. To adjust the projector:
1. Press the left and right buttons near the front of the
projector and lift the front of the projector slightly, to
approximately the correct position for your screen.
2. Screw the height adjustments to fine-tune the vertical angle.
If the screen and the projector are not perpendicular to each
other, the projected image becomes vertical trapezoidal. To
correct this problem, adjust the value of Keystone in the
Installation menu. See page 26 for more information.