


9 XENYX 1002B User Manual
Creating a monitor mix 4.2
For live applications, audio engineers often send dierent mixes to the audience
and to the performing musicians. To allow this, the 1002B is equipped with a
dedicated monitor send bus. Each channel features a MON knob that sends a
“pre-fader” signal to the MON OUT jack, allowing the channel’s volume fader to
be adjusted without aecting the monitor mix. The signal can also be used as a
second eects send. Follow these steps to set up a basic monitor mix:
Make sure the powered monitor speaker or power amp is turned o. •
Connect a ¼" TS cable from the MON OUT jack to the powered speaker or
power amp.
Turn on the powered speaker or power amp, and then turn the volume up •
about half way.
Turn the MON SEND knob to the center (12 o’clock) position. This setting may •
need to be adjusted later depending on volume requirements.
As the musicians begin to play, turn each channel’s MON knob up slowly until •
each source is audible in the monitor mix.
It may take some time to get a balanced mix that all the musicians are happy •
with. If possible, avoid turning a channel’s MON knob much past the center
position. Do not point the monitor speakers directly at a microphone, as this
will likely cause feedback.
See the Applications section for details.
As previously stated, the MON SEND jack can also be used as a second eects
send. This application requires a similar setup to the normal eects send,
but since the signal from each channel is sent pre-fader using the MON knob,
adjustments to the channel’s volume will aect the mix of wet and dry eect
signal. Therefore, if you alter a channel’s volume during the performance,
you must also adjust that channel’s MON knob.
NOTE: When using the MON SEND for eects, if you neglect to change a •
channel’s MON knob while turning that channel’s volume fader all the
way down, you will still hear the eected signal coming through the mix.
This problem happens because the signal routes “pre-fader,” but the normal
FX SEND bus will not experience this issue.
Battery installation4.3
The 1002B can be powered by three 9V batteries. This feature allows you,
for example, to capture a high-quality recording while sitting on the beach with
your laptop. You’re no longer tethered by an electrical outlet. You can still record
with condenser mics thanks to the 18V of phantom power supplied by two of the
batteries. Follow these steps to install the batteries:
Open the battery compartment located on the underside of the mixer. •
You will need to remove a small screw with a Phillips screwdriver.
Slide the compartment cover out. There are slots for three batteries inside •
the compartment.
Insert the batteries so that the + and – poles are in the correct position. •
Replace the cover and tighten the screw. •
The battery power will last approximately four hours using high-quality
alkaline batteries.
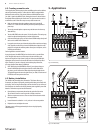
Applications5.
UL2000M
UCA222
XENYX1002B
HPS5000
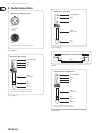
Fig. 5.1: Field Recording
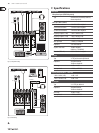
XENYX1002B
DI100
HPS5000
B212A
F1220A
MP3 Player
Fig. 5.2: Live Small Combo