


7
PRO MIXER VMX100
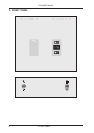
2. FRONT PANEL
+ Never connect line-level equipment to the highly sensitive phono inputs! The output levels of
phono cartridge systems are in the millivolt range, whereas CD and MD players, as well as
tape decks, provide outputs levels in the volt range. In other words, the level of line signals is
up to 100 times higher than phono output levels.
2
The GAIN control is used to adjust the input signal level.
+ The overall level of your signal is also effected by the EQ settings. Its a good idea to adjust the
equalizer before you set the level with the GAIN control.
3
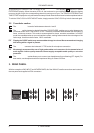
Each of the two input channels is equipped with a 2-BAND EQUALIZER with kill characteristic. The
maximum amount of attenuation (-32 dB) is much higher than the maximum boost (+12 dB), allowing
entire frequency spectrums to be removed from a track.
4
The CHANNEL fader adjusts the final channel volume.
2.2 PFL section (Pre Fader Listening)
The PFL signal is a pre-fader headphones signal, enabling you to pre-listen to a signal source without effecting
the main signal.
5
The LEVEL control determines the volume of the headphones signal.
6
The MIX control lets you fade between channels 1 and 2.
7
The LEVEL METER displays the level of the signal selected via the MAIN/PFL button ( ).
8
The MAIN/PFL button allows you to route either the main or PFL signal to the display. Remember: PFL
is your pre-listening or headphone signal and MAIN is the signal assigned to the outputs of the VMX100.
+ In PFL mode, the channel 1 signal is displayed on the left side of the LEVEL METER, and
channel 2 on the right.
2.3 MIC/MAIN section
9
The MAIN knob controls the overall output volume.
10
The MIC LEVEL control adjusts the volume of the microphone signal.
2.4 Beat counter
The PRO MIXER VMX100s built-in beat counter is an extremely useful feature, allowing smooth crossfades
between two tracksan important key to the success of your performance. The beat counter analyzes and
displays the tempi of your tracks in BPM (Beats Per Minute). The beat counter sections of channel 1 and 2 are
identical.
The tempo of the track is shown in the respective channels DISPLAY ( ). In the case of multiple tempo
changes, the display would change continuously, causing unnecessary confusion and rendering the function
virtually useless. Enter the SYNC LOCK button ( ): with it, you can limit the range of possible tempo values
within a song. Pressing this button once the counter has caught and displayed a realistic value will simplify
things. The BEAT ASSIST button ( ) allows you to set the beat counters tempo manually, similar to
tap tempo. Pressing the button three times in time with the track will set the beat counter and its display at
that tempo. The BEAT ASSISST and SYNC LOCK buttons are each equipped with an LED to show that the
respective function is activated.
Once the tempo of the two tracks have been determined and locked with the SYNC LOCK or BEAT ASSIST
buttons, the tempo difference between channel 1 and 2 will be depicted via the 9-segment TEMPO DIFFERENCE
LED display ( ). It shows the degree of the tempo difference by a respective deflection to the right (channel
2 track is faster) or to the left (channel 2 track is faster). The center LED lights when the tempi are equal. The