


12
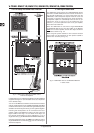
V-TONE GMX110/GMX112/GMX210/GMX212/GMX1200H
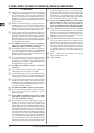
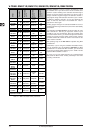
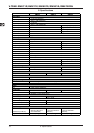
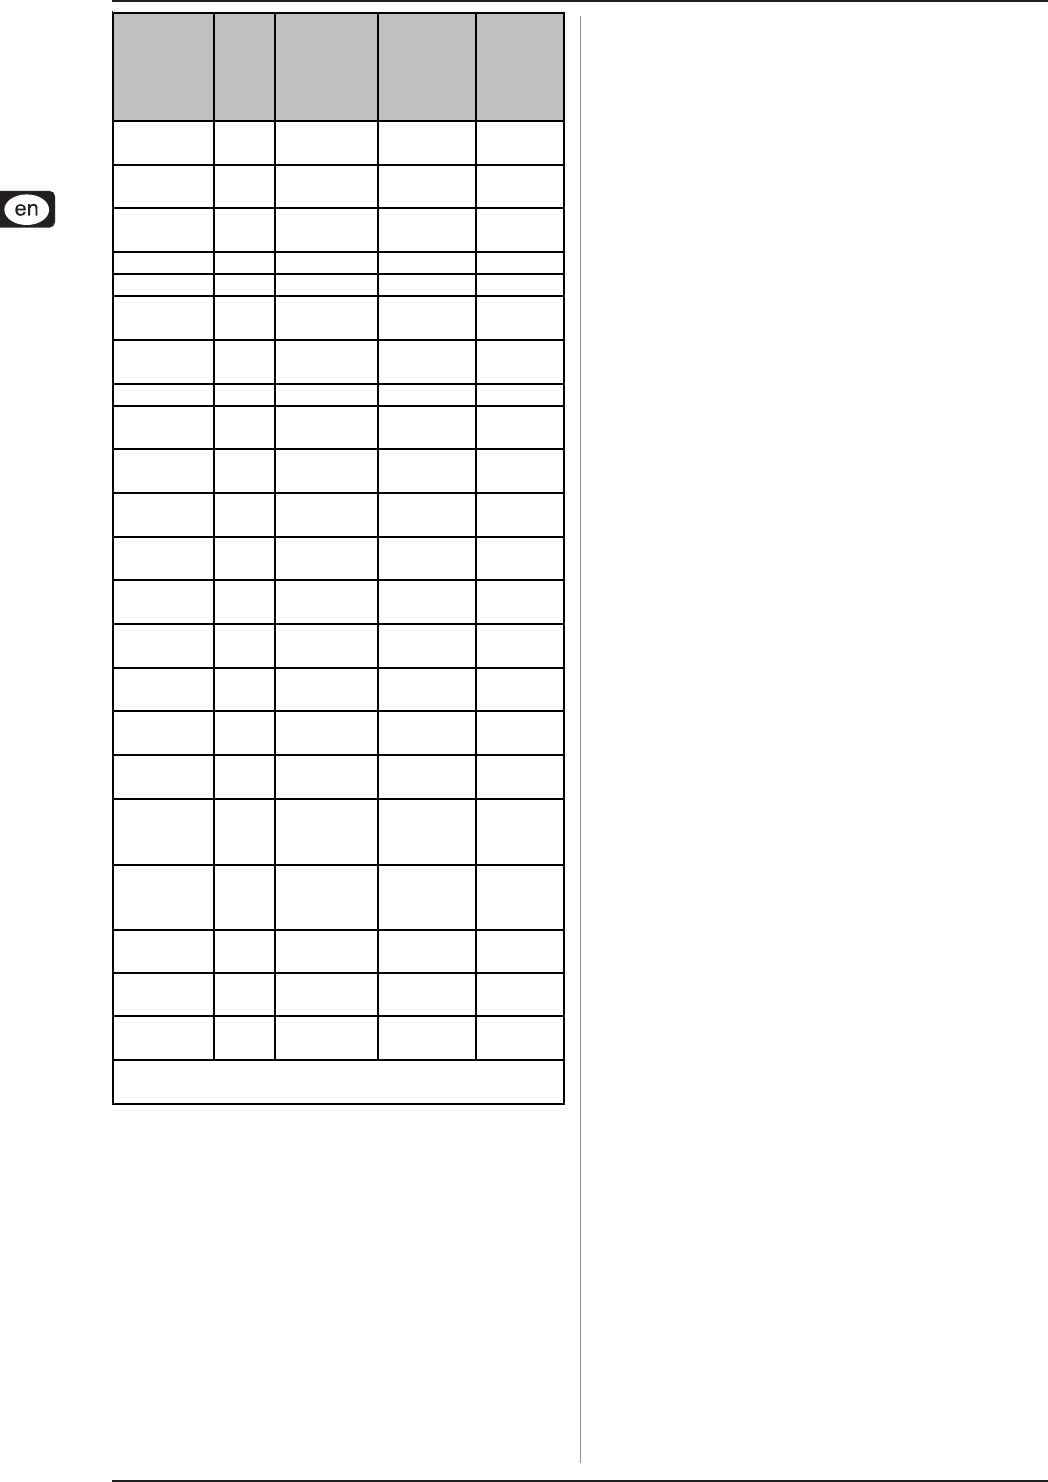
4. Effects processor
Effect
Preset No.
Parameter 3
CC 12
Parameter 2
CC 13
Parameter 1
CC14
REVERB 0 - 16 -
Reverb
Time
Mix
DELAY/
REVERB
17 - 20 Delay Time* Delay Mix
Reverb
Mix
DELAY 21 - 29 Delay Time* Feedback Mix
PHASER 30 - 33 LFO Speed* Feedback Depth
CHORUS 34 - 37 LFO Speed* Depth Mix
CHORUS/
REVERB
38 - 42 Reverb Time
Reverb
Mix
Chorus
Mix
CHORUS/
DELAY
43 - 47 Delay Time* Delay Mix
Chorus
Mix
FLANGER 48 - 51 LFO Speed* Resonance Depth
FLANGER/
REVERB
52 - 56 Reverb Time
Reverb
Mix
Depth
FLANGER/
DELAY
57 - 61 Delay Time* Delay Mix Depth
TREMOLO/
REVERB
62, 63 LFO Speed*
Reverb
Mix
Tremolo
Mix
TREMOLO/
DELAY
64 - 66 LFO Speed* Delay Mix
Tremolo
Mix
ROTARY
SPEAKER
67, 68 LFO Speed*
Reverb
Mix
Depth
ROTARY
DRIVE
69, 70 LFO Speed* Delay Mix Depth
AUTO WAH
REVERB
71, 72 Reverb Mix Depth Sensitivity
AUTO WAH
DELAY
73, 74 Delay Mix Depth Sensitivity
PITCH
SHIFTER
75 - 81 - - Pitch Mix
PITCH
SHIFTER/
REVERB
82 - 85 Reverb Time
Reverb
Mix
Pitch Mix
PITCH
SHIFTER/
DELAY
86 - 89 Delay Time* Delay Mix Pitch Mix
COM-
PRESSOR
90, 91
Delay Time/
Rev Time²
Delay Mix/
Rev Mix²
Sensitivity
EXPANDER 92, 93
Rev Time/
Delay Time²
Rev Mix/
Delay Mix²
Threshold
GUITAR
COMBO
94 - 99
Delay Time*/
Rev Time²
Delay Mix/
Rev Mix²
Drive
*) Tap tempo: MIDI Control No. 64
²) depends on Variation
Table 4.1: MIDI-controllable effect parameters
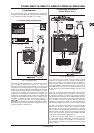
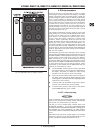
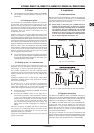
Channel switching: Changing modeling CHANNELS is done
via controller #10. If you send value 0 via this controller, then
channel 1 is active. Sending value 1 activates channel change to
channel 2. Program change instructions can also be used to
change channels. Program change #123 activates channels 1
and program change #124 activates channel 2 of your V-TONE.
In addition to switching channels, you can also deactivate the
effect. To this end, send value 0 via controller #11. Value 1
activates the effect again.
Sending program change #127 activates the tuner. As soon as
another program change number is sent, the tuner is automatically
deactivated.
You determine the input volume of the effect module by using
MIDI controller #7. This lets you adjust the volume of your
V-TONE to your own requirements. Since this controller does
not control master volume, you should first adjust the maximum
volume you need by using the master volume control, and then
use MIDI controller #7 to lower the volume. This function is also
called “volume controller”.
The operating range of the Wah effect is adjusted using MIDI
controller #27.
Furthermore, if you’re using LFO-controlled modulation effects,
you can deactivate LFO and implement modulation via MIDI
controller #27. To activate this MIDI controller, you should first
set up the LFO velocity either directly on your V-TONE or set the
respective MIDI controller to value 0.
Of course, you can use a MIDI sequencer or a computer-based
MIDI editor for MIDI remote control, particularly in the home
recording environment.