


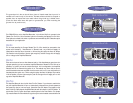


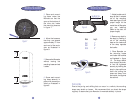


3. Place each mount-
ing base under the
Bazooka so that the
apex at the bottom of
the tube sits inside
the mounting base as
in figure 7.
4. Move the bases so
that they are spaced
approximately 3” from
each end of the enclo-
sure as illustrated in
figure 8.
5. Remove the Bazooka
without moving the
mounting bases and set
it aside.
6. Screw each mount-
ing base securely in
place with screws pro-
vided as illustrated in
figure 6.
MOUNTING THE BAZOOKA
7
Figure 7
Figure 8
3
,,
3
,,
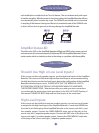
See Model Size
For Length
Figure 9
Figure 10
MOUNTING THE BAZOOKA
8
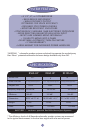
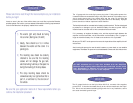
7. Adjust buckle end of
strap so that it extends
out of the mounting
base (see figure 9) the
proper length for the
model size of Bazooka
you are installing
(Refer to the chart for
proper length)
8. Remove any slack in
the strap by feeding it
out of the mounting
base on the loose end
of the strap opposite
the buckle.
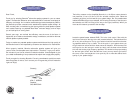
9. Place Bazooka on
the mounting bases
and fasten the buckles
as illustrated in figure
10. The strap should
loop through the buck-
le and be tightened
securely by holding the
strap in place with one
hand and pulling the
loose end away from
the buckle, but against
the cabinet.
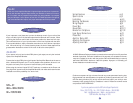
Technical Note
Due to the jarring and shifting that can occur in a vehicle, the mounting
straps may stretch or loosen. We recommend that you check the straps
regularly to assure that your Bazooka is mounted securely in place.
Model Length
RS6A 17”
RS8A 22”
RS10A 27”