


2
II. Frequency Selection:
The IRB-10 can be set to transmit on either one of two preset frequencies. This is so
that two different speakers can talk at the same time in the same room. While it does
not matter which frequency is chosen for the body-pack, two transmitters cannot share
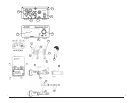
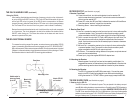
the same frequency at the same time. To select the desired frequency (channel) slide
the switch (T) as shown on the sticker on the back of the battery door.
II. Power Mode Selection:
The IRB-10 has two Power Modes - Lo and Hi. These modes can be selected via a
switch (Q) inside the battery compartment, and affect two areas related to perfor-
mance - battery life and area coverage. If the body-pack is switched to the Hi position
(Q - to the right) the range is set to maximum (approximately 1600 square feet) while
the battery life is reduced to approximately 10 hours with Alkaline batteries. If, on the
other hand, the body-pack is switched to Lo the operating range is reduced to approxi-
mately 1200 square feet and the battery life increases to approximately 15 hours with
Alkaline batteries. Experimentation is the only way to know which position is best for
your room. We suggest, however, that it always best to use the Lo position if possible
as that provides the most economical use.
III. Adjusting MIC Gain:
The MIC gain (volume) is adjustable to compensate for various microphone element
characteristics. The adjustment (R) is located in the battery compartment and can be
adjusted using the provided tool. While speaking into your microphone, adjust the gain
(more gain-clockwise rotation, less gain-counterclockwise rotation) until the desired
volume level is achieved. Best results are normally achieved when the gain control on
the IRB-10 body-pack and the volume control on the IRR-20 receiver (D or F) are both
at their mid-points.
IV. Using the IRB-10:
After inserting fresh batteries, the IRB-10 can be powered by sliding the ON/OFF
Switch (N) to the ON position. The Power LED (O) will glow when the IRB-10 is pow-
ered ON as will the red LED on the front panel of the IRR-20 which corresponds to the
chosen channel. Be sure to slide the Power Switch to OFF when not in use to preserve
battery life. The Power LED on the mic will turn from green to red to indicate “Low
Battery”.
The emitter (1) must be plugged into the IRB-10 (P) and either attached to the clothing
with the clip (2) or worn around the neck with the lanyard (7) as described in section V.
The emitter acts as the transmitter and, for best results, should be worn in such a way
as to have a clear path to the receiving sensor(s).
3
IV. Using the IRB-10 (continued):
While there is a built-in microphone in the emitter, for best results an external micro-
phone should be used. This microphone can be attached to the IRB-10 through the
3.5mm EXT. MIC jack (M). See page 5 for microphone suggestions. The internal mi-
crophone is disabled when an external mic is attached.
The IRB-10 can be attached to the belt or other clothing by way of the metal belt clip.
It is suggested that the body-pack be worn in the front portion of the body to avoid the
possibility of damaging it.
V. Attaching and Using the Lanyard with the IRE-10 Emitter:
As described above, the emitter can be attached to clothing using the built-in clip (2).
If that is not convenient, or if the built-in auxiliary mic is being used, it is best to use the
included lanyard. To attach, insert the metal clip (2) through the holes (3) on the lanyard’s
clear plastic slide (5).
To adjust the emitter, hold the end of the lanyard (4) and slide the emitter up or down
to the desired position. When using the built-in auxiliary mic it is best to slide the
emitter up as far as possible so that it is close to the mouth (6).
THE IRH-10 HANDHELD MIC (see illustration on page i)
I. Batteries for the IRH-10:
The IRH-10 uses two “AA” batteries or one AN-2A Ni-Cd for power. Batteries are
placed in the battery compartment after unscrewing and removing the bottom portion
of the mic handle (W). When using the AN-2A battery (U) carefully place a FULLY
CHARGED battery in the compartment in the direction shown in the illustration (- to the
top, + to the bottom). OBSERVE PROPER POLARITY! The IRH-10 can also use
either 2 “AA” size Alkaline, Ni-Cd or Ni-MH batteries. When using this size battery, first
place the two batteries (Y) into the included adapter sleeve (X) and then place in the
compartment as shown. Again, OBSERVE PROPER POLARITY! Be sure to use
FRESH “AA” Alkaline batteries, or, in the case of “AA” rechargeable batteries, be sure
that they are FULLY CHARGED before use. Battery life depends on (1) the type of
battery used, (2) the power mode chosen and other factors.
II. Frequency Selection:
The IRH-10 can be set to transmit on either one of two preset frequencies. This is so
that two different speakers can talk at the same time in the same room. While it does
not matter which frequency is chosen for the handheld mic, two transmitters cannot
share the same frequency at the same time. To select the desired frequency (channel)
slide the switch (V) as shown on the sticker on the side of the battery compartment.