


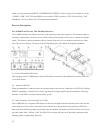


(2) Insert one fresh Alkaline 9-volt battery into the compartment. Make sure the battery polarity is correct.
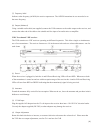
(3) Frequency Label
The Frequency label indicates what frequency (in MHz) the transmitter broadcasts on. The AZDEN receiver
in use must also be on the same frequency.
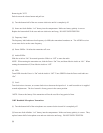
(4) 31IT 1/4-inch plug
Plugs into output on electric guitars and keyboards.
or
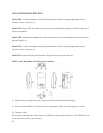
(4) 31LT lavalier mic:
Clips onto a tie, lapel, etc. The transmitter’s cable doubles as an antenna. Extend the cable as much as
possible for the best performance.
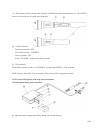
(5) Audio Input Level Control
Turn clockwise to increase, or counter-clockwise to decrease the input level. A small screwdriver is supplied
to make adjustments. The level control is factory-preset in the center position.
(6) 3 Position Switch
The left position: OFF
The middle position: STANDBY
The right position: ON
In the “STANDBY” position, the audio is muted.
(7) LED Indicator
Turns RED when the switch is in “STANDBY” position and GREEN in “ON” position.
NOTE: Remove the battery if the transmitter will not be used for a long period of time.
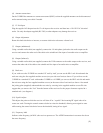
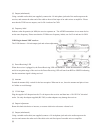
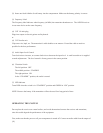
OPERATING THE SYSTEM
Do not place the receiver on a metal surface, and avoid obstructions between the receiver and transmitter,
since this could degrade the performance of the equipment.
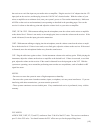
First, make sure that the power to all your components is turned off. Connect an audio cable from the output of
(11)