


5
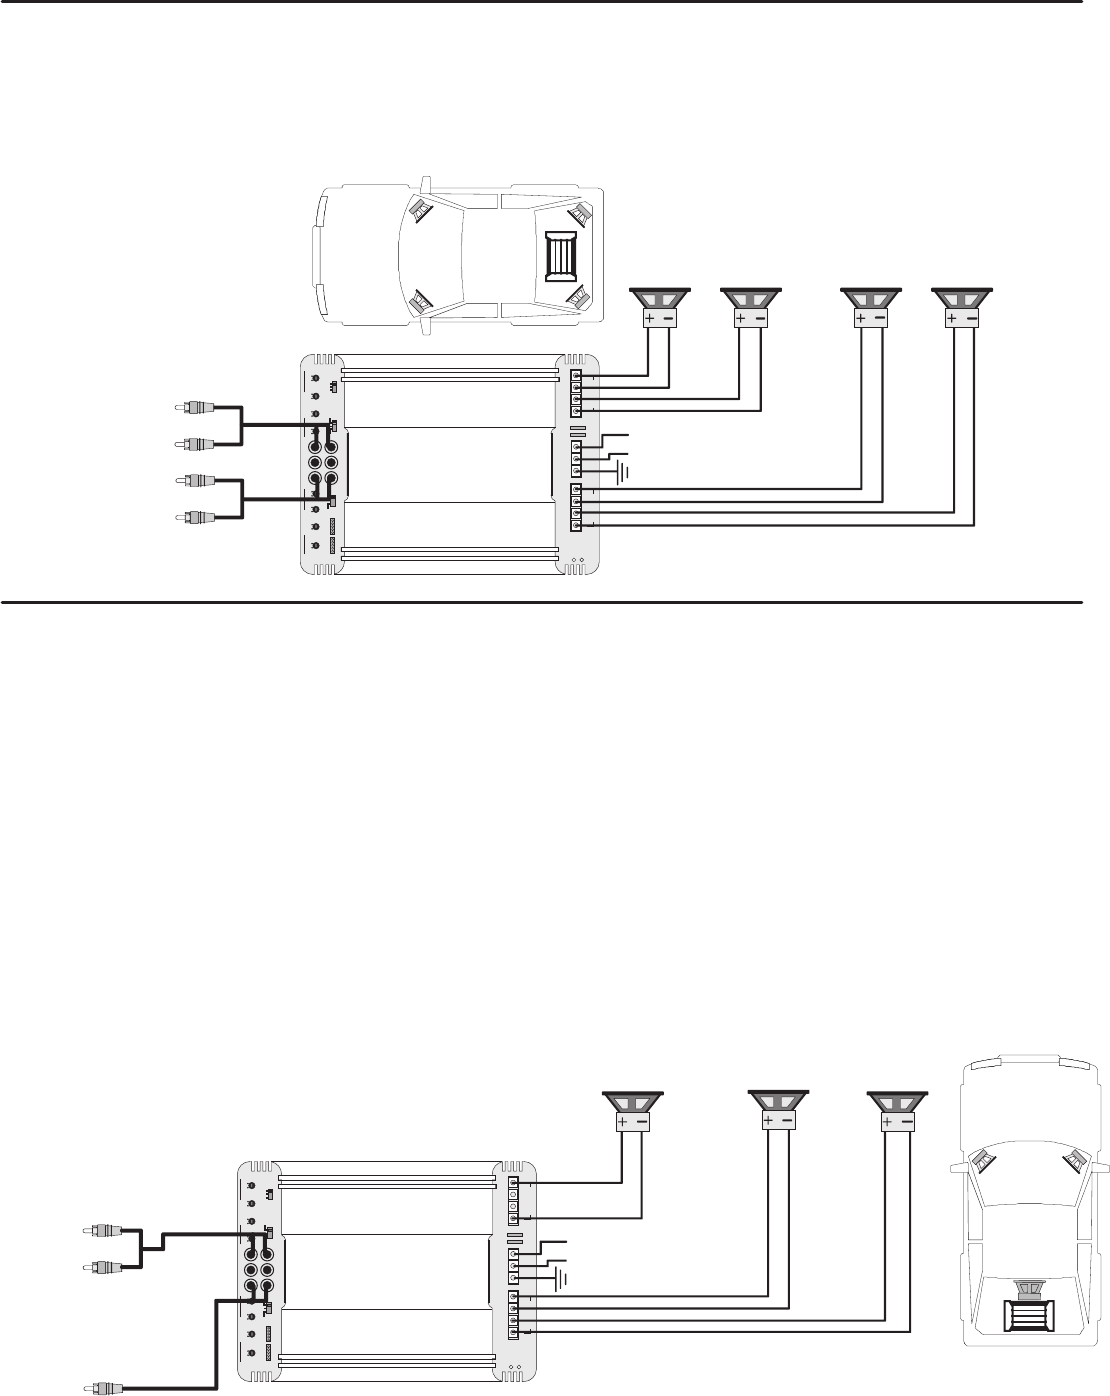
AT950 / AT1200 / 4 CHANNEL AMPLIFIER APPLICATIONS
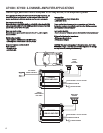
4 CHANNEL FULL RANGE SYSTEM
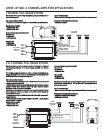
2 or 3 CHANNEL FULL RANGE SYSTEM
Level control checklist:
Here we show how to use the 4 channel amplifiers as straight forward discrete 4
- Refer to the section “Setting up systems after installation for best performance”
channel full range units.
Minimum final loudspeaker impedances:
Interconnect cable checklist:
- 2-Ohms per channel.
- Connect the four inputs of the amplifier to a Radio/CD with quality RCA cables.
Switch setting checklist:
- 1/2CH X-OVER: FULL
- 3/4CH X-OVER: FULL
Crossover frequency control checklist:
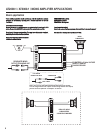
Channels 1/2:
- HI PASS: N/A
- LOW PASS: N/A
Channels 3/4:
- HI PASS: N/A
- LOW PASS: N/A
Crossover frequency control checklist:
Here we show how to use the 4 channel amplifiers as full range 2 or 3 channel
Channels 1/2:
units by taking advantage of the mono bridging capability of all Autotek
amplifiers.
- HI PASS: N/A
- LOW PASS: N/A
The following example shows how to create a 3 channel system by mono
bridging channel pair 3 / 4. In order to create a 2 channel system, simply follow
Channels 3/4:
the example to also mono bridge channel pair 1 / 2.
- HI PASS: N/A
- LOW PASS: N/A
Interconnect cable checklist:
- Connect the inputs of channel pair 1/2 to a suitable stereo source, e.g. a head
TIP: If you are using the mono sub bass output of an active crossover, there is
unit with good quality RCA cables.
nothing wrong with switching in the low pass filter in these amplifiers for a
- A MONO signal source is required to bridge channel pair 3/4, such as would be
steeper low pass rolloff.
available from the mono sub bass output of an active crossover, whether
standalone, or built into a head unit or equalizer.
Level control checklist:
Important: Do not be tempted to connect the hot, or positive outputs, from any
- Refer to the section “Setting up systems after installation for best performance”
source together to obtain a mono signal, as this could very well damage the
output stage of that source.
Minimum final loudspeaker impedances:
- It is necessary to feed the SAME signal to both left and right inputs via a Y-
- 2-Ohms per channel in stereo mode.
adapter RCA cable.
- 4-Ohms mono bridged.
- Connect the mono speaker positive terminal to the LEFT +, and its negative
terminal to RIGHT - as shown.
Switch setting checklist:
- 1/2CH X-OVER: FULL
- 3/4CH X-OVER: FULL
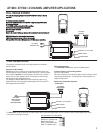
GND REM +12V
POWER INPUT FUSE
POWER
PROTECT
CH 3/4 SPEAKER OUTPUT
BRIDGED
RIGHT LEFT
+ - + -
RIGHT LEFT
+ - + -
CH ½ SPEAKER OUTPUT
BRIDGED
GND REM +12V
POWER INPUT FUSE
POWER
PROTECT
CH 3/4 SPEAKER OUTPUT
BRIDGED
CH ½ SPEAKER OUTPUT
BRIDGED
FULL RANGE
SPEAKERS
FULL RANGE
STEREO LINE
INPUTS
STEREO
FULL RANGE
OR HIGHS
SPEAKERS
MONO
OR SUB BASS
SPEAKER
1 STEREO
1 MONO
FULL RANGE
LINE INPUTS
REMOTE TURN-ON
CHASSIS GROUND
TO BATTERY + 12 Volts VIA FUSE
REMOTE TURN-ON
CHASSIS GROUND
TO BATTERY + 12 Volts VIA FUSE
RIGHT LEFT
+ - + -
RIGHT LEFT
+ - + -
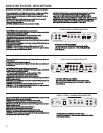
4CH MONO MIX
INPUT
CH1
CH1
CH3
CH3
CH4
CH4
CH2
CH2
INPUTOUTPUT
CHANNEL 1 / 2
CHANNEL 3 / 4
+ - GND - + + - GND - +
FULL
FULL
LPF
LPF
HPF
HPF
X-OVER
X-OVER
30Hz 250Hz
30Hz 250Hz
60Hz 1.2KHz
60Hz 1.2KHz
0dB 12dB 0dB 12dB5V 0.2v
5V 0.2v
LPF
LPF
HPF
HPF
BASS EQ BASS EQ
LEVEL
LEVEL
2 3 4
MODE
4CH MONO MIX
INPUT
CH1
CH1
CH3
CH3
CH4
CH4
CH2
CH2
INPUTOUTPUT
CHANNEL 1 / 2
CHANNEL 3 / 4
+ - GND - + + - GND - +
FULL
FULL
LPF
LPF
HPF
HPF
X-OVER
X-OVER
30Hz 250Hz
30Hz 250Hz
60Hz 1.2KHz
60Hz 1.2KHz
0dB 12dB 0dB 12dB5V 0.2v
5V 0.2v
LPF
LPF
HPF
HPF
BASS EQ BASS EQ
LEVEL
LEVEL
2 3 4
MODE