


-1-
INSTALLATION INSTRUCTIONS
This unit is designed for installation in cars, trucks, and vans with an existing radio
opening. In many cases, a special installation kit will be required to mount the radio to the
dashboard. These kits are available at electronics supply stores and car stereo specialist
shops. Always check the kit application before purchasing to make sure the kit works with
your vehicle. If you need a kit but cannot find it available, call our toll-free “HELP” line.
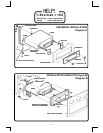
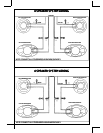
UNIVERSAL INSTALLATION(Diagram A)
1. Inspect the Existing Radio Opening
A. Use the trimplate supplied with the radio to cover the existing dashboard opening. If
it completely covers the opening, you can install the radio without an installation kit.
If it does not cover the opening, you will need an installation kit.
B. Check that there will be sufficient space behind the dashboard for the radio chassis.
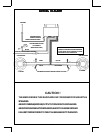
2. Wire the Radio to the Vehicle’s Wiring
A. In most cases, it is easier to wire the radio before mounting it. Place the radio near
the dashboard so the wires can be led through the opening.
B. Carefully follow the wiring diagram in this manual and make certain all connections
are secure and insulated with wire nuts or electrical tape to insure proper operation
of the unit.
C. After completing the wiring, turn the unit on to confirm operation (ignition switch
must be “on”). If unit does not operate, re-check all wiring until the problem is
corrected. Once proper operation is achieved, turn off unit and ignition switch, and
proceed with final mounting of the radio.
3. Mounting the Radio
A. Thread a shaft nut half-way down each radio shaft.
B. Place a metal back-up plate on each radio shaft against the shaft nut.
C. Position the radio behind the dashboard opening so that the back-up plates are snug
against the back of the opening. Adjust the shaft nuts behind the back-up plates so
that the desired amount of radio nosepiece extends through the opening. The best
appearance is usually achieved when there is just enough of the radio extending to
be flush with the front of the trimplate.
D. Place the trimplate over the front of the radio and secure it with a shaft nut on each
radio shaft.
E. Attach one end of the perforated support strap (supplied) to the screw stud on the
radio using the hex nut provided. Bend the strap to position it as necessary.
CAUTION: The rear of the radio must be supported with the strap to prevent damage to
the dashboard from the weight of the radio or improper operation due to
vibration.
F. Install knobs on the radio.
INSTALLATION USING KITS (Diagram B)
Use these instructions if your vehicle requires the use of an installation kit to mount this
radio.
1. Follow the instructions included with the installation kit to attach the radio to the
mounting plate supplied with the kit.
2. Wire and test the radio as described in section 2 above.
3. Install the radio/mounting plate assembly to the sub-dashboard according to the
instructions of the installation kit.
4. Attach the support strap to the radio and dashboard as described in section 3-E above.
5. Replace the dashboard trimpanel and install knobs on the radio shafts.