


Hooking Them Up
The five-way binding posts accommodate nearly any type of connector and up to 14-gauge wire. For bare wire, press the binding post in
to reveal the eye, thread the wire into the eye, and release the spring-loaded connector. For banana plugs, simply insert the plug
into the end of the connector.
When connecting the speakers, be sure to retain the correct polarity. Attach the wire from the +, red, or positive terminal on one
component to the +, red, or positive terminal on the corresponding component's speaker output terminals. The –, black or
negative terminals must connect to the respective –, black or negative terminals. This is easy to do by observing the color, stripe, or rib-
bing that appears on the wire.
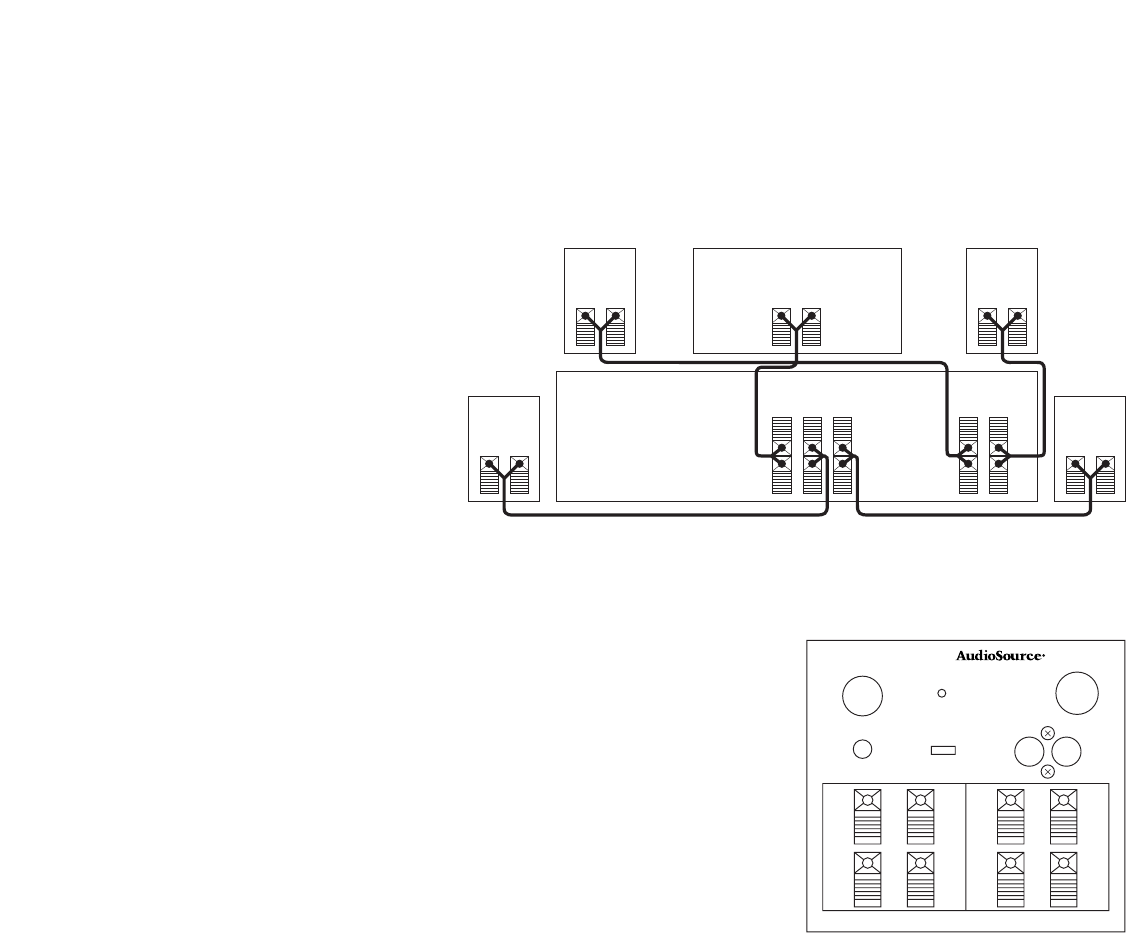
1. Connect the left front speaker terminals (+/-) of
your receiver to the left LS2 front speaker.
2. Connect the right front speaker terminals (+/-)
of your receiver to the right LS2 front speaker.
3. Connect the left surround speaker terminals (+/-)
of your receiver to the left LS2 rear surround
speaker.
4. Connect the right surround speaker terminals (+/-)
of your receiver to the right LS2 rear surround
speaker.
5. Connect the center channel speaker terminals (+/-) of your receiver to the LS2C center channel speaker.
Note: If you are using an outboard Dolby
©
Surround Processor, the speaker terminals for the center and rear/surround speakers will be
found on this component, not on your receiver.
SW 80 Powered Subwoofer
Subwoofers extend the bass response of your system beyond the limitations of most speak-
ers. They are used with, not in place of, your existing left and right speakers. A subwoofer
can dramatically enhance a stereo TV, a stereo system, or a full fledged home theater.
Features of the SW 80
The AudioSource SW 80 features a highly efficient ported enclosure, a rugged 8-inch rein-
forced driver and a eighty-watt amplifier with a passive low frequency crossover network. A
line level input is provided for fast and easy connection to virtually any system.
Using the Controls
Power
The power switch has two positions: off and on. When the power LED is lit, the power is on.
Level
The level control adjusts the volume of the SW 80. Once set, the level control should not require further adjustment. Begin with the
level control at the minimum position. Slowly increase the level until you can hear the subwoofer. A subwoofer playing too loud can
give your system a muddy sound, so be sure to balance the subwoofer carefully with your other speakers. Output level is relative
and can be different from location to location. Always return to the normal listening location to evaluate any setting changes.
Placement Guidelines
Prior to installing your new subwoofer, please consider the following guidelines. Placing the subwoofer near a wall or in a corner will
greatly increase its bass response. As frequencies reproduced by subwoofers are long and need room to propagate, a subwoofer placed
near the listening position will not sound as full as one placed farther away. Please be careful about placing anything directly on top of
your subwoofer, as the vibrations of the speaker cabinet could cause these items to shake loose or fall.
Connecting the SW 80
The diagrams on the following page show four of the most common types of subwoofer connections. This information will guide you
through the connection process.
All signals into your unit will first pass through the crossover. The portion of the signal below the current crossover frequency setting
will be reproduced by the subwoofer. The unprocessed signal will also be passed to the hi and line level outputs. If you have a choice
of connection options, remember that it may be easier to run long distances with speaker wire than with line connectors.
Fuse
5A 250V
Power In
18.5 VAC
Level
Power
Line
In
On Off
+–
LR
+
L
R
L
R
–
SW 80
Powered Subwoofer
Speaker Out Speaker In
Made in China
–
LR
C
Center Rear Surround
Center Speaker
Receiver
Left
Surround
Speaker
Right
Surround
Speaker
Right
Front
Speaker
Left
Front
Speaker
+
+
–+
+
–+
+
–+
+
–+
+
–+
–
LR
Front Speakers
+