Basic Guidelines
A graphic equalizer adjusts the sound of your audio system. Before setting the sliders, listen to your system and ask
yourself what you'd like to change about its sound. If you want more bass, for example, either raise the low frequency
sliders or lower the midrange or high frequency sliders. Conversely, if you'd like to hear more high frequencies, either
raise the high frequency sliders or lower the midrange or bass frequencies.
Using The Controls
Power
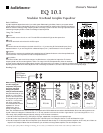
Press this switch to turn the unit on or off. The red LED in the switch will light to show power is on.
Level
This knob controls the volume level of the EQ’s output.
Line
This switch refers to the hookups on the back of the EQ 10.1. If you are using XLR or balanced inputs (line 2),
depress this button. If you are using RCA or unbalanced inputs (line 1), leave this button in the out position.
EQ/Pass
Use this switch to compare the equalized and unequalized sound. Depress this button to hear the equalized sound.
Leave this switch in the out position to hear the unequalized sound.
EQ Sliders
There are ten sliders, each of which has a range of 12 dB to boost or cut its particular frequencies. The lowest
frequency slider is 30 Hz, and the highest is 16 kHz. The range of this EQ corresponds with all but the extremes
of human hearing. Adjusting the sliders makes it simple to alter the sound of your system. For instance, the lowest note of a bass guitar is around 42 Hz.
Adjusting the 30 hz and 60 Hz sliders adjusts the level of the bass guitar, bass drum, and other instruments within this frequency range.
Hooking It Up
When connecting the EQ 10.1,
turn off or unplug your
components. This prevents
loud “pops” that might
damage your speakers
while you connect the cables.
We recommend that you use
the EQ 10.1 with a pream-
plifier or other sort of mixer.
The diagram at right shows
the EQ 10.1 in conjunction
with other components
from AudioSource’s modular
separates line. You can
substitute any amp or
preamp; the setup is the
same. Also, XLR/balanced connections follow the same paths as the RCA/unbalanced connections described below. Since most audio systems are con-
figured in stereo, this diagram includes two EQ 10.1s. You may use either of the two for the left or right channel. If you have a single EQ 10.1 in a
mono setup, simply adapt the diagram above by omitting one of the stereo connections.
1. Connect the source component (e.g. DVD player, CD player, cassette deck, microphone) to the preamp input.
2. Connect the two output channels of the preamp to each of the EQ inputs. In this diagram, Channel 1 is left and Channel 2 is right.
3. Connect the outputs from each EQ to the amplifier inputs. Please note that the Amp 5.1 is also a single-channel amplifier, which is why two of them are
required in this example. Rather than two monoblocks, you could also use a single stereo amplifier, such as an Amp 6.2 or 6.3.
5
4
3
2
1
Owner’s Manual
Line 2 In
Line 2 Out
120 VAC 60 Hz 12 Watts
Line 1 OutIn
EQ 10.1
Balanced Input
Speaker Output
+
–
Unbalanced
Line In
Line Out/
Thru
120 VAC 60 Hz 200 Watts
Amp 5.1
Balanced Input
Speaker Output
+
–
Unbalanced
Line In
Line Out/
Thru
120 VAC 60 Hz 200 Watts
Amp 5.1
Line 2 In
Line 2 Out
120 VAC 60 Hz 12 Watts
Line 1In Out
EQ 10.1
Ch. 1 In Ch. 2 In
Ch. 1 Out
Line 2
Line 2
Ch. 2 Out
120 VAC 60 Hz 12 Watts
Ch. 1 Ch. 2 OutCh. 1 Ch. 2
Line 1
Preamp 5.1
Audio Out
L
Audio In
R
DVD Player,
CD Player or
Other Source
Modular Ten-Band Graphic Equalizer
EQ 10.1
Note: If any part of this product is damaged or missing, do not contact your AudioSource dealer. Please call us directly at 800-435-7115.


