


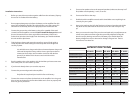


SPECIFICATIONS
5 6
Installation Instructions
1. Before you start, disconnect the negative cable from the car battery. Tape up
the end so it is isolated form the battery.
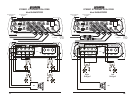
2. Run an appropriate gauge wire from the battery to the amplifier. Plan this
part of the installation carefully. This cable will carry very high current. If it
should short to the body and it is not properly fused it could catch fire.
3. Connect the power wire to the battery using a fuse capable of the total
current load of all amplifiers connected. Don’t install the fuse yet. Wait until
the end. Locate the fuse as close as possible to the battery. If the fuse is
further that 18 inches (wire length) from the battery you should reevaluate
the wire and fuse placement.
4. Find the closest clear metal area to the amp for a ground. Sand, grind or
scrape all paint and undercoating from the body and screw the ground
securely in place.
It is advisable to test the ground with an ohmmeter between the ground
cable and the negative battery cable to insure a good low resistance
connection. Some alloys used in modern cars do not offer the best
ground. If you believe this is the case consult with the vehicle
manufacturer.
5. Run the speaker wire to the speakers. It is advised that you leave some extra
wire at this point. You can “clean it up” later.
6. If you haven’t already done so, mount the amp now.
7. Connect the power and ground to the amplifier.
Only after this step should you install the fuse at the battery.
8. Connect the remote wire from the head unit to the amplifier. Now is a good
time to turn on the amp for the first time. Make sure it turns on properly and
does not go into protection.
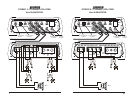
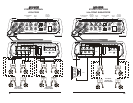
9. Connect the speaker wires to the amp and speakers (make sure the amp is off
first). Make sure the polarity (+ and-) is correct.
10. Connect the RCA’s to the amp.
11. Double check the amplifier controls at this time. Make sure everything is set
correctly for your system.
12. Now you’re ready to play it for the first time. It is best to leave the gain all the
way down at first. Start with the head unit volume low and work your way
up.
13. Now you can tune the amp. Take your time and make only one adjustment at
a time. It may take some time to get the system fully adjusted. During this
time the amp is drawing current from the battery. You should check the
battery voltage from time to time and re-charge it if it gets low. That’s it.
You’re done. Now have fun.
POWER OUTPUT @ 4 :
POWER OUTPUT @ 2 :
POWER OUTPUT @ 1 :
POWER OUTPUT @ 4 :
BRIDGED
POWER OUTPUT @ 2 :
BRIDGED
TOTAL HARMONIC DISTORTION
S/N RATIO
(A WTG) REF 1W AT 4 :
GAIN RANGE
CROSSOVER RANGE
FREQUENCY RANGE
BASS BOOST
80 X 4
80 X 4
240 X 1
250 X 1
120 X 4
400 X 1
NOT
RECOMMENDED
NOT
RECOMMENDED
240 X 2 240 X 2 N/A
NOT
RECOMMENDED
NOT
RECOMMENDED
N/A
.07% .08% .03%
79dB 79dB 65dB
HIGH 55Hz- 250Hz
LOW 55Hz - 250Hz
HIGH 55Hz- 250Hz
LOW 55Hz - 250Hz
0.25V - 4.0V 0.25V - 4.0V
20Hz - 20KHz20Hz - 20KHz
0dB - +15dB
@ 45Hz
0.25V - 4.0V
LOW 55Hz - 250Hz
20Hz - 250Hz
400 X 1
700 X 1
N/A
N/A
.03%
65dB
0.25V - 4.0V
LOW 55Hz - 250Hz
20Hz - 250Hz
600 X 1 1150 X 1
80 X 2
240 X 1
120 X 2
400 X 1
NOT
RECOMMENDED
240 X 1
NOT
RECOMMENDED
.08%
79dB
HIGH 55Hz- 250Hz
LOW 55Hz - 250Hz
0.25V - 4.0V
20Hz - 20KHz
120 X 4
400 X 1
Quasi Parametric
Bass EQ
+15dB @ 40Hz to100Hz
XDi 803 XDi 804 XDi 805 XDi 600.1 XDi 1000.1
We reserve the right to change individual specifications at any time without prior notice.
Quasi Parametric
Bass EQ
+15dB @ 40Hz to100Hz
Quasi Parametric
Bass EQ
+15dB @ 40Hz to100Hz
Quasi Parametric
Bass EQ
+15dB @ 40Hz to100Hz