


For full warranty information, refer to the AMX Instruction Manual(s) associated with your Product(s).
3/08
©2008 AMX. All rights reserved. AMX and the AMX logo are registered trademarks of AMX.
AMX reserves the right to alter specifications without notice at any time.
3000 RESEARCH DRIVE, RICHARDSON, TX 75082 • 800.222.0193 • fax 469.624.7153 • technical support 800.932.6993 • www.amx.com
93-1103-04 REV: A
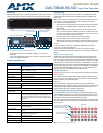
Connecting Zone Outputs
Tango Controllers can be accessed by SWT Metreau keypads (DAS-
MET6SRC and DAS-MET-NUM) to provide basic transport control, source
selection and volume up and down, as well as enhanced controls including
direct access capability, favorite’s source selection, zone grouping, alarm clock
setting, and Keypad lockout.
Note: The Matrix Pushbutton (DAS-KP series) and LCD Keypads
(DAS-KP-LCD series) are also supported by Tango Controllers.
SWT Connectors
SWT cabling follows a specific pinout configuration that is labelled on the
Tango Controller, Metreau keypads, and other Matrix devices, as shown in
FIG. 3.
Connecting Paging Inputs/Outputs
Paging Inputs are for Phone Systems or Communications Boxes. If the paging
override is used, connect the paging Output connector on the Tango Controller
to the Tango Zone Expander (FIG. 4):
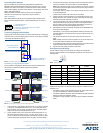
Connecting To Tango Audio Controllers
FIG. 5 provides a wiring diagram illustrating the connections between the
Tango Audio Controller and multiple Tango Zone Expanders:
1. Connect the RJ-11 jack labelled "Expansion Out" on the Tango Controller
to the RJ-11 jack labelled "Expansion Port In" on the rear panel of the
Zone Expander. This connection provides the Tango Controller with the
ability to control the Zone Expander (see FIG. 5).
2. Set the Address switch on the rear panel of the Zone Expander to "1" if
the Zone Expander services zones 9 – 16, set to "2" for zones 17 – 24
and so on until all seven Zone Expanders are utilized (see FIG. 5). Refer
to the Zone Expander Addressing section on page 2 for further details.
3. Connect the source inputs. Patch each source from the source output on
the Tango controller to the source inputs on the Zone Expander.
Note: Ensure the left and right source connections are properly matched
and seated to the left and right terminals of the both the Tango Controller
and the Zone Expander.
For example, Source 1 Output, on the Tango Controller to Source 1 Input
on the Zone Expander).
Continue this procedure until each source is connected.
4. Paging Inputs are for Phone Systems or Communications Boxes. If the
paging override is used, connect the paging output loop from the Tango
Controller to the Zone Expander (see FIG. 5).
5. Connect the keypads to the Tango Controller and Zone Expander(s). Fol-
lowing the same wiring code you used at each of the keypad locations,
plug each SWT connector into the desired Zone Output connectors on
the Tango Controller and Zone Expanders (see FIG. 5).
6. SWT Speakers connect to the Tango Controller via the SPEAKERS con-
nector on the SWT keypads.
• Alternatively, you can terminate the speakers directly to the back of the
Controller. Speakers connected directly to the zone output must be com-
mon grounded.
• The minimum impedance for each zone should never be less than 4
ohms.
Note: Installing more than 2 pairs of speakers on any Zone output is not
recommended without installing an external amplifier.
7. On the Main Controller, make the necessary NIC Port connections for the
(optional) Network Interface Card and AM/FM Antennas.
8. Connect the power supply and power up the units.
Zone Expander Addressing
Use the Address switch on the rear panel of the Tango Zone Expanders
(FIG. 6) to set the Address for each Expander, according to the values in the
following table:
Additional Documentation
Additional documentation for Distributed Audio products is available online at
www.amx.com:
• For details on Tango Audio Controllers, refer to the Tango Audio Control-
lers Operation/Reference Guide and Installation Guide.
• For details on Metreau Keypads, refer to the Metreau Keypads Operation/
Reference Guide and Installation Guides.
• For details on Tango Amplifiers, refer to the Tango Amplifiers Installation
Guide.
FIG. 3 SWT pinout configuration
FIG. 4 Connecting Paging Input/Outputs
FIG. 5 Connecting the Tango Controller to Zone Expanders
LDGR
L = Left audio channel (+)
D = Data / Power (+)
G = Ground (-) - also provides return for L/R Audio
R = Right audio channel (+)
Tango Audio Controller
Tango Zone Expander (#1)
Paging
Out
Paging In
From phone system or
Paging
Out
Paging In
To "Paging In" connector on
Tango Zone Expander #2
communication box
Audio
To Zones 1-4 To Zones 5-8
To Zones 9-10 To Zones 11-12
To Zones 19-20To Zones 17-18
Audio Device (L/R)
RJ-11
RJ-11
Zone
Expander
#1
Zone
Expander
#2
Controller
FIG. 6
Address switch
Zone Expander # Address DAS-T0804X-SIG(4
Zone)
DAS-T0808X-SIG
(8 Zone)
1 1 Zones 9-12 Zones 9-16
2 2 Zones 17-20 Zones 17-24
3 3 Zones 25-28 Zones 25-32
4 4 Zones 33-36 Zones 33-40
5 5 Zones 41-44 Zones 41-48
6 6 Zones 49-52 Zones 49-56
7 7 Zones 57-60 Zones 57-64
Address 1