


For full warranty information, refer to the AMX Instruction Manual(s) associated with your Product(s).
1/08
©2008 AMX. All rights reserved. AMX and the AMX logo are registered trademarks of AMX.
AMX reserves the right to alter specifications without notice at any time.
3000 RESEARCH DRIVE, RICHARDSON, TX 75082 • 800.222.0193 • fax 469.624.7153 • technical support 800.932.6993 • www.amx.com
93-1122-01 REV: A
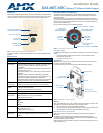
1. Connect the Matrix Controller’s Zone Output connector to the 4-pin connector
on the rear panel of the Metreau keypad labeled TO CONTROLLER for data
and 12 VDC power.
2. Connect the other 4-pin connector on the keypad labeled TO SPEAKERS to
the SWT speakers as shown in FIG. 4.
NOTE: If you connect a keypad while the controller is on you must restart the
controller for that keypad to become active.
Source Power Handling:
The Matrix Audio Controller learns the IR commands for power on/off during the
programming setup. Source components are turned on when they are selected on
the keypad. The source remains on until it has been idle in all zones for a duration of
10 minutes. The source is then turned off until selected again.
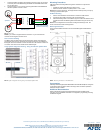
Tango System Integration Drawing - Using 4-Conductor Speaker Wire
Mounting Procedures
AMX recommends mounting Metreau keypads in standard U.S.-style decora
wallboxes:
• Conduit box should meet NEC specs (section 370)
• Minimum internal clearance of (HWD) 2-5/8" x 1-3/4" x 1-5/8".
Note: Before touching the device, discharge the static electricity from your body by
touching a grounded metal object.
Wallbox Mounting
1. Use the cutout dimension for the wallbox to cutout the install surface.
2. Connect the SWT cable connector to the rear of the keypad.
3. Place the Mounting Plate on the wallbox; align the screw holes with the mount-
ing holes and fasten the Mounting Plate to the wallbox using the screws sup-
plied.
Note: Do not overtighten the screws when mounting the Mounting Frame. The
device should be flush with mounting surface.
Mounting Dimensions
FIG. 6 provides detailed dimensions for the 6-button/Navigation Wheel Metreau
keypads.
Programming
SWT-only Metreau keypads (DAS-MET-6SRC and DAS-MET-NUM) are configured
via the Tango Audio Controller. Refer to the Tango Audio Controllers Operation /
Reference Guide for details.
Additional Documentation
Refer to the Metreau Keypads Operation/Reference Guide (available online
www.amx.com) for additional information on configuration, programming and using
the Metreau keypads.
FIG. 4
SWT wiring
FIG. 5 System Integration Drawing Using 4-Conductor Speaker Wire
SWT connectors on
Mi-Series Controller
Speakers
Metreau keypad
R+
L
D
G
R
TO CONTROLLER
TO SPEAKERS
R-
L-
L+
Delta Series Controller
Carbon XA Series Amp
L
D
G
R
IR OUT LINE IN
Tango
Controller
Shared 4-conductor speaker wire
FIG. 6
Mounting Dimensions - DAS-MET-6SRC