


3
System Specifications*
Altec Lansing’s superior sound comes from our patented Dynamic EQ technology,
which utilizes custom-built, high-fidelity drivers, state-of-the-art equalization circuitry,
and a harmonious mix of the following specifications:
*Power rating conforms to FTC Amplifier Rule #16 C.F.R. Part 432.
Powering On
1. After all other connections are made, plug the AC power cord (on the back
of subwoofer) into a wall outlet. The speaker system is now ready
to operate.
2. Turn on the audio source.
3. Turn on the speaker system by pushing the stand-by button located on
the control pod . An LED will light on the control pod when the power
is ON.
Note: To avoid hearing a popping sound when you turn on your Altec
Lansing speaker system, always turn on your audio source first.
Master Volume
The VOLUME knob on the control pod and the “+” and “–” buttons on the
wireless remote control the master volume. On the control pod, turn the
knob clockwise to increase the volume and counterclockwise to decrease
the volume. On the wireless remote, push the “+” and “–” buttons to
increase or decrease the volume.
Surround Volume
When the SURROUND button on the control pod or the wireless remote is
pushed, the VOLUME knob on the control pod and the “+” and “–” buttons
on the wireless remote control the volume of the left and right surround
speakers. Adjust this control as necessary to create the optimum sound. The
surround volume control operates in the same manner even on computers
that only have stereo outputs.
Center Volume
When the CENTER button on the control pod or the wireless remote is
pushed, the VOLUME knob on the control pod and the “+” and “–” buttons
on the wireless remote control the volume of the center speaker. Adjust this
control as necessary to achieve a balanced sound.
Subwoofer Volume
When the SUB button on the control pod or the wireless remote is pushed,
the VOLUME knob on the control pod and the “+” and “–” buttons on the
wireless remote control the volume of the subwoofer. Adjust this control as
necessary to achieve optimum bass.
Headphones
To use headphones with the system, plug them into the labeled jack
on the control pod. When headphones are connected, the speaker system
is muted.
Sound Pressure Level (SPL): 103 dB
Total Continuous Power: 50 Watts RMS
• Front Speakers: 5 Watts/channel @ 8 ohms
@ 10% THD @ 150 Hz – 20 kHz
2 Channels Loaded
• Rear Speakers: 5 Watts/channel @ 8 ohms
@ 10% THD @ 150 Hz – 20 kHz
2 Channels Loaded
• Center Speaker: 10 Watts @ 8 ohms
@ 10% THD @ 150 Hz – 20 kHz
Single Channel Loaded
• Subwoofer: 20 Watts @ 8 ohms
@ 10% THD @ 40 – 150 Hz
Single Channel Loaded
Frequency Response: 40 Hz – 20 kHz (-10 dB)
Signal to Noise Ratio
@ 1 kHz input: > 80 dB
Drivers (per satellite): One 2" full-range driver
Subwoofer: One 5.25" woofer
POWER REQUIREMENTS
Taiwan 110 V AC @60 Hz
Europe 230 V AC @50 Hz
UK 230 V AC @50 Hz
Australia 240 V AC @50 Hz
Korea 220 V AC @60 Hz
CE Approved
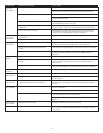
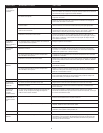
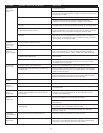
No LEDs are lit.
Power isn’t turned on.
AC power cord isn’t connected to the wall outlet.
Surge protector (if used) isn’t powered on.
Wall outlet not functioning.
Turn on the speaker system by pushing the On/Off button located on the
control pod. An LED will light on the control pod when the power is ON.
Check to see if the “Power On” LED is illuminated on the control pod. If not,
connect AC power.
If the AC power cord is plugged into a surge protector, make sure the surge
protector is switched on.
Plug another device into the wall outlet (same jack) to verify the wall outlet
is working.
Troubleshooting
Symptom Possible Problem Solution