26-EN
XM Radio (Optional)
Receiving XM Channels with the XM
Receiver (Optional)
XM Satellite Radio* is the next generation of audio entertainment,
with up to 100 brand-new digital channels. For a small monthly fee,
subscribers can hear crystal-clear music, sports, news and talk, coast-
to-coast via satellite. For more information, visit XM’s website at
www.xmradio.com or call 1-800-852-9696.
An optional XM Satellite Radio Receiver (TUA-T020XM) and an
optional XM antenna may be connected to the CDA-9831/CDA-9830.
With an XM Receiver connected to the Ai-NET input of the CDA-
9831/CDA-9830, the XM Receiver will be controllable from the
CDA-9831/CDA-9830.
* XM and its corresponding logos are trademarks of XM Satellite
Radio Inc.
• The controls on the CDA-9831/CDA-9830 for XM Receiver
operation are operative only when an XM Receiver is connected.
• The XM1, XM2 or XM3 band illuminates when in XM mode.
1
Press SOURCE/POWER to select XM mode.
2
Press BAND/TEL. to select XM1, XM2 or XM3.
Each press changes the band:
XM1 → XM2 → XM3 → XM1
3
Press 8 or 9 to select desired category.
Holding down 8 or 9 will change categories
continuously.
4
Press g or f to select the desired channel.
Holding down g or f will change channels
continuously.
• When using the optional remote control (RUE-4190), an XM
Channel can be directly called up with the numeric keypad of the
remote control.
1 While in XM Radio mode, enter the Channel number you
want to call up with the numeric keypad on the remote
control.
2Press ENTER or + 10/OK on the remote control within 5
seconds to receive the XM Channel.
If the channel number is 3 digits, the XM Channel is
automatically received after the channel number is input.
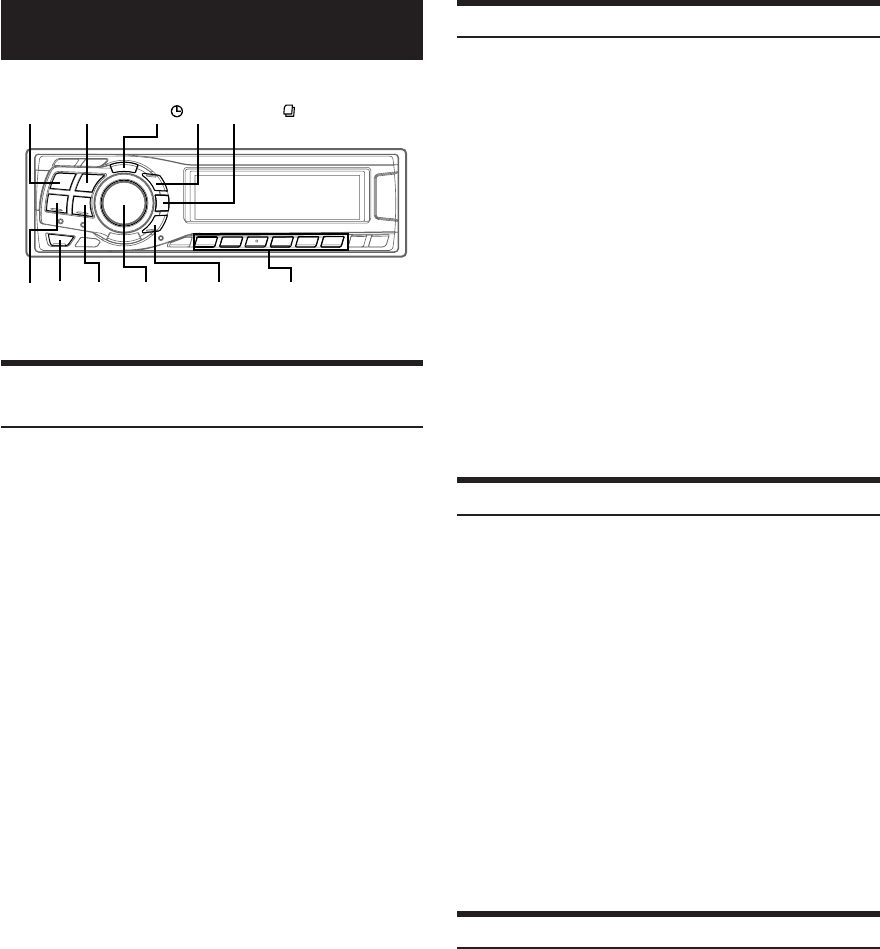
SOURCE/
POWER
Preset buttons
(1 through 6)
BAND/
TEL.
f g MENU
TITLE
SEARCH
Rotary
encoder
8
9
Checking the XM Radio ID Number
You need to provide XM with the unique XM Radio ID number for
your XM Radio Receiver in order to subscribe to XM's programming.
This number is an 8 character alphanumeric number that is printed on
a label directly on the XM Receiver.
It can also be displayed on the screen of the CDA-9831/CDA-9830 in
the following way.
1
While receiving XM1, XM2 or XM3, press g or
f to select channel “0.”
The unit alternately displays “RADIO ID” for 2 seconds,
then the ID number for 10 seconds.
While displaying "RADIO ID" as shown above, Blackout
(page 20) and Demonstration (page 25) become
nonfunctional.
2
To cancel the ID number display, set the channel to
other than “0.”
•You cannot use “O,” “S,”“ I,” or “F” for the ID Number.
•You can check your ID number printed on the label on the package
of your XM Satellite Radio Receiver (TUA-T020XM).
Storing XM Channel Presets
1
Press BAND/TEL. to select the desired band (XM1,
XM2 or XM3) you want to store.
2
After tuning in the desired channel, press and hold,
for at least 2 seconds, any one of the preset
buttons (1 through 6) into which you wish to
store the channel.
The selected station is stored.
3
Repeat the procedure to store up to 5 other
channels onto the same band.
•To use this procedure for other bands, simply select the band
desired and repeat the procedure.
•A total of 18 channels can be stored in the preset memory (6
channels for each band; XM1, XM2 and XM3).
• If you store a channel in a preset memory which already has a
station, the current channel will be cleared and replaced with the
new one.
Receiving Stored XM Channels
1
Press BAND/TEL. to select the desired band (XM1,
XM2 or XM3).
XM1 → XM2 → XM3 → XM1
2
Press the channel preset button that has your
desired satellite channel in memory.


