


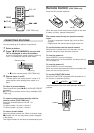


SETTING THE SLEEP TIMER
The unit can be turned off automatically at a specified
time.
1 Keep REPEAT/SLEEP pressed until “30”
flashes in the display.
2 Within 4 seconds, press r or t to
specify the time until the power is turned
off.
Each time it is pressed, the time changes between
10 and 90 minutes in 10-minute steps.
To check the time remaining until the power is
turned off
Repeat step 1 shown above. The remaining time is
displayed for 4 seconds.
To cancel the sleep timer
Display the remaining time and press r or t
repeatedly until OFF is displayed.
NOTE
If the unit is turned off during tape playback, x on the
deck will not be released. Press Z to release x.
ENGLISH
9
En
SOUND ADJUSTMENT
Volume or tone adjustment does not affect recording.
VOLUME (VOL)
Press VOLUME N or M. The volume level is
displayed as a number from 0 to MAX (25).
• The volume level is automatically set to 14 if the
power is turned off when the volume level is set to
15 or more. (except when turning the power back
on within 4 seconds)
• Pressing DISPLAY on the remote control displays
the adjusted volume level (CSD-TD66 only).
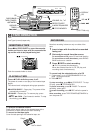
3-MODE EQUALIZER
Press *3-MODE EQUALIZER repeatedly until the
desired mode is displayed.
The equalizer mode changes to R (Rock), P (Pop),
J (Jazz) or no equalization, cyclically.
Rock - Emphasizes the high and low range of music.
Pop - Emphasizes voice and midrange of music.
Jazz - Emphasizes the low range of music.
* or EQ on the remote control (CSD-TD66 only)
T-BASS system
The T-BASS system enhances the realism of low-
frequency sound.
Press T-BASS and the T-BASS indicator lights up.
QSOUND system
This system provides a rich, three dimensional sound
area for stereo sources.
You can enjoy more enhanced sound.
Press QSOUND and the QSOUND indicator lights up.
• At higher volumes, turning QSOUND on may cause
sound distortion. In this case, make the volume
down.
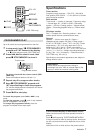
Specified time While the sleep timer works,
the dot keeps flashing.
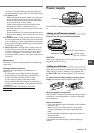
GENERAL
Maintenance
To clean the cabinet
Use a soft cloth lightly moistened with mild
detergent solution. Do not use strong solvents such
as alcohol, benzine or thinner.
To clean the heads
When the tape heads are dirty;
- high frequency sound is not emitted
- the sound is not adequately high
- the sound is off-balance
- the tape cannot be erased
- the tape cannot be recorded on
After every 10 hours of use, clean the tape heads
with a head cleaning cassette.
Use separately sold dry-type or wet-type cleaning
cassette.
Refer to the instructions of the cleaning cassette for
details.
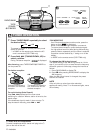
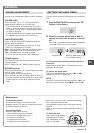
To clean the lens
Use a cotton swab slightly
moistened with cleaning
fluid. Wipe gently from the
center to the edge.
Lens