


En
ENGLISH
7
PREPARATIONS
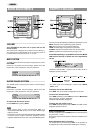
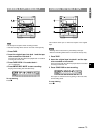
4-Channel Multi-Amplifier System
To provide reinforcement for the ultra-low frequencies, in addition
to the Left/Right 2-channel amplifier used to reproduce mid-to-
high-range frequencies, this system incorporates a second L/R
2-channel amplifier just for reproduction of ultra-low frequencies
— making it, in effect, a 4-amplifier system. By utilizing discrete
amplifiers for mid to-high-frequencies and low frequencies, high-
quality sonic reproduction that is virtually free from distortion can
be realized.
This Multi Amplifier System, which utilizes independent circuitry
for the different frequency ranges, enables superb sonic
reproduction free from distortion.
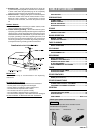
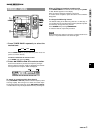
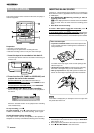
Built-in Subwoofer System
The built-in subwoofer System has a separate subwoofer cavity
area that is part of the loudspeaker cabinet structure, which acts
as a sonic filter to cut distortion components. (In the Multi Amplifier
System, the ultra-low frequency signals transmitted from their
own independent amplifier are reproduced in this area.) This
separate construction gives a clear, rich definition to bass
reproduction and it can realize clear, well-defined mid-to-high
frequency signals.
And AIWA’s built-in subwoofer system incorporates a subwoofer
capable of powerful, satisfying bass performance with true stereo
separation.
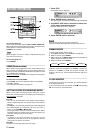
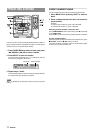
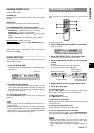
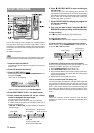
SETTING THE CLOCK
1
Press CLOCK.
When using the remote control, press CLOCK while pressing
SHIFT.
The clock is displayed. (The “:” between the hours and minutes
flashes.)
2
Within 4 seconds, turn MULTI JOG to designate
the hour and the minute.
Turning MULTI JOG changes both the hour and the minute.
f or g is also available in place of MULTI JOG. Holding
these buttons down will vary the time rapidly.
3
Press ENTER or
aa
aa
a.
The clock starts from 00 seconds.
To restore an original clock setting
Press CLOCK before completing step 3 to restore the previous
time setting. This cancels any new setting.
To view the clock when another display is in the display
Press CLOCK. The time is displayed for 4 seconds and then the
original display reappears. However, the clock cannot be
displayed during recording.
To switch to the 24-hour standard
Press CLOCK and then press s within 4 seconds.
Repeat the same procedure to restore the 12-hour standard.
In the 12-hour standard, “AM 12:00” indicates midnight and “PM
12:00” indicates noon.
If the clock display flashes
If the display flashes when the clock is displayed, it indicates
that the clock has stopped due to a power failure or the removal
of the power cord. The current time needs to be reset.
If the power-economizing mode (page 6) is on, the unit blacks
out when the power is turned off. To view the clock, press CLOCK
so that the time is displayed for 4 seconds.