


AW811
AW871
Battery
Battery
Battery
Battery
Battery
Battery
Battery Battery
Audio Output
Audio Output
Audio Output
Audio Output
Sortie audio
Sortie audio
AW811
AW871
Battery
Battery
Battery
Battery
Battery
Battery
Battery Battery
Audio Output
Audio Output
Audio Output
Audio Output
Sortie audio
Sortie audio
AW811
AW871
Battery
Battery
Battery
Battery
Battery
Battery
Battery Battery
Audio Output
Audio Output
Audio Output
Audio Output
Sortie audio
Sortie audio
AW811
AW871
Battery
Battery
Battery
Battery
Battery
Battery
Battery Battery
Audio Output
Audio Output
Audio Output
Audio Output
Sortie audio
Sortie audio
3
II. Connecting the Speaker System
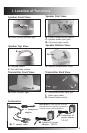
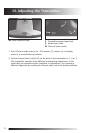
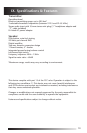
I. Powering the Transmitter
Connect the small, round plug from the transmitter AC power adapter (L) to
the transmitter power input jack (I) and plug the other end of the transmitter
AC power adapter (L) into any standard 120V AC wall outlet.
Note: Be sure to use the AC power
adapter rated 12V DC 100 mA.
Note: There is no transmitter ON/OFF
switch. The transmitter is designed to be
left plugged in and powered at all times.
If you will not be using the AW811 for
an extended period of time, you may
wish to unplug the transmitter AC power
adapter.
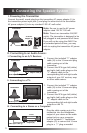
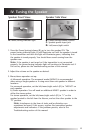
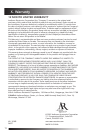
1. Connect the included “Y” adapter
cable (N) to the 3.5mm mini plug
cable coming out of the
transmitter.
2. Connect the RCA-type left (white)
and right (red) audio plugs on the
”Y” adapter cable to the
corresponding left and right audio
outputs of your A/V receiver, amp
or other audio source.
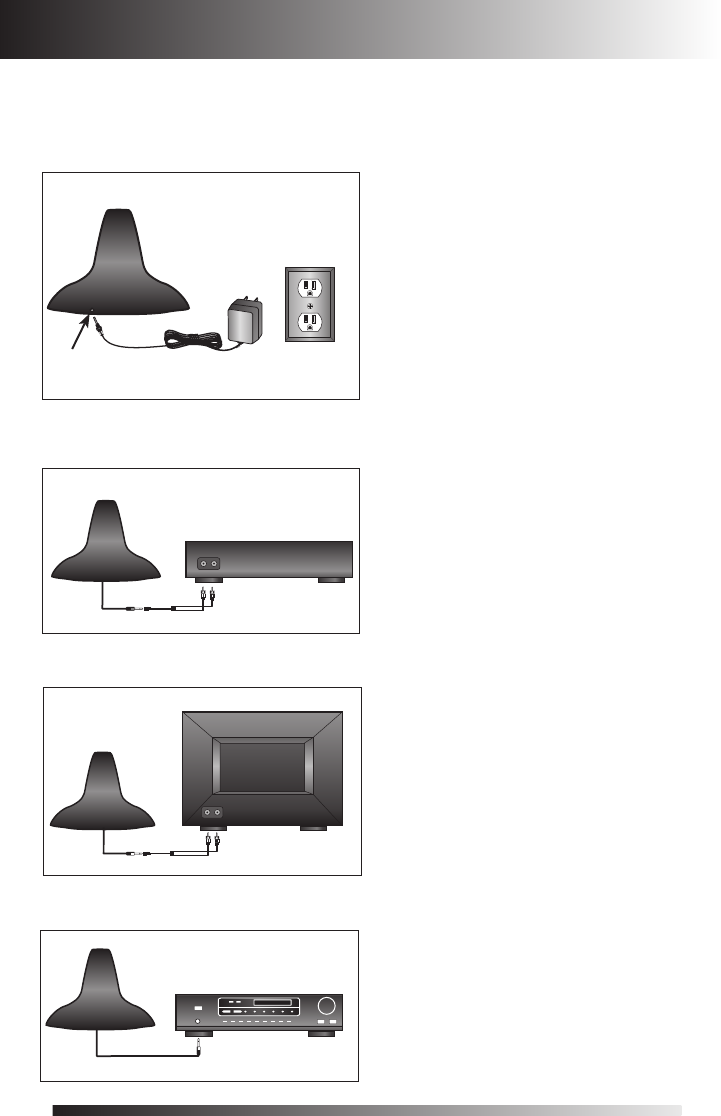
1. Connect the included “Y” adapter
cable (N) to the 3.5mm mini plug
cable coming out of the
transmitter.
2. Connect the RCA-type left (white)
and right (red) audio plugs on the
“Y” adapter cable to the
corresponding left and right audio
outputs on the TV.
Plug the cable coming out of the
transmitter into the headphone
output of your stereo or the audio
output jack on your computer.
Use the included
1
/
4” headphone
adapter (O) to convert the 3.5mm
plug to a
1
/
4” plug as needed.
Transmitter
AC Power
Adapter (L)
120V AC
wall
outlet
i. Connecting to an A/V Receiver:
iii. Connecting to a Stereo or a Computer:
II. Connecting to an Audio Source:
I
Transmitter
Transmitter
Transmitter
A/V Receiver
Stereo
Audio Input Cable (J)
“Y” adapter cable (N)
1/4” headphone
adapter (O)
Audio Input Cable (J)
“Y” adapter cable (N)
Audio Input Cable (J)
ii. Connecting to a TV:
TV