


E-39
English
video
& audio
connection
settings
Each input on the AVR500/AVR600/AV888 has multiple
connection possibilities for both audio and video,
including HDMI, Component Video, digital audio and
analogue audio. When an input is selected, by default
the AVR500/AVR600/AV888 will scan all possible video
and audio connectors for that input until a valid signal is
detected. is ensures that the input is found no matter
what connection is used, however, it increases the time
that it takes to activate the input.
For fastest operation, set the Audio Source and Video
Source to the connection type you are using: HDMI,
Component, S-Video or Composite for video and
HDMI, Digital or Analogue for audio. e AVR500/
AVR600/AV888 will then select this connection
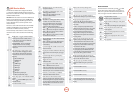
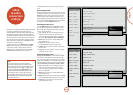
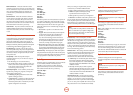
Select the type of audio: Auto, HDMI, Digital or Analogue
Video Source
Colour
Picture Mode
Edge Enhancement
Mosquito NR
Noise Reduction
Block NR
Component Mode
Audio Source
Input Config
General Setup
Spkr Types
Spkr Distance
Spkr Levels
Video Inputs
Video Outputs
Mode
Zone Settings
Network
Auto Setup
>
Auto
HDMI
Digital
Analogue
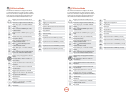
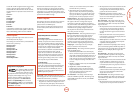
Select the type of video: Auto, HDMI, Component, S-Video
or Composite
Video Source
Colour
Picture Mode
Edge Enhancement
Mosquito NR
Noise Reduction
Block NR
Component Mode
Audio Source
Input Config
General Setup
Spkr Types
Spkr Distance
Spkr Levels
Video Inputs
Video Outputs
Mode
Zone Settings
Network
Auto Setup
>
Auto
HDMI
Component
S-Video
Composite
immediately without looking at the other connection
types.
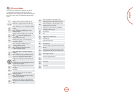
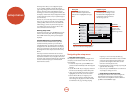
Entering Setup mode
Before entering the menu, select the input that you wish
to change (e.g. DVD). To enter the setup menu, press the
MENU button on the remote control or font panel. e
front panel display shows ‘MENU’ and the setup menu
(pictured right) is displayed. Press the remote control
E
key to enter the Input Cong menu then use the
C
key
to navigate down to the Video Source option.
Selecting the video source
Once the Video Source option is highlighted as shown,
press the OK key to select it for modication. Use the
B
and
C
keys to select from the list the video type
you are using on this source.
<
Auto: (default) the unit scans through the various
video input connectors/formats for the current
source and selects the highest quality available for
this source. is setting increases switching time.
<
HDMI: the unit is forced to use the HDMI video
input for this source.
<
Component: the unit is forced to use the
Component/RGB video input for this source.
<
S-Video: the unit is forced to use the S-Video input
for this source.
<
Composite: the unit is forced to use the Composite
video input for this source.
Selecting the audio source (software version 1.9 +)
Highlight the Audio Source as shown and press the OK
key to select it for modication. Use the
B
and
C
keys to select from the list the audio type you are using
on this source. NOTE: you may experience some audio
transients when changing this setting. As a precaution,
we recommend that you reduce the volume level rst.
<
Auto: (default) the unit scans through the various
audio input connectors/formats for the current
source and selects the highest quality available for
this source. See note.
<
HDMI: the unit is forced to use the HDMI audio
input for this source.
<
Digital: the unit is forced to use the optical (TOSLINK)
or coaxial (S/PDIF) digital audio input for this source
<
Analogue: the unit is forced to use the analogue
audio input for this source.
NOTE
Some sources such as set-top boxes, PVRs or
network streaming devices may shut down their
digital audio outputs under certain conditions such
as when pausing, fast-forwarding, changing tracks
or changing channels. If the Audio Source is set
to Auto, the AVR500/AVR600/AV888 may switch
to the analogue input, causing a delay when the
digital signal is restored by the source. To prevent
this, change the source settings from Auto to the
connection type in use.