


E-19
English
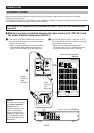
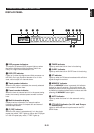
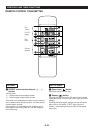
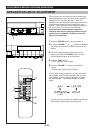
8 CD input selector button [ (Stop), /
(play/pause)]
When an input source other than the built-in CD player
is selected, pressing this button selects the CD player
as an input source and starts playback if a disc is
loaded on the disc tray.
While playing back a disc, pressing the lower side
( / ) of this button pauses the playback. Pressing
the lower side again resumes the playback.
While playing back a disc, pressing the upper side ( )
stops the play.
9 TUNER input selector button
[ (up)/ (down)]
When an input source other than the built-in tuner is
selected, pressing this button selects the tuner as an
input source.
When the tuner is in the automatic or manual tuning
mode, this button is used for tuning search. Pressing
the upper side ( ) makes a tuning search to higher
frequencies, and pressing the lower side ( ) makes a
tuning search to lower frequencies.
When the tuner is in the preset tuning mode, this button
is used for selecting a preset station number. Pressing
the upper side ( ) selects a higher preset station
number and pressing the lower side ( ) selects a
lower preset station number.
<For U.K. and Europe models only>
When the tuner is in the PTY SEEK mode, pressing
this button changes the currently selected program
type.
0 VOLUME button [ (up)/ (down)]
Pressing the upper side ( ) raises and pressing the
lower ( ) side lowers the volume of whole sound
output of this system.
A PHONES jack
When you listen with headphones, connect the
headphones to the PHONES jack. You can listen to the
sound to be output from the front speakers through
headphones.
When listening with headphones privately, switch off
the digital sound field processor (so that no DSP
program name is illuminated on the display) by
pressing the DSP ON/OFF button on the remote
control transmitter.
B MEMORY button
This button is available when the tuner is selected.
When this button is pressed, “MEMORY” flashes on the
display for about 5 seconds. During this period, select
a desired preset station number by pressing the
TUNER “ ” or “ ” button on the front panel (or the
PRESET station number selector “ ” or “ ” button
on the remote control transmitter) and press the
MEMORY button again to enter the displayed station
into the memory.
When this button is pressed and held for about 2
seconds, the automatic preset tuning begins. (Refer to
page 37 for details.)
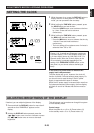
TIME ADJ
This button is also used for setting the built-in clock.
(See page 25 for details.)
C AUTO/MAN’L button
Press this button to switch the tuning mode to
automatic or manual. To select the automatic tuning
mode, press this button so that “AUTO” lights up on the
display. To select the manual tuning mode, press this
button so that “AUTO” goes off.
TIMER
This button is also used for setting the built-in timer.
(See pages 49 to 50 for details.)
D PRESET/BAND button
Whenever this button is pressed, the mode of tuner is
changed to the FM band reception mode, AM band
reception mode and the preset tuning mode in turn.
<For U.K. and Europe models only>
The mode of tuner is changed to the FM mode, MW
mode, LW mode and the preset tuning mode in turn.
E DISPLAY button
Used for setting the built-in clock, timer, etc. (See
pages 25 and 49 to 50 for details.)
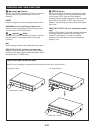
F VIDEO 2 input terminals
Connect an auxiliary video or audio input source unit
such as a camcorder to these terminals. The source
connected to these terminals can be selected by the
corresponding input selector button.
CONTROLS AND THEIR FUNCTIONS