NOTE: Windows will prompt you through the New Hardware Wizard with windows
such as the one at right. However, in some instances the New Hardware Wizard
windows will not appear while drivers are being installed. In this case, the drivers
install automatically.
2. Windows Add New Hardware Wizard – First Pass – USB Composite Device
Note: Windows 98 Second Edition Upgrade users may need the Windows 98 Second Edition Upgrade
CD-ROM available.
1. The Add New Hardware Wizard should detect the new USB Composite Device. Click Next.
2. The next window asks, “What do you want Windows to do?” Select “Search for the best driver for
your device.” Click Next.
3. The next window asks, “Where do you want Windows to search?” Select the hard drive only with the
default location in the text box (either“C:\Windows” or “C:\Windows\Options\Cabs” depending on
your PC). Click Next.
4. The next window states, “Windows will now install the driver for ‘USB Composite Device’.” Click Next.
5. Click Finish.
3. Windows Add New Hardware Wizard – Second Pass – USB Human Interface Device
The second pass of the Add New Hardware Wizard detects a USB Human Interface Device. This portion
of the installation proceeds like the first, but installs “USB Human Interface Device" instead of “USB
Composite Device”.
4. Windows Add New Hardware Wizard – Third Pass – USB Audio Device
The third pass of the Add New Hardware Wizard detects a USB Audio Device. This portion of the
installation proceeds like the first, but installs “USB Audio Device" instead of “USB Composite Device”.
The Windows drivers have now been installed.
To test for microphone transmit and audio output, refer to the troubleshooting section of this user guide.
MACINTOSH INSTALLATION Compatible with 9.1 or higher operating systems. If more
cord length is needed, attach the included USB extension cord to the B1000-GTX USB connector.
1. Connect The B1000-GTX Base To The PC
Plug the B1000-GTX USB plug directly into the Mac's USB port (not the keyboard USB hub).
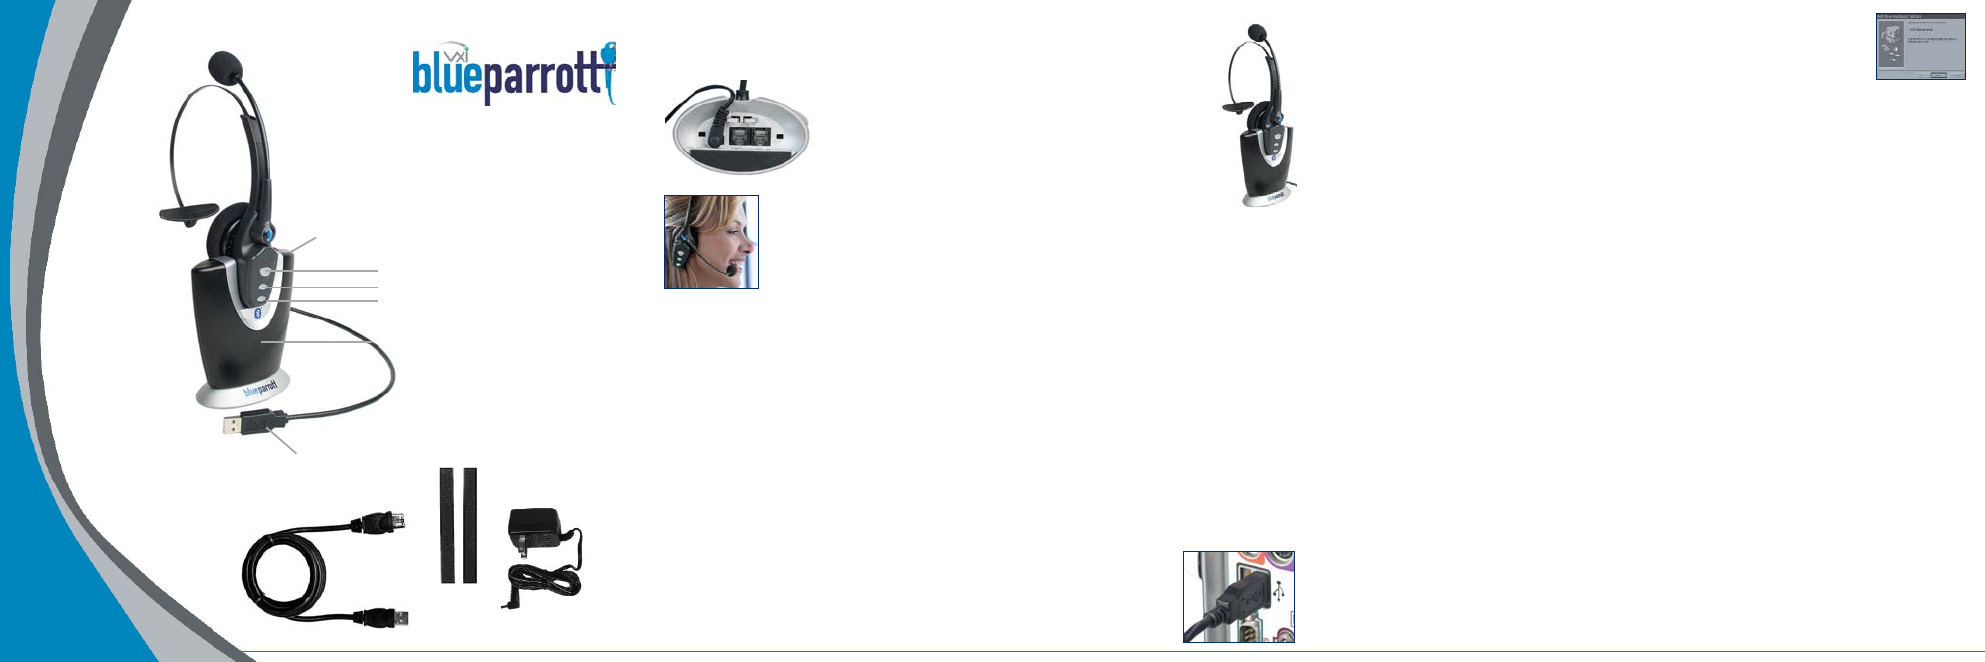
TALKPRO B1000-GTX
Controls & Components
Standby/pairing/power indicator lights
Volume decrease
Volume increase / Microphone mute
Multifunction button / indicator lights
Pairing button
The headset battery charges
continuously while the
headset is in the base.
USB Cord
BASIC OPERATION
Charge Headset in Base for 4 Hours Before First Use - Plug AC adapter into
the base of the B1000-GTX Then plug the cord into the wall
electrical outlet. The multifunction button on the headset
will turn green when fully charged. After use, this light will
turn red when placed back in base. It’s not necessary for
the light to turn green to use the headset. Talk time on a
full charge is up to 6 hours. See User Guide for low battery
indicator information.
Microphone Adjustment - For proper microphone performance:
1. The microphone has a dot printed on it (under the cushion). This
mark must face your mouth.
2. For quality sound and effective background noise cancellation, position
microphone a finger’s width away from your face just below your bottom lip.
The microphone is sensitive, minor adjustments may be needed to achieve
optimum voice quality.
Standby / Talk Time Modes - The headset is automatically in standby mode when you remove
it from the base. The yellow light on the headset will flash every 4-5 seconds. A single, 1 second
press of the multifunction button will put the headset into Talk Time Mode. When the headset is in
Talk Time mode the yellow light will flash faster, once per second. If the yellow light is not flashing,
turn the headset on (see User Guide, page 15). Standby time is up to 100 hours on a full charge. Talk
Time is up to 6 hours on a full charge.
Adjust Speaker Volume - To adjust the volume in your earpiece, press the increase or decrease
volume button for 1 second, then release. Repeat until volume is at desired level.
WINDOWS INSTALLATION Compatible with Windows XP, Me, 2000, 98SE operating systems.
If more cord length is needed, attach the included USB extension cord to the B1000-GTX USB connector.
1. Connect The B1000-GTX Base To The PC
Insert the USB plug on the B1000-GTX base into an open USB port on your
computer. When the USB plug is inserted into the USB port, Windows will detect the
addition of the B1000-GTX base, and the Add New Hardware Wizard will run
automatically as described below.
Extension cord
Cord wraps
AC adapter
Premium noise canceling
microphone
202028B_B1000QuickGuide.qxd 12/27/2005 4:13 PM Page 1