


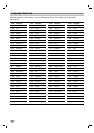

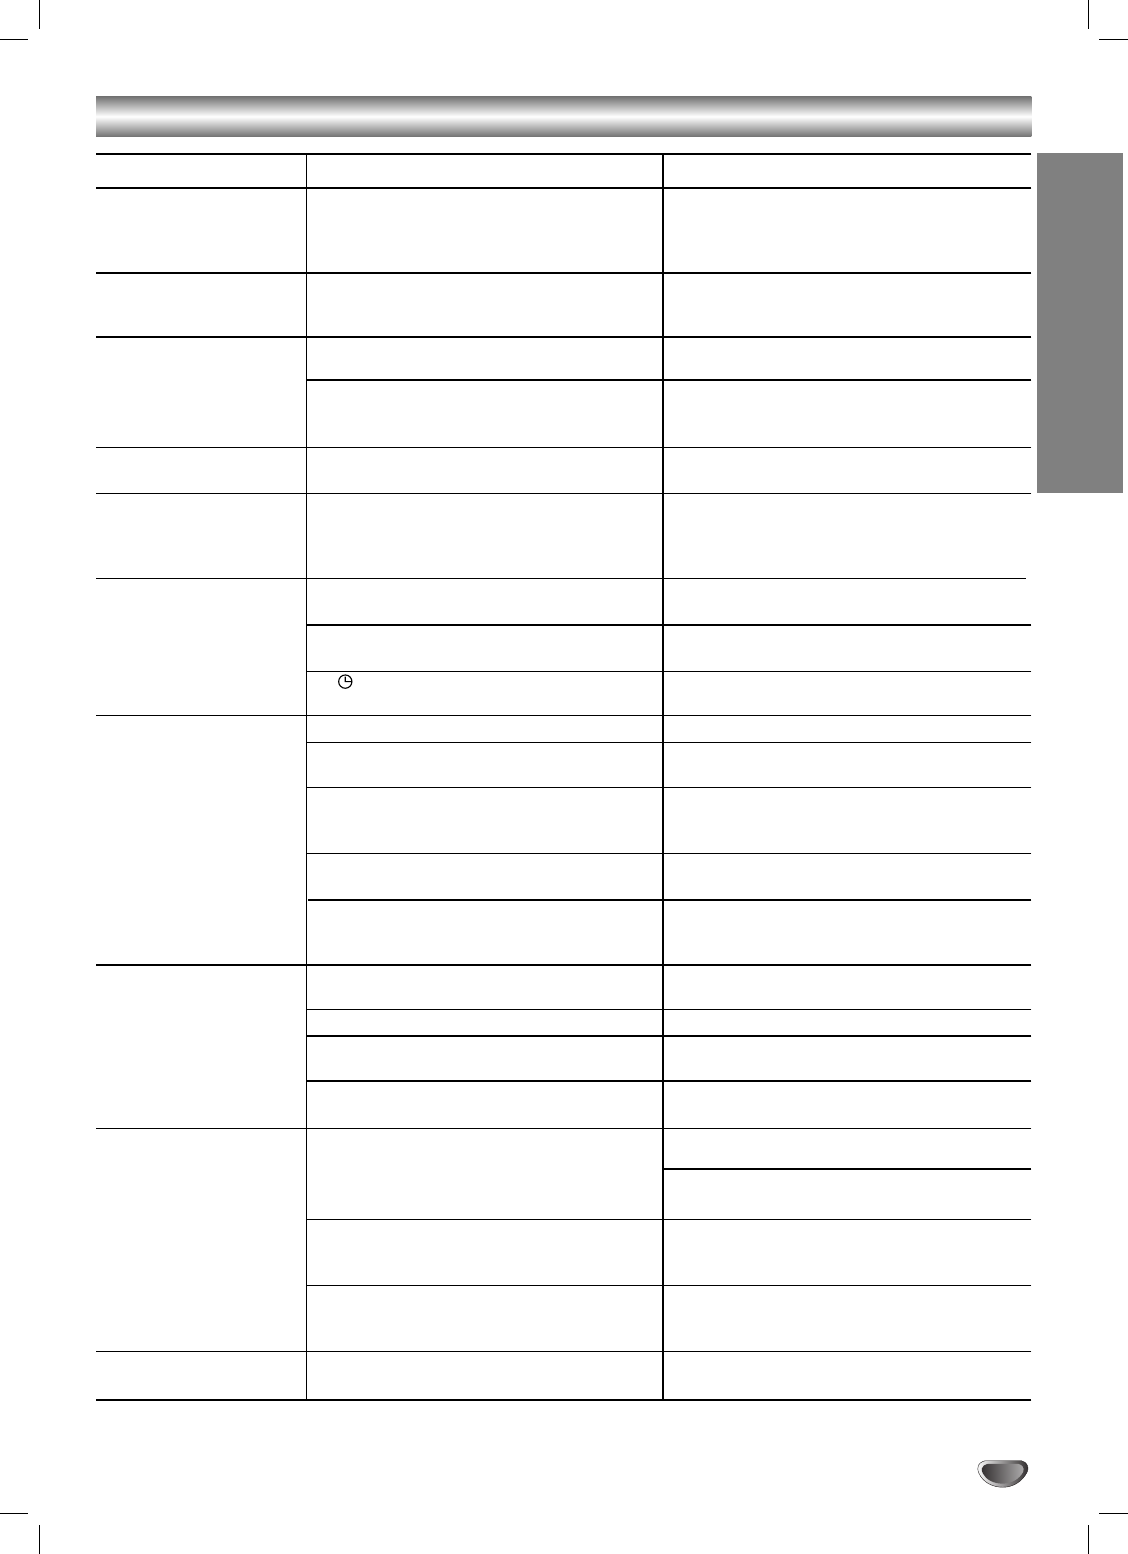
Troubleshooting (Continued)
REFERENCE
43
Symptom
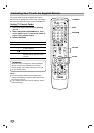
INPUT, VOLUME (
v/V)
and
b/B/v/V buttons on
remote control cannot
operate.
Some channels are
skipped over when using
CH/TRK (v/V)
Picture and sound of
broadcasting channel are
weak or missing.
Camcorder image is not
shown.
Camcorder image via
A/V input to
DVD/VCR
Receiver is not shown on
TV screen.
Timer recording is not
possible.
Stereo Audio Record
and/or Playback is not
present.
Severe hum or noise is
heard.
Radio stations cannot be
tuned in.
No sound from DIGITAL
AUDIO IN (OPTICAL).
Cause
Incorrect mode (e.g. Remote control in
TV mode).
Those channels were deleted with the
CH. ADD/DEL option.
Antenna or cables are loose.
Wrong CHANNEL SOURCE option is
being used.
Camcorder is off.
DVD/VCR Receiver INPUT SELECT is
not set to LINE1(L1) or LINE2(L2).
Clock in DVD/VCR Receiver is not set
to correct time.
Timer has been programmed
incorrectly.
indicator light does not appear after
programming timer.
TV is not Stereo-compatible.
Broadcast program is not in stereo for-
mat.
DVD/VCR Receiver A/V Out jacks are
not connected to TV A/V In jacks.
DVD/VCR Receiver Audio/Video Out is
not selected for viewing at the TV.
DVD/VCR Receiver BROADCAST
TYPE mode is set to SAP or MONO.
The plugs and jacks are dirty.
The disc is dirty.
The speakers and components are
connected poorly.
The DVD/VCR Receiver is located too
close to the TV.
The antenna is positioned or connected
poorly.
The signal strength of the stations is too
weak (when tuning in with automatic
tuning).
No stations have been preset or preset
stations have been cleared (when
tuning by scanning preset stations).
DVD/VCR Receiver source is not set to
DIGITAL AUDIO IN (OPTICAL).
Solution
Press DVD/CD, VCR or FM/AM to
select the correct mode on the remote
control.
Use CH. ADD/DEL to restore channels.
See “Channel Selection” on page 18.
Tighten connections or replace cable.
Try all CHANNEL SOURCE options.
See “Channel Selection” on page 18 for
details.
Turn camcorder on and operate
properly.
Press INPUT to select LINE input chan-
nel (LINE1(L1) or LINE2(L2)).
Set clock to correct time. See “Setting
the Clock” on page 19.
Reprogram Timer. See “Timer
Recording” on pages 25 and 26.
Reprogram Timer.
No action is possible.
No action is possible.
Make A/V connections. Stereo is
available only via A/V output from
DVD/VCR Receiver.
Select AUX or A/V source as TV input.
Set BROADCAST TYPE mode to
STEREO. See “VCR Setup Menu
Option” on page 18.
Wipe them with a cloth slightly mois-
tened with alcohol.
Clean the disc.
Connect the speakers and components
securely.
Move your TV away from the audio
components.
Connect the antenna securely.
Adjust the antennas and connect an
external antenna if necessary.
Tune in the station manually.
Preset the stations (page 38).
Select OPTICAL by pressing AUX once.