


3-859-562-11(1)
MZ-F40
Radio MiniDisc Player
Operating instructions
Sony Corporation ©1997 Printed in Japan
Caution
The use of optical instruments with this
product will increase eye hazard.
Information
For customers in the United States
Information
This equipment has been tested and found to
comply with the limits for a Class B digital
device, pursuant to Part 15 of the FCC rules.
These limits are designed to provide reasonable
protection against harmful interference in a
residential installation. This equipment
generates, used, and can radiate radio frequency
energy and, if not installed and used in
accordance with the instructions, may cause
harmful interference to radio communications.
However, there is no guarantee that interference
will not occur in a particular installation. If this
equipment does cause harmful interference to
radio or television reception, which can be
determined by turning the equipment off and on,
the user is encouraged to try to correct the
interference by one or more of the following
measures:
• Reorient or relocate the receiving antenna.
• Increase the separation between the equipment
and the receiver.
• Connect the equipment into an outlet on a
circuit different from that to which the receiver
is connected.
• Consult the dealer or an experienced radio/TV
technician for help.
You are cautioned that any changes or
modifications not expressly approved in this
manual could void your authority to operate this
equipment.
Owner's Record
The serial number and the model number are
located at the bottom. Record the serial
number in the space provided below. Refer
to them whenever you call upon your Sony
dealer regarding this product.
Model No. MZ-F40
Serial No. _______________________________
"MD WALKMAN" is a trademark of Sony
Corporation.
Welcome!
Welcome to the world of the MiniDisc! Here
are some of the capabilities and features you'll
discover with the new MiniDisc Player.
• Built-in FM/AM tuner — You can enjoy
FM stereo/ AM. You can preset stations
using the Auto Station Preset (ASP)
function.
• Twin LCD display — LCD display for each
MD and Radio for easier operations.
• The battery compartment can hold R6 (size
AA) batteries or BP-DM20 rechargeable
batteries. The rechargeable batteries can be
charged by this unit.
• Remote controller-equipped headphones
— You can operate the MD Player or Radio
through the remote controller, leaving the
player in your pocket or bag.
To Press (Beeps in the
headphones)
Find the = or = side of
beginning of ( on the remote
the current control once (Three
track short beeps).
Find the + or + side of
beginning of ( on the remote
the next track control once (Two
short beeps).
Go backwards keep pressing =
while playing or = side of ( on
the remote control.
Go forward keep pressing +
while playing or + side of ( on
the remote control.
Remove the p/CHARGE and
MD open the lid.
1)
Install the batteries.
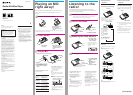
Playing an MD
right away!
Prepare two R6 (size AA) alkaline Batteries. You can also use this
player on house current or a rechargeable battery (see "Power
sources").
Play an MD.
3
1 Press (.
If you are using the remote control, a
short beep sounds in the headphones.
2 Turn VOLUME (VOL on the
remote control) to adjust the
volume.
1
2Install two LR6 (size AA)
alkaline batteries
(not supplied), and close
the lid.
1 Open the lid.
The battery life is approx. 8 hours for MD playback. (This may be shorter due to operating
conditions and the temperature of the location.)
Insert an MD.
2
2 Insert an MD with the
label side facing up, and
press the lid down to
close.
1 Slide OPEN and
open the lid.
If the playback does not start
• Make sure the MD Walkman is not
locked. See Locking the controls.
• Is the radio turned on?
Turn off the radio.
Note
Do not slide OPEN during playback. If
you do, the lid will open and playback
will stop.
MD display window while playing
back
1) Once you open the lid, the point to start
play will change to the beginning of the
first track.
2) Appears only with MDs that have been
electronically labeled.
1
2
To stop play, press p/CHARGE (p on
the remote control).
1
SHUF
Track number
Track name
2)
or elapsed time
of the track being played
VOL
VOLUME
Headphones with a remote control (supplied)
to 2/REMOTE
IN NO EVENT SHALL SELLER BE LIABLE
FOR ANY DIRECT, INCIDENTAL OR
CONSEQUENTIAL DAMAGES OF ANY
NATURE, OR LOSSES OR EXPENSES
RESULTING FROM ANY DEFECTIVE
PRODUCT OR THE USE OF ANY
PRODUCT.
Install the batteries.
The battery life is approx. 30 hours for Radio (This may be shorter due to
operating conditions and the temperature of the location).
Turn on the Radio.
Scanning the radio stations.
Tuning in to a station.
4
2
Z
To know the track name
and time
Press DISPLAY while the player is playing an
MD.
Each time you press DISPLAY, the display
changes as follows.
Note
Disc and track names appear only with MDs that
have been electronically labeled.
(none) (normal play)
All the tracks are played once.
.
”
f
”
(all repeat)
All the tracks are played
repeatedly.
.
”
f
1”
(single repeat)
A single track is played
repeatedly.
.
”
f
SHUF”
(shuffle repeat)
All the tracks are played
repeatedly in random order.
zVarious ways of
playback
Playing tracks repeatedly
You can play tracks repeatedly in three ways;
all repeat, single repeat, and shuffle repeat.
Press PLAY MODE while the player is
playing an MD.
Each time you press PLAY MODE, the play
mode indication changes as follows.
Play mode indication
DISPLAY
PLAY MODE
Number of the
track recorded
on the MD.
Track number
Track name
Track number
Elapsed time
Disc name
Listening to the
radio!
The unit automatically scans and tunes in to stations that are
receivable in your present location. Therefore you should operate
where you can get good reception.
1 Press RADIO ON/BAND
to select AM, FM1
1)
or
FM2
1)
.
2 Press PRESET +/– to
select the preset
number.
3 Adjust the VOLUME.
Tuning in to stations
manually (Manual tuning)
If you do not know the frequency of a station
you may scan by moving the frequency step
by step.
1 Press RADIO ON/BAND to turn on the
radio. Then press RADIO ON/BAND to
select AM, FM1* or FM2*.
2 Press TUNING +/– to tune in a desired
station.
If you press and hold TUNING +/– for more
than a few seconds, the MD Walkman will
start tuning the stations automatically.
*Operation is the same for FM1 and FM2.
zVarious ways of radio
reception
1
2
1 Press RADIO ON/BAND.
3
TUNING –,+
RADIO ON/BAND
RADIO ON/BAND
VOLUME
(turn over)
MINIDISC
Then the FM frequency and
“PRESET 1” will appear in the
radio display of the MD
Walkman.
To turn off the radio, press RADIO
OFF (p on the remote control).
If the radio does not play
• Make sure the MD Walkman is not
locked. See Locking the controls.
• Is the MD playing?
Turn off the MD.
Notes
• Do not remove the power sources while
scanning stations, or the received
stations may not be stored.
• If you cannot receive the stations well,
tune in manually and store the stations.
Tip
Next time you listen to the radio in the
same area, you can skip step 3.
To improve the radio reception
FM: Extend the headphones cord for
better reception.
AM: Rotate the unit horizontally for
optimum reception.
When you are listening to a
stereo broadcast
Set the FM switch (located at the top
surface of the MD Walkman) to STEREO.
If the reception is poor or noisy, set the FM
switch to MONO.
When the FM switch is set to MONO the
sound will become monaural.
1)
Up to 16 stations can be preset, FM1 and
FM2 combined.
1 Press and hold ASP
until “AREA” flashes
in the radio display.
FM STEREO / AM
MINIDISC
MINIDISC
MINIDISC
to 2/REMOTE