English Personal Audio System
Before operating the system, please read this guide thoroughly and retain it for
future reference.
Owner’s Record
The model number and the serial number are located on the bottom.
Record the serial number in the space provided below. Refer to them whenever
you call upon your Sony dealer regarding this product.
Model No. ICF-CS20BT
Serial No.
WARNING
DO NOT INGEST BATTERY, CHEMICAL BURN HAZARD
This product contains a coin/button cell battery. If the coin/button cell battery is
swallowed, it can cause severe internal burns in just 2 hours and can lead to
death.
Keep new and used batteries away from children. If the battery compartment
does not close securely, stop using the product and keep it away from children.
If you think batteries might have been swallowed or placed inside any part of the
body, seek immediate medical attention.
This graphical symbol is located on the bottom of the unit.
For customers in the USA:
Please register this product on line at http://www.sony.com/
productregistration.
For Customers in Canada:
Please register this product online at http://productregistration.sony.ca.
Proper registration will enable us to send you periodic updates about new
products, services and other important announcements. Registering your
product will also allow us to contact you in the unlikely event that the product
needs adjustment or modification. Thank you.
WARNING
To reduce the risk of fire or electric shock, do not expose this apparatus to
dripping or splashing, and do not place objects filled with liquids, such as vases,
on the apparatus.
Do not install the appliance in a confined space, such as a bookcase or built-in
cabinet.
As the main plug is used to disconnect the unit from the mains, connect the
system to an easily accessible AC outlet. Should you notice an abnormality in the
system, disconnect the main plug from the AC outlet immediately.
The system is not disconnected from the AC power source (mains) as long as it is
connected to the wall outlet, even if the system itself has been turned off.
Battery may explode if mistreated. Do not recharge, disassemble or dispose of in
fire.
On Copyrights and Licenses
The BLUETOOTH® word mark and logos are owned by the Bluetooth SIG, Inc. and
any use of such marks by Sony Corporation is under license.
The N Mark is a trademark or registered trademark of NFC Forum, Inc. in the
United States and in other countries.
Android and Google Play are trademarks of Google Inc.
iPad, iPhone, iPod, iPod classic, iPod nano, iPod touch and Mac are trademarks of
Apple Inc. registered in the U.S. and other countries.
Lightning is a trademark of Apple Inc.
“Made for iPod,” and “Made for iPhone” mean that an electronic accessory has
been designed to connect specifically to iPod or iPhone, respectively, and has
been certified by the developer to meet Apple performance standards. Apple is
not responsible for the operation of this device or its compliance with safety and
regulatory standards. Please note that the use of this accessory with iPod or
iPhone may affect wireless performance.
No Power No Problem is a trademark of Sony Corporation.
Auto Time Set is a trademark of Sony Corporation.
Other trademarks and trade names are those of their respective owners.
Notes
This system is not specified for use with an iPad via USB connection, and
malfunction may result if used with one.
In the Operating Instructions, “iPod” is used as a general reference to functions
on an iPhone, iPad or iPod, unless otherwise specified by the text or
illustrations.
CAUTION
You are cautioned that any changes or modifications not expressly approved in
this manual could void your authority to operate this equipment.
Danger of explosion if battery is incorrectly replaced. Replace only with the same
or equivalent type.
To reduce the risk of fire or electric shock, do not expose this apparatus to rain or
moisture.
NOTE
This equipment has been tested and found to comply with the limits for a Class B
digital device, pursuant to Part 15 of the FCC Rules. These limits are designed to
provide reasonable protection against harmful interference in a residential
installation. This equipment generates, uses and can radiate radio frequency
energy and, if not installed and used in accordance with the instructions, may
cause harmful interference to radio communications. However, there is no
guarantee that interference will not occur in a particular installation. If this
equipment does cause harmful interference to radio or television reception,
which can be determined by turning the equipment off and on, the user is
encouraged to try to correct the interference by one or more of the following
measures:
Reorient or relocate the receiving antenna.
Increase the separation between the equipment and receiver.
Connect the equipment into an outlet on a circuit different from that to which
the receiver is connected.
Consult the dealer or an experienced radio/TV technician for help.
This equipment must not be co-located or operated in conjunction with any other
antenna or transmitter.
The following FCC/IC statement applies only to the version of this model
manufactured for sale in the U.S.A. and Canada. Other versions may not comply
with FCC/IC technical regulations.
This equipment complies with FCC/IC radiation exposure limits set forth for an
uncontrolled environment and meets the FCC radio frequency (RF) Exposure
Guidelines in Supplement C to OET65 and RSS-102 of the IC radio frequency (RF)
Exposure rules. This equipment has very low levels of RF energy that it deemed to
comply without maximum permissive exposure evaluation (MPE). But it is
desirable that it should be installed and operated keeping the radiator at least 20
cm or more away from person’s body (excluding extremities: hands, wrists, feet
and ankles).
For customers in Canada
This device complies with Industry Canada licence-exempt RSS standard(s).
Operation is subject to the following two conditions: (1) this device may not cause
interference, and (2) this device must accept any interference, including
interference that may cause undesired operation of the device.
Important Safety Instructions
1) Read these instructions.
2) Keep these instructions.
3) Heed all warnings.
4) Follow all instructions.
5) Do not use this apparatus near water.
6) Clean only with dry cloth.
7) Do not block any ventilation openings.
Install in accordance with the manufacturer’s instructions.
8) Do not install near any heat sources such as radiators, heat registers, stoves,
or other apparatus (including amplifiers) that produce heat.
9) Do not defeat the safety purpose of the polarized or grounding-type plug. A
polarized plug has two blades with one wider than the other. A grounding
type plug has two blades and a third grounding prong. The wide blade or the
third prong are provided for your safety. If the provided plug does not fit into
your outlet, consult an electrician for replacement of the obsolete outlet.
10) Protect the power cord from being walked on or pinched particularly at plugs,
convenience receptacles, and the point where they exit from the apparatus.
11) Only use attachments/accessories specified by the manufacturer.
12) Use only with the cart, stand, tripod, bracket, or table specified by the
manufacturer, or sold with the apparatus. When a cart is used, use caution
when moving the cart/apparatus combination to avoid injury from tip-over.
13) Unplug this apparatus during lightning storms or when unused for long
periods of time.
14) Refer all servicing to qualified service personnel. Servicing is required when
the apparatus has been damaged in any way, such as power-supply cord or
plug is damaged, liquid has been spilled or objects have fallen into the
apparatus, the apparatus has been exposed to rain or moisture, does not
operate normally, or has been dropped.
For the state of California USA only
Perchlorate Material –special handling may apply, see
www.dtsc.ca.gov/hazardouswaste/perchlorate
Precautions
Note when using with a mobile phone
For details on operation of your mobile phone when receiving a telephone call
while transmitting the sound using the BLUETOOTH connection, refer to the
operating instructions supplied with the mobile phone.
On safety
The nameplate indicating Sony trademark, model number and electrical rating is
located on the bottom exterior of this system.
Notes on the AC plug
Plug the AC plug into a nearby wall outlet (mains). In the case of a problem,
unplug it from the wall outlet (mains) immediately.
Do not twist or place heavy objects on the AC plug cord.
To disconnect AC power, grasp the plug itself, not the cord.
On placement
Do not set the speaker in an inclined position.
Do not leave the system in a location near heat sources, or in a place subject to
direct sunlight, excessive dust, moisture, rain or mechanical shock.
Do not expose the battery to excessive heat such as direct sunlight, fire or the
like.
On operation
Do not insert any small objects, etc., into the jacks. The system may short out or
malfunction.
On cleaning
Do not use alcohol, benzine, or thinner to clean the cabinet.
Others
If you have any questions or problems concerning this system that are not
covered in this manual, please consult your nearest Sony dealer.
FOR UNITED STATES CUSTOMERS. NOT APPLICABLE IN CANADA,
INCLUDING IN THE PROVINCE OF QUEBEC.
This symbol is intended to alert the user to the presence of
important operating and maintenance (servicing) instructions in
the literature accompanying the appliance
The Caution Marking is put on the Bottom Enclosure.
Getting Started
Connecting to a Power Source
1 Plug the AC plug into a wall outlet firmly.
About the battery as a backup power source
This system contains a CR2032 battery as a backup power source to keep the
clock and the alarm operating during a power interruption. (No Power No
Problem system)
CAUTION
When to replace the battery
When the battery becomes weak, “” lights up in the display.
If a power interruption occurs while the battery is weak, the current time and
alarm will be erased.
Replace the battery with a Sony CR2032 lithium battery. Use of another battery
may cause a fire or explosion.
To replace the battery, see “Replacing the Battery” for details.
Note
If “AM 12:00” flashes in the display when the system is connected to an AC outlet for the first
time, the battery may be weak. In this case, consult your nearest Sony dealer.
Setting the Clock
Right side of the system
Setting the clock for the first time
This system is preset to the current EST (Eastern Standard Time) at the factory,
and is powered by a backup battery. All you need to do the first time is just plug it
in and select your time zone.
1 Plug in the system.
The current EST (Eastern Standard Time) lights up in the display.
2 Press and hold OFF and CLOCK until area number “2”
begins to flash in the display.
3 Press ALARM TIME SET +/– to select the number as
follows:
Area number Time zone
0 Newfoundland Standard Time
1 Atlantic Standard Time
2 (default setting) Eastern Standard Time
3 Central Standard Time
4 Mountain Standard Time
5 Pacific Standard Time
6 Alaska Standard Time
7 Hawaii Standard Time
4 Press DISPLAY/ENTER to confirm.
Notes
To cancel the time zone setting, press OFF instead of DISPLAY/ENTER in step 4.
Though the clock is correctly set at the factory, discrepancies may arise during transport or
storage. If necessary, set the clock to the correct time by referring to “Setting the clock
manually.”
When daylight saving time (DST/summer time) begins
This system automatically adjusts for daylight saving time (summer time).
“
” lights up from the beginning of daylight saving time (summer time) and turns
off at the end of the daylight saving time (summer time) automatically.
Daylight saving time (summer time) begins at: 2:00 AM on the second Sunday
of March.
Standard time begins at: 2:00 AM on the first Sunday of November.
To cancel Auto DST/summer time adjustment during the daylight
saving time (summer time) period
The Auto DST/summer time adjustment can be canceled.
While the clock is displayed, press and hold OFF and DISPLAY/ENTER until
“
” and “OFF” light up in the display. Auto DST/summer time adjustment has
been canceled, then the display returns to the clock.
To activate Auto DST/summer time adjustment again, press and hold OFF and
DISPLAY/ENTER until “
” and “On” light up in the display.
Notes
Changes to Auto DST/summer time adjustment by the system (see above) are subject to
circumstances and laws in each country/region. Should this interfere with desired
adjustment, cancel the Auto DST/summer time adjustment and set the DST display manually
as necessary. Customers living in a country/region that does not use daylight saving time
(summer time) must cancel Auto DST/summer time adjustment before using the system.
When Hawaii Standard Time is set, Auto DST/summer time adjustment defaults to off. You
can turn it on by the above operation.
Setting the clock manually
To change the clock setting manually, operate the system as follows.
1 Plug in the system.
2 Press and hold CLOCK until the year digits begin to flash
in the display.
3 Press ALARM TIME SET +/– to select the year, and then
press
CLOCK to confirm.
Press and hold ALARM TIME SET +/– to change the year digits quickly.
Once you confirm the setting by pressing CLOCK , the month digits begin
to flash.
4 Repeat step 3 to set the month, day, hour and minute.
The seconds start incrementing from zero.
Notes
If you do not press any button for about 1 minute while setting the clock, the clock setting will
be canceled.
A 100-year calendar (2013 - 2112) is installed in the system. When the date is set, the day of
the week is automatically displayed.
MON = Monday, TUE = Tuesday, WED = Wednesday,
THU = Thursday, FRI = Friday, SAT = Saturday, SUN = Sunday
To change the time format
You can choose the displayed time format between the 12-hour system (default)
or the 24-hour system.
Press and hold OFF and SNOOZE/BRIGHTNESS for about 2 seconds.
The time format toggles between the 12-hour system (“AM 12:00” = midnight) and
the 24-hour system (“0:00” = midnight).
To display the year and date
While the clock is displayed, press CLOCK once to display the month and date,
and press again to display the year. To return to the current time display, press
CLOCK once again; or after a few seconds the display will return automatically.
Connecting the AM Loop Antenna
The shape and length of the antenna is designed to receive AM signals. Do not
dismantle or roll up the antenna.
1 Raise the plastic stand and fit the antenna into the slot of
the stand.
Press the antenna into the
stand until it clicks.
Plastic stand
2 Insert the AM antenna connector in the AM ANTENNA jack
on the rear of the system.
To remove the AM loop antenna
Push and hold down the tab of the antenna terminal clamp, and remove the AM
loop antenna.
How to Make Wireless Connection with
BLUETOOTH Devices
You can enjoy music and hands-free calling with the system wirelessly by using
your device’s BLUETOOTH function.
Choose one of the following three connection methods, best suited for the
BLUETOOTH device. For details on how to operate your device, refer to the
operating instructions supplied with the device.
Pairing with a BLUETOOTH device: see
Pattern A
BLUETOOTH devices need to be “paired” with each other beforehand.
Connecting with a paired device: see
Pattern B
To listen to music with a BLUETOOTH device that has been paired, see this
pattern.
One-touch connection with a smartphone (NFC):
see
Pattern C
Using an NFC compatible smartphone, you can establish BLUETOOTH connection
by just touching the system with it.
For details about NFC, see “About NFC” in
Pattern C
.
Check the following before operating the system.
Both the system and the device are placed within 1 m (3 ft) of each other.
The system is connected to a power source.
The operating instructions supplied with the device are kept at hand.
Pattern A
Pairing and connecting with a BLUETOOTH device
1 Set the BLUETOOTH function of the BLUETOOTH device to
on.
For details, refer to the operating instructions supplied with the device.
2 Press and hold BLUETOOTH PAIRING on the system
until beeps are heard and “
(BLUETOOTH)” begins to flash
quickly in the display.
Tip
From the factory, pairing information is not stored in the system. In this case, if you only
press
BLUETOOTH PAIRING , “ (BLUETOOTH)” starts flashing quickly in the
display.
(BLUETOOTH)
flashes quickly
3 Perform the pairing procedure on the BLUETOOTH device to
detect the system.
If “SONY: ICF-CS20BT” does not appear on the device’s display, repeat from
step 1.
Note
Some devices cannot display a list of detected devices.
4 Select “SONY: ICF-CS20BT” shown in the display of the
BLUETOOTH device.
5 If Passcode* input is required on the display of the
BLUETOOTH device, input “0000.”
The BLUETOOTH connection is established and “ (BLUETOOTH)” in the display
stays on.
* Passcode may be called “Passkey,” “PIN code,” “PIN number,” or “Password.”
Tip
To pair with other BLUETOOTH devices, repeat steps 1 to 5 for each device.
Notes
Pairing mode of the system is canceled after about 5 minutes, and “ (BLUETOOTH)” in the
display flashes slowly. If the pairing mode is canceled while performing this procedure, start
over from step 2.
Passcode of the system is fixed as “0000.” The system cannot be paired with a BLUETOOTH
device whose Passcode is not “0000.”
Once BLUETOOTH devices are paired, there is no need to pair those devices again. However,
in the following cases, you will need to perform the pairing procedure again.
Pairing information is deleted after repair, etc.
The system is paired with 5 or more devices.
The system can be paired with up to 4 BLUETOOTH devices. If a new device is paired after 4
devices have been paired, the device whose latest connection time is the oldest among the
4 paired devices is replaced by the new one.
More than one device can be paired with the system, but sound will be heard from just one
of those devices.
Pattern B
Connecting with a paired BLUETOOTH device
1 Set the BLUETOOTH function of the BLUETOOTH device to
on.
Tips
When BLUETOOTH is pressed, the system tries to establish BLUETOOTH connection
with the BLUETOOTH device connected to the system last time. The BLUETOOTH
connection is established and “
(BLUETOOTH)” in the display stays on.
When “
(BLUETOOTH)” lights up in the display, the system is connected to a BLUETOOTH
device. When you want to connect another BLUETOOTH device, terminate the current
BLUETOOTH connection first by operating the connected BLUETOOTH device.
2 Select “SONY: ICF-CS20BT” shown in the display of the
BLUETOOTH device.
If necessary, select a BLUETOOTH profile that the system supports from the
following: A2DP, HSP or HFP. For details on each profile, see “Listening to
Music by BLUETOOTH Connection with a Smartphone, etc.” or “Using
Hands-free Calling While Listening to Music.”
Note
This step may not be necessary for some devices.
The BLUETOOTH connection is established and “ (BLUETOOTH)” in the display
stays on.
Pattern C
Connecting with a smartphone by One touch (NFC)
By just touching the system with an NFC compatible smartphone, the system
pairs and connects with the smartphone. (After making the BLUETOOTH
connection, the system switches to the BLUETOOTH function automatically.)
Compatible smartphones
Smartphones with the NFC function built-in
(OS: Android 2.3.3 or later, excluding Android 3.x)
Customers in the U.S.A.
Access the following Web site for details:
http://esupport.sony.com/US
Customers in Canada
Access the following Web site for details:
http://esupport.sony.com/CA
About NFC
NFC (Near Field Communication) is a technology enabling short-range wireless
communication between various devices, such as mobile phones and IC tags.
Thanks to the NFC function, data communication can be achieved easily just by
touching the relevant symbol or designated location on NFC compatible devices.
1 Set the NFC function of the smartphone to on.
For details, refer to the operating instructions supplied with the smartphone.
If your smartphone OS is Android 2.3.3 or later, and less than Android 4.1:
proceed to step 2.
If your smartphone OS is Android 4.1 or later: proceed to step 4.
2 Download and install the app “NFC Easy Connect” on the
smartphone.
“NFC Easy Connect” is an original app by Sony for Android phones, and is
available at Google Play Store.
Search for “NFC Easy Connect” or scan the following two-dimensional code to
download and install the free app. Communication fees are required to
download the app.
The App may not be available in some countries and/or regions.
Tip
For some smartphones, One-touch connection may be available without downloading
the app “NFC Easy Connect.” In that case, the operation and specifications may be
different from the description here. For details, refer to the operating instructions
supplied with the smartphone.
By the two-dimensional code:
Use a two-dimensional code reader app.
3 Start the app “NFC Easy Connect” on the smartphone.
Make sure that the application screen is displayed.
4 Touch the system with the smartphone.
Keep touching the smartphone on the N marked part of the system until the
smartphone responds.
Note
If the screen of your smartphone is locked, the smartphone will not function. In this case,
release the lock, then touch the smartphone on the N marked part again.
Smartphone responds (system recognized)
(BLUETOOTH) lights up
Follow the on-screen instructions to establish the connection.
The BLUETOOTH connection is established and “
(BLUETOOTH)” in the display
stays on.
Tips
If it is difficult to establish the connection, try the following.
Activate the app “NFC Easy Connect” and move the smartphone slightly on the N
marked part of the system.
If the smartphone is in a case, remove it.
Touch the system with the smartphone again to disconnect.
If you have multiple NFC compatible devices, just touch the smartphone to a different
device to switch the connection to that device. For example, when your smartphone is
connected with NFC compatible headphones, just touch the smartphone to the system to
change the BLUETOOTH connection to the system.
Indications of the BLUETOOTH function
Status Display
BLUETOOTH function “BLUETOOTH” lights up
Pairing with a device
“
(BLUETOOTH)” flashes quickly
Searching for a device
“
(BLUETOOTH)” flashes
Connected to a device
“
(BLUETOOTH)” lights up
Listening to Music
Listening to Music by BLUETOOTH
Connection with a Smartphone, etc.
You can enjoy listening to music and basic remote control operation of a
BLUETOOTH device via BLUETOOTH connection. The BLUETOOTH device is
required to support the following BLUETOOTH profiles.
A2DP (Advanced Audio Distribution Profile): enables you to enjoy high-quality
audio content wirelessly.
AVRCP (Audio Video Remote Control Profile): enables you to enjoy basic remote
control operation (play, stop, etc.) of a BLUETOOTH device.
Operations may vary depending on the BLUETOOTH device. Refer also to the
operating instructions supplied with your BLUETOOTH device.
1 Make the BLUETOOTH connection between the system and
the device.
For details on the BLUETOOTH connection procedure, see “How to Make
Wireless Connection with BLUETOOTH Devices.” The BLUETOOTH connection is
established and “
(BLUETOOTH)” in the display stays on.
2 Start playback on the BLUETOOTH device, then adjust the
volume.
Set the volume of the BLUETOOTH device to a moderate level, and press
VOLUME –/+ on the system.
After use
Do any of the following to terminate the BLUETOOTH connection.
Set the BLUETOOTH function of the BLUETOOTH device to off. For details, refer
to the operating instructions supplied with the device.
Turn off the BLUETOOTH device.
Touch the system with the smartphone again to disconnect (NFC compatible
smartphones only).
System button functions during music playback
You can operate a BLUETOOTH device that supports AVRCP. Available functions
may vary depending on the BLUETOOTH device. Refer to the operating
instructions supplied with the BLUETOOTH device.
Buttons Functions
(play/pause)
Press once to pause/resume playback.
/ (forward/
rewind)
Press once to skip to the next/previous track.
VOLUME –/+
Press to adjust the volume.
Listening to Music by Wired Connection
Listening to Music via USB Connection with an
iPhone/iPod
You can enjoy listening to music and play back an iPhone/iPod connected to the
system via USB.
Update your device to the latest software version before use.
USB cable*
(not supplied)
(USB) port on the rear of the system
* USB cable: Use the Lightning to USB Cable or Dock Connector
to USB Cable supplied with your iPhone/iPod.
1 Connect the iPhone/iPod to the (USB) port on the rear of
the system.
2 Press FUNCTION to select “USB.”
Press FUNCTION repeatedly until “USB” lights up in the display.
3 Start playback on the connected iPhone/iPod, then adjust
the volume.
Set the volume of the connected iPhone/iPod to a moderate level, and press
the VOLUME –/+ on the system.
Notes
When a USB device other than an iPhone/iPod is connected to the system, only charging
begins automatically.
Do not connect the multiple devices to the (USB) port of the system.
After use
Press FUNCTION or OFF to deactivate the USB function.
System button functions during music playback
Buttons Functions
(play/pause)
Press once to pause/resume playback.
/ (forward/
rewind)
Press once to skip to the next/previous track.
Press and hold to fast-forward/fast-rewind.
VOLUME –/+
Press to adjust the volume.
Listening to Music by Wired Connection with a
Portable Audio Device, etc.
You can enjoy sound from the external device, such as a portable digital music
player, through the speaker of this system. Be sure to turn off the power of the
device before making any connections.
AUDIO IN jack (stereo mini jack)
on the rear of the system
Connecting cord
(not supplied)
1 Connect the device to the AUDIO IN jack on the rear of the
system.
2 Press FUNCTION to select “AUDIO IN.”
Press FUNCTION repeatedly until “AUDIO IN” lights up in the display.
3 Start playback on the connected device, then adjust the
volume.
Set the volume of the connected device to a moderate level, and press the
VOLUME –/+ on the system.
After use
Press FUNCTION or OFF to deactivate the AUDIO IN function. To stop
playback on the connected device, operate the connected device.
Notes when connecting the device by wired connection
The necessary type of cable or connecting cord depends on the device. Be sure to use the
correct type of cable or cord.
When you watching TV or listening to the radio with a device connected to the system, the
reception may be poor.
When you listen to the radio with a device connected, turn off the connected device to
prevent noise. If noise occurs, even when the device is turned off, disconnect and place the
device away from the system.
Tip
You can use hands-free calling while the cable or connecting cord is used with this system.
Listening to Radio
FM wire
antenna
Rear of the system
Right side of the system
Presetting the radio stations automatically - Auto
preset tuning
You can preset receivable radio stations in your area automatically by auto preset
tuning. You can preset up to 20 FM stations and 10 AM stations.
1 Press FUNCTION to select “FM” or “AM.”
Press FUNCTION repeatedly until “FM” or “AM” lights up in the display.
2 Press and hold FUNCTION AUTO PRESET until “AP”
begins to flash in the display.
3 Press DISPLAY/ENTER .
Receivable radio stations will be preset automatically in order of frequency.
Tip
To cancel auto preset tuning, press OFF .
Listening to the radio from preset radio stations
You can listen to the radio simply by selecting a preset number. Although radio
frequencies are preset at the factory, we recommend you to preset receivable
radio stations in your area by auto preset tuning.
1 Press FUNCTION to select “FM” or “AM.”
Press FUNCTION repeatedly until “FM” or “AM” lights up in the display.
2 Press MODE to select “PRESET.”
3 Press PRESET +/– to select the preset number for the
desired radio station.
4 Press VOLUME –/+ to adjust the volume.
To display the preset number and the frequency when listening
to radio
Press DISPLAY/ENTER once to display the preset number, and press again to
display the frequency of the current station. To return to the clock display, press
DISPLAY/ENTER once again; or after a few seconds the display will return
automatically.
After use
Press FUNCTION or OFF to deactivate the radio function.
To improve reception
For FM radio reception, extend the FM wire antenna fully to increase reception
sensitivity.
For AM radio reception, connect the supplied AM loop antenna to the system.
Rotate the antenna horizontally for optimum reception.
If stereo FM reception is noisy, press and hold MODE until “MONO” lights up
in the display. You will lose the stereo effect, but noise will be reduced.
Listening to the radio by manual tuning
1 Press FUNCTION to select “FM” or “AM.”
Press FUNCTION repeatedly until “FM” or “AM” lights up in the display.
2 Press MODE to select “TUNING.”
3 Press and hold TUNE +/– until the frequency digits begin
to change quickly in the display.
The system automatically scans the radio frequencies and stops when it finds
a clear station (automatic tuning mode).
If you cannot tune to a station using the automatic tuning mode, press TUNE
+/– repeatedly to change the frequency step by step.
When an FM stereo broadcast is received, “ST” lights up in the display.
4 Press VOLUME –/+ to adjust the volume.
To preset radio stations manually
You can manually preset a radio station which cannot be preset automatically.
1 Tune to a station you want to preset.
2 Press and hold DISPLAY/ENTER until “PRESET” begins to
flash in the display.
3 Press PRESET +/– to select the preset number, and then
press
DISPLAY/ENTER to confirm.
The station is preset and assigned to the selected preset number.
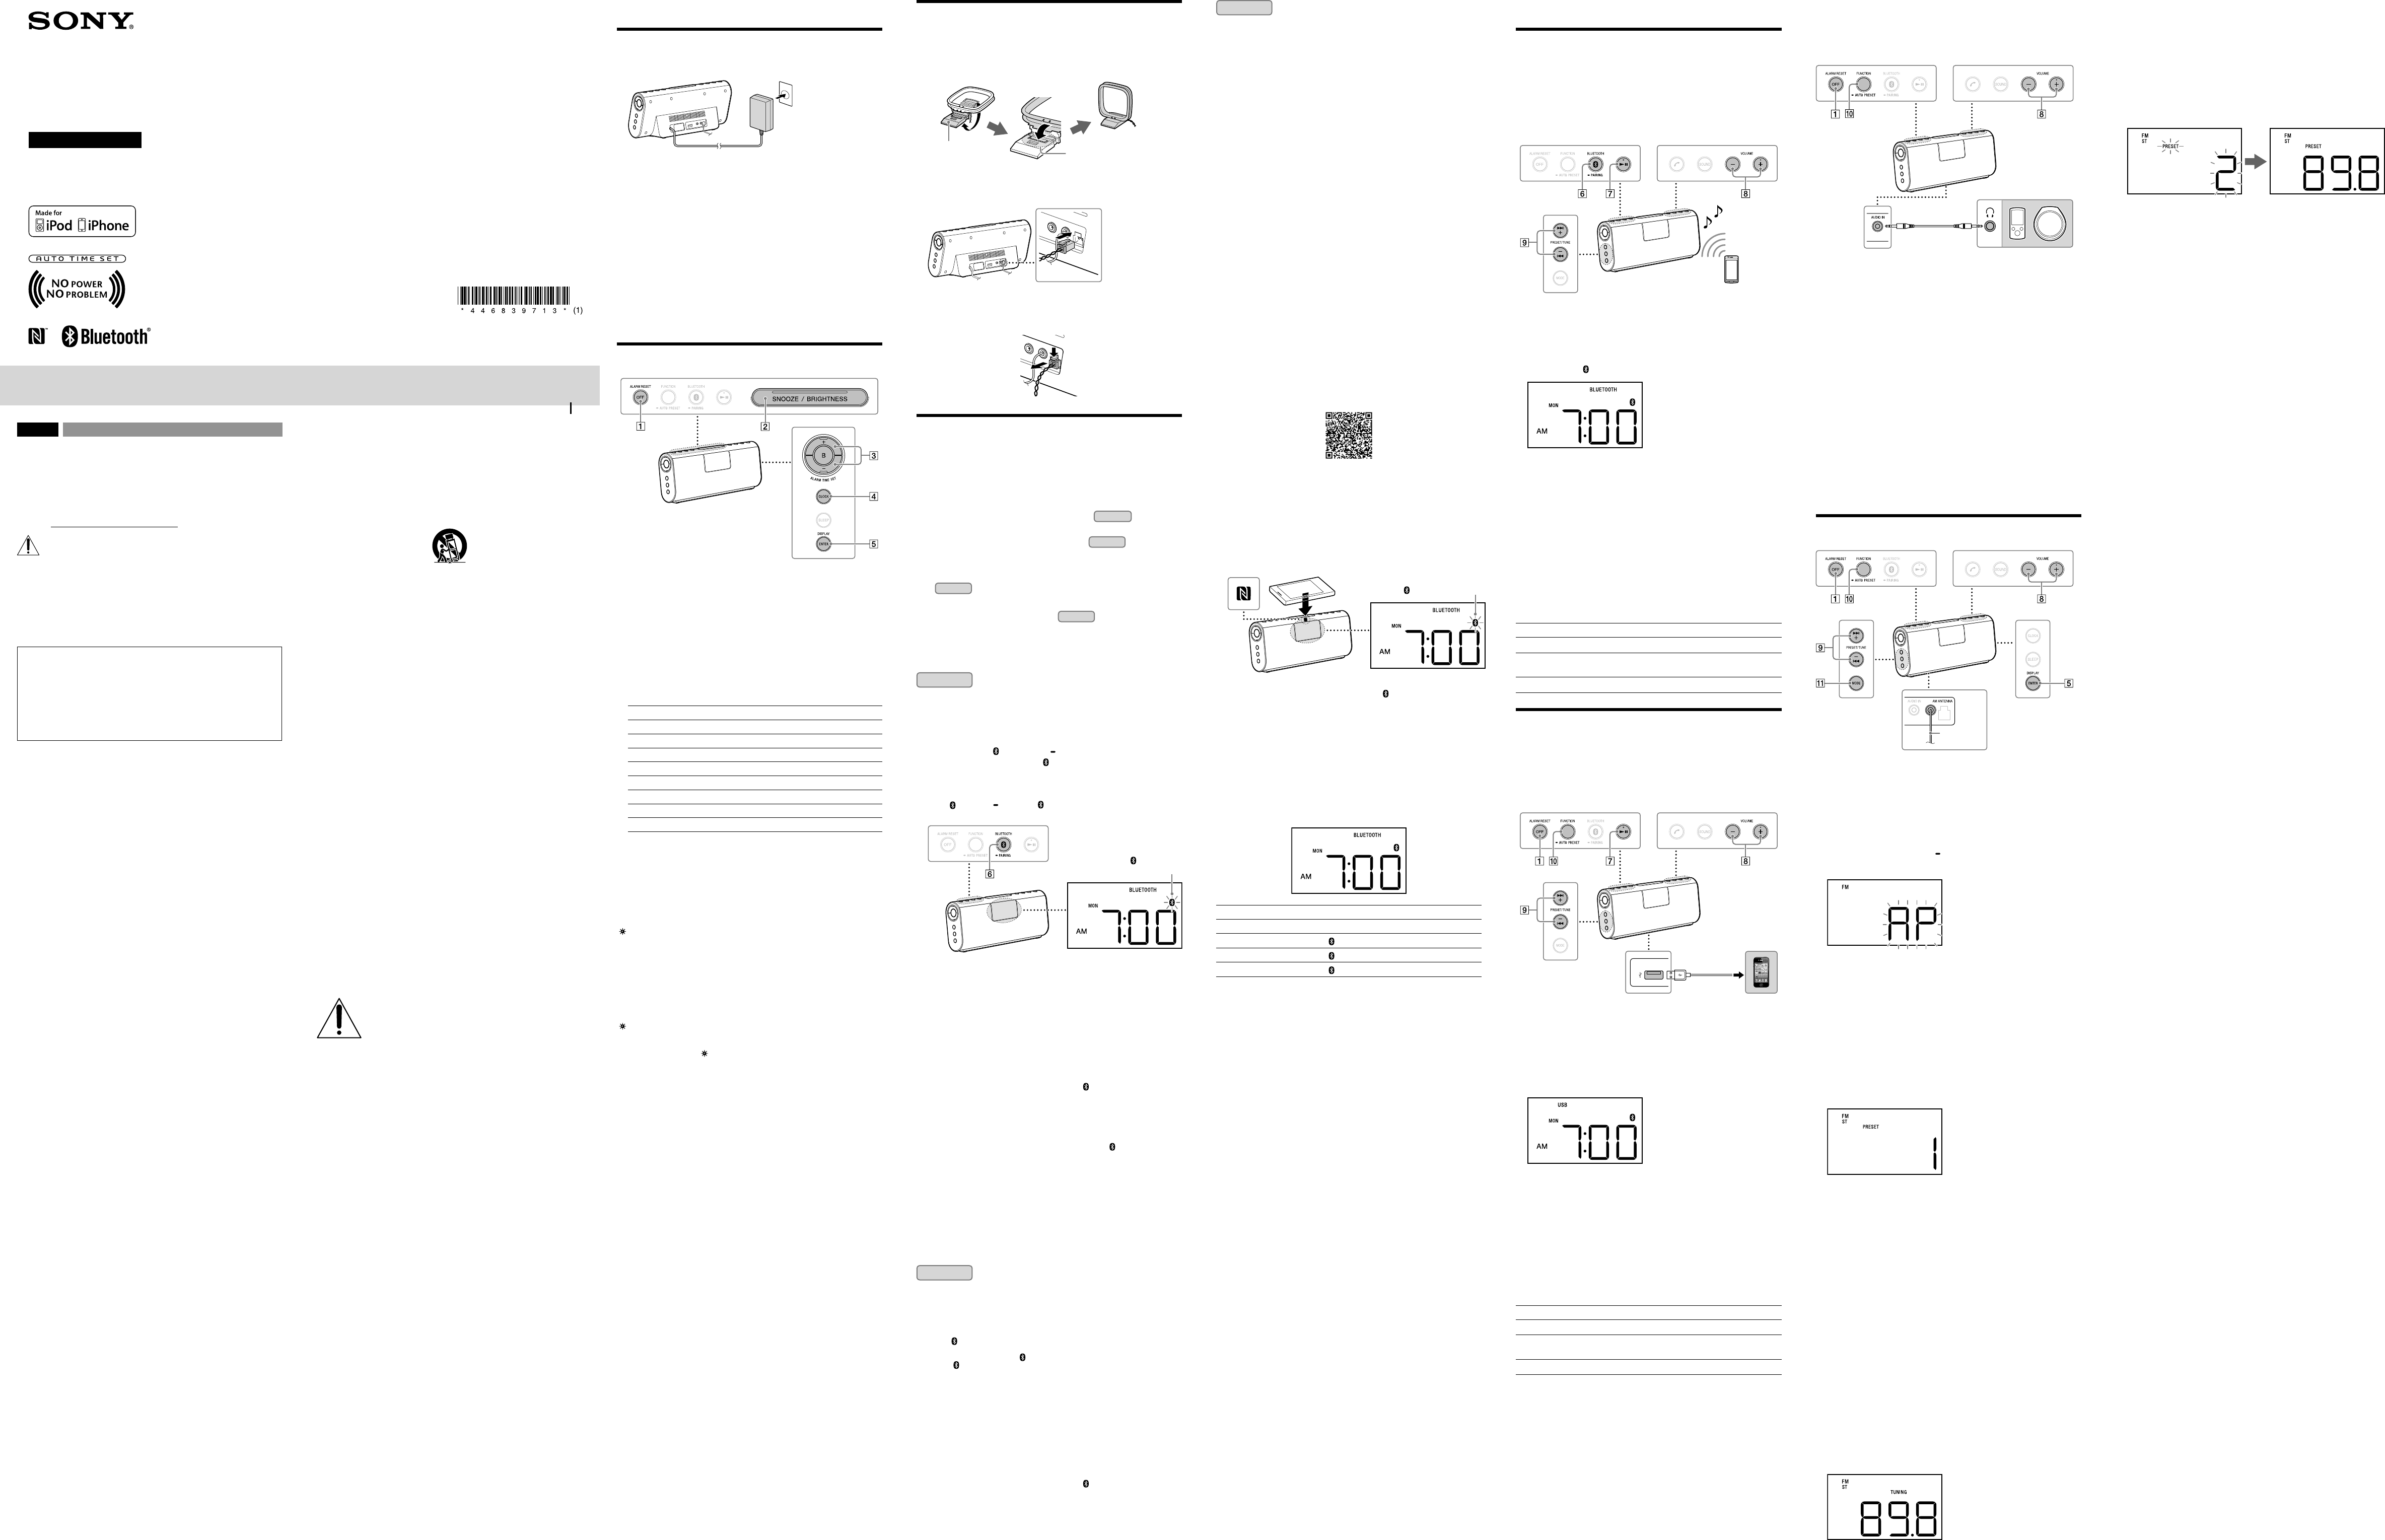
Example: The following displays appear when you preset FM 89.8 MHz to
preset number 2 for FM.
Tip
To cancel the preset number, press OFF instead of DISPLAY/ENTER in step 3.
Notes on radio reception
Do not place the AM loop antenna near the system, power supply or other A/V equipment
during use, as noise may result.
Keep digital music players or mobile phones away from the AM loop antenna or the FM
antenna, as this may lead to reception interference.
When you are listening to radio with a BLUETOOTH device or USB device connected to the
system, interference with radio reception may occur. In this case, terminate BLUETOOTH
connection, or disconnect the USB device from the system.
Tip
You can use hands-free calling while listening to the radio on this system.
Personal Audio System
Operating Instructions
ICF-CS20BT
©2013 Sony Corporation Printed in China
4-468-397-13(1)


