


Wireless Stereo
Headphone System
© 2007 Sony Corporation Printed in China
Operating Instructions
3-095-629-13(2)
WARNING
To reduce the risk of fire or electric shock,
do not expose this apparatus to rain or
moisture.
To reduce the risk of fire or electric shock, do not place
objects filled with liquids, such as vases, on the
apparatus.
To avoid electrical shock, do not open the cabinet.
Refer servicing to qualified personnel only.
Connect AC power adaptor to an easily accessible AC
outlet. Should you notice an abnormality in AC power
adaptor, disconnect it from the AC outlet
immediately.
Do not install the appliance in a confined space, such
as a bookcase or built-in cabinet.
Do not expose the battery to excessive heat such as
direct sunlight, fire or the like.
The nameplate is located on the bottom exterior.
Hereby, Sony Corp., declares that this equipment is in
compliance with the essential requirements and other
relevant provisions of Directive 1999/5/EC.
For details, please access the following URL :
http://www.compliance.sony.de/
Disposal of Old Electrical &
Electronic Equipment
(Applicable in the European
Union and other European
countries with separate
collection systems)
This symbol on the product or on its packaging
indicates that this product shall not be treated as
household waste. Instead it shall be handed over to
the applicable collection point for the recycling of
electrical and electronic equipment. By ensuring this
product is disposed of correctly, you will help prevent
potential negative consequences for the environment
and human health, which could otherwise be caused
by inappropriate waste handling of this product. The
recycling of materials will help to conserve natural
resources. For more detailed information about
recycling of this product, please contact your local
Civic Office, your household waste disposal service or
the shop where you purchased the product.
Disposal of waste batteries
(applicable in the European
Union and other European
countries with separate
collection systems)
This symbol on the battery or on the packaging
indicates that the battery provided with this product
shall not be treated as household waste.
On certain batteries this symbol might be used in
combination with a chemical symbol. The chemical
symbols for mercury (Hg) or lead (Pb) are added if the
battery contains more than 0.0005% mercury or
0.004% lead.
By ensuring these batteries are disposed of correctly,
you will help prevent potentially negative
consequences for the environment and human health
which could otherwise be caused by inappropriate
waste handling of the battery. The recycling of the
materials will help to conserve natural resources.
In case of products that for safety, performance or
data integrity reasons require a permanent connection
with an incorporated battery, this battery should be
replaced by qualified service staff only.
To ensure that the battery will be treated properly,
hand over the product at end-of-life to the applicable
collection point for the recycling of electrical and
electronic equipment.
For all other batteries, please view the section on how
to remove the battery from the product safely. Hand
the battery over to the applicable collection point for
the recycling of waste batteries.
For more detailed information about recycling of this
product or battery, please contact your local Civic
Office, your household waste disposal service or the
shop where you purchased the product.
Do not expose batteries or apparatus with battery
installed to excessive heat such as sunshine fire or the
like.
Notice for customers: the following
information is only applicable to
equipment sold in countries applying EU
directives.
The manufacturer of this product is Sony Corporation,
1-7-1 Konan Minato-ku, Tokyo, 108-0075 Japan. The
Authorized Representative for EMC and product
safety is Sony Deutschland GmbH, Hedelfinger
Strasse 61, 70327 Stuttgart, Germany. For any service
or guarantee matters, please refer to the addresses
given in separate service or guarantee documents.
Welcome!
Thank you for purchasing the Sony MDR-RF840RK/
RF860RK Wireless Stereo Headphone System. Before
operating the unit, please read this manual
thoroughly and retain it for future reference.
Some features are:
•A compact transmitter enables simple charging by a
contactless charge method that requires no terminals
by the electromagnetic induction.
Just by placing the headphones on the transmitter,
the headphone battery can be charged.
•Automatic ON/OFF function on headphones to
preserve battery power.
•Noise reduction system to reproduce a clear sound
with minimum transmission noise (MDR-RF860RK
only).
•Wireless system that allows you to listen to a
program free from the restriction of a cord.
•High fidelity sound reproduction.
•Easy connection with TV and HiFi Audio system
equipment.
•Up to 100 meters reception range.
•Volume control function on the headphones.
•Comfortable Circum-aural headphone with self
adjusting head band.
Notes on receiving
performance
This system utilizes very high frequency signals in the
800 MHz band so the receiving performance may
deteriorate due to the surroundings. The following
examples illustrate conditions that may reduce the
reception range or cause interference.
•Inside a building with walls containing steel beams.
•An area with many steel file cabinets, etc.
•An area with many electrical appliances capable of
generating electromagnetic fields.
•The transmitter is placed on a metal instrument.
•An area facing a roadway.
•Noise or interfering signals exist in the surroundings
due to radio transceivers in trucks, etc.
•Noise or interfering signals exist in the surroundings
owing to wireless communication systems installed
along roadways.
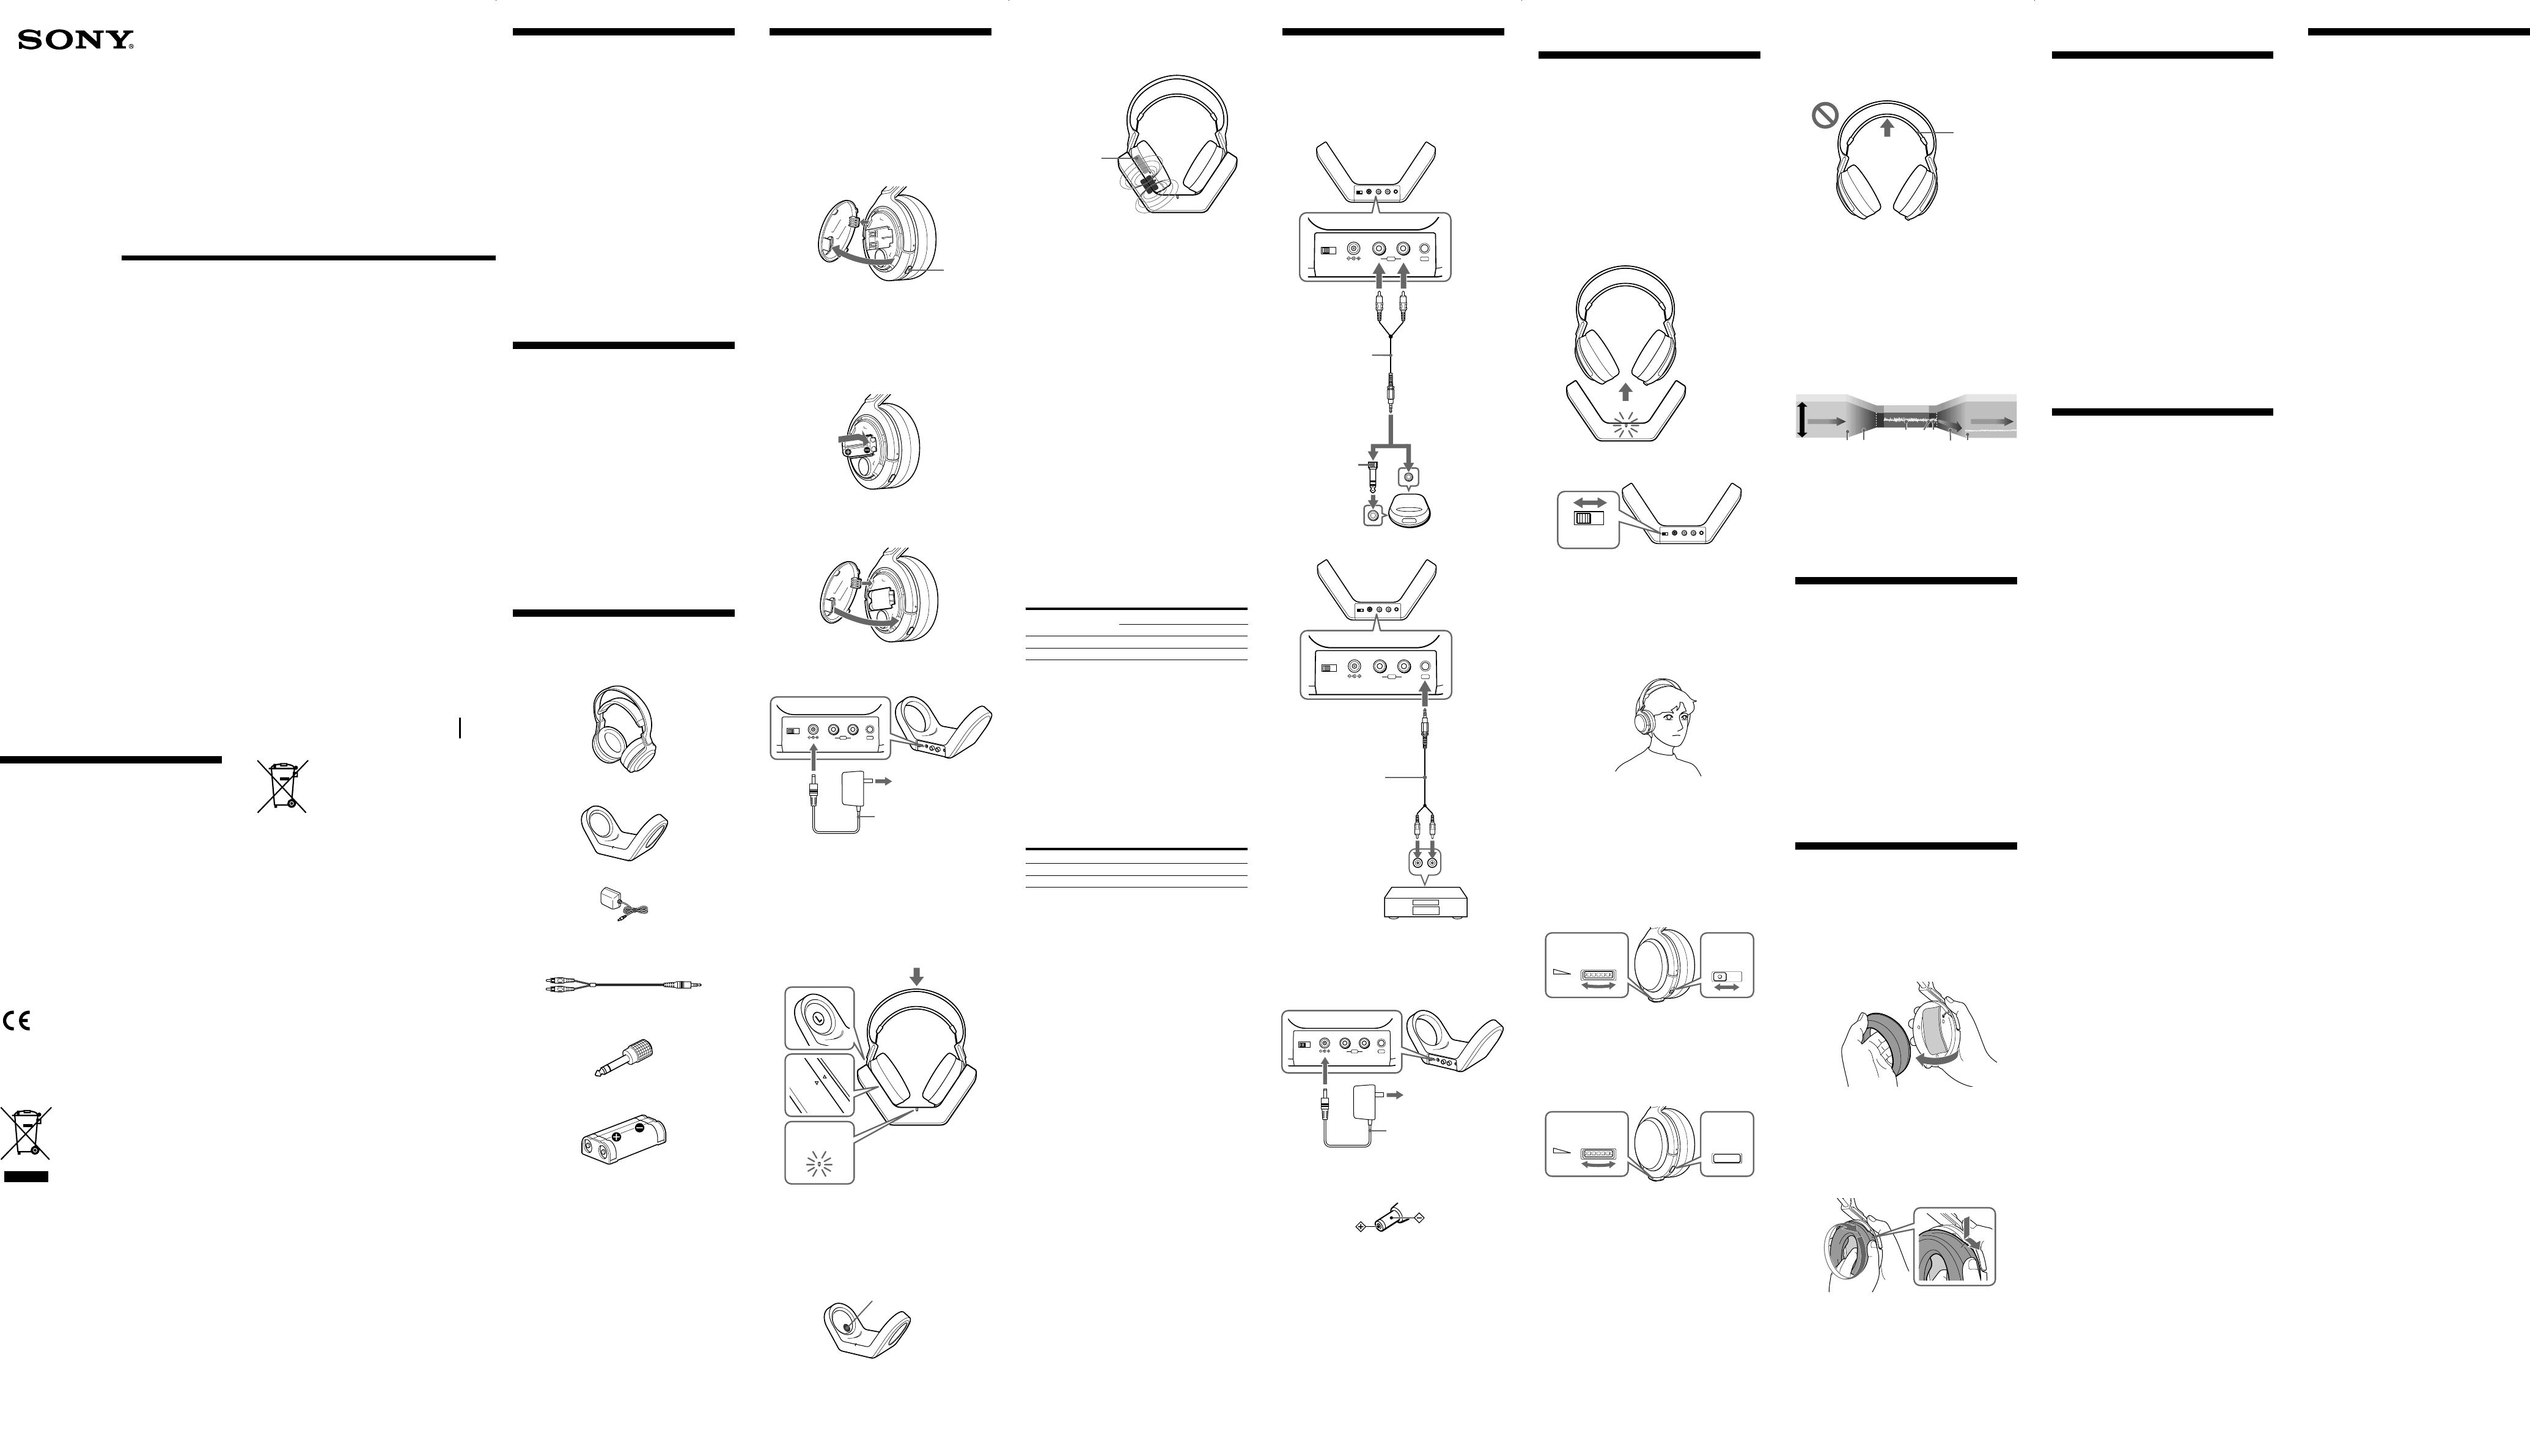
N Getting started
Unpacking
Check that you have the following items:
•The headphones (1)
•The transmitter (1)
•AC power adaptor (1)
•Connecting cord (1) (phono plugs y stereo
miniplug), 1 m
• Unimatch plug adaptor (1) (stereo mini jack y
stereo phone plug)
• Rechargeable nickel-metal hydride battery
BP-HP550-11 (1)
Charging the supplied
rechargeable battery
The supplied rechargeable nickel-metal hydride
battery is not charged from the first time you use it. Be
sure to charge it before use.
To charge the headphones, place them on the transmitter.
1 Press the PUSH button of the left housing to
open the battery compartment lid.
The battery compartment lid comes off.
L
2 Insert the supplied rechargeable nickel-
metal hydride battery into the battery
compartment matching the 3 terminal on
the battery to the 3 mark in the
compartment.
Do not use rechargeable battery other than the
supplied one.
3 Close the battery compartment lid.
1Insert the tab into the hole at the upper left.
2Close the lid until it clicks.
1
L
2
4 Connect the supplied AC power adaptor to
the transmitter.
5 Rest the headphones on the transmitter so
that the transmitter’s POWER/CHG indicator
lights in red.
Please place the headphones on the transmitter so
that the triangle arrow would be matched. If the
headphones are not properly placed, it will not be
charged.
Charging will take about 16 hours, after which the
POWER/CHG indicator will go off.
About the charging method of the system
This system employs a contactless charge method that
requires no terminals by the electromagnetic induction.
Notes
•Do not leave any metallic objects (coin, clip, etc.)
near the transmitter’s charging point. The
transmitter and the metal might become hot and it is
dangerous.
•Do not leave any objects susceptible to magnetism
(cash cards, floppy disks with magnetic coding, etc.)
near the system. Exposure to the transmitter’s
electromagnetic field may render them unusable.
•Do not place a radio near the system. A noise may be
heard from the radio. In such a case, change the
angle of the radio or move away from the system so
that a noise is not heard.
When the transmitter’s POWER/CHG
indicator does not light up red
Check if the right and left headphones are rested on
the transmitter correctly. Remove the headphones and
replace them on the transmitter again so that the
POWER/CHG indicator lights in red.
To recharge the headphone battery after use
Place the headphones on the transmitter after use.
Since the built-in timer recognizes when charging is
complete, there is no need to remove the headphones
from the transmitter after charging.
Notes
• The transmitter automatically stops sending RF
signals while charging the battery.
• This system is designed to charge only the supplied
rechargeable battery type BP-HP550-11 for safety.
Note that other types of rechargeable batteries
cannot be charged with this system.
• If dry batteries are installed, they cannot be charged.
• Do not attempt to use the supplied BP-HP550-11
rechargeable battery for other components. They are
for use with this system only.
• Charge in an environmental temperature of
between 0 °C and 40 °C (between 32 °F and 104 °F).
Charging and usage hours
Approx. charging Approx. usage time*
1
hours*
1
1 hour 60 minutes*
3
40 minutes*
3
16 hours*
2
18 hours*
3
14 hours*
3
*
1
at 1 kHz, 1 mW+1 mW output
*
2
hours required to fully charge an empty battery
*
3
Time stated above may vary, depending on the
temperature or conditions of use.
Using the headphones with dry batteries
(sold separately)
Commercially available (size AAA) dry batteries can also
be used to power the headphones. Install the batteries in
the same manner as described in steps 1 through 3 of
“Charging the supplied rechargeable battery.”
When dry batteries are installed, the battery charge
function will not be activated.
Battery life
(Using Sony alkaline batteries LR03/AM-4 (N))
Model Approx. hours*
1
MDR-RF840RK 28 hours*
2
MDR-RF860RK 22 hours*
2
*
1
at 1 kHz, 1 mW+1 mW output
*
2
Time stated above may vary, depending on the
temperature or conditions of use.
Notes on Batteries
• Do not charge a dry battery.
• Do not carry a dry battery together with coins or
other metallic objects. It can generate heat if the
positive and negative terminals of the battery
accidentally come into contact with metallic objects.
• If you are not going to use the unit for a long time,
remove the batteries to avoid damage from battery
leakage or corrosion.
Checking the remaining battery power
Pull up the self-adjusting band and check the POWER
indicator located on the right housing. The battery is
still serviceable when the indicator lights in red.
Charge the rechargeable battery or install new dry
batteries if the POWER indicator light dims, flashes, or
the sound becomes distorted or noisy.
Note
The rechargeable nickel-metal hydride battery should
be replaced with new one when they last only half the
expected time after a proper recharging. The
rechargeable battery type BP-HP550-11 is not
commercially available. You can order the battery
from the store where you purchased this system, or at
your nearest Sony dealer.
Setting up the transmitter
1 Connect the transmitter to audio/video
equipment.
Select one of the hookups below depending on the
jack type:
A To connect to a headphones jack
B To connect to LINE OUT or REC OUT
* “WALKMAN” and “WALKMAN” logo are
registered trademarks of Sony Corporation.
2 Connect the supplied AC power adaptor to
the transmitter.
Notes
•Use only the supplied AC power adaptor. Do not
use any other AC power adaptor.
•When the transmitter is placed on or near a TV, it
may pick up a noise. In such a case, place the
transmitter away from the TV.
•If the connected equipment has the AVLS
(Automatic Volume Limiter System) function, be
sure to turn the function off when using the
transmitter. Otherwise, you will have to turn up the
volume of the headphones, and that may cause
noise.
N Operating the system
Listening to a programme
Before listening
To reduce the risk of hearing damage, first lower the
volume.
1 Turn on the audio/video equipment
connected to the transmitter.
If the transmitter is connected to the headphone
jack, set the volume control of the audio source
equipment as high as possible but not so high that
the audio signal becomes distorted.
2 Remove the headphones from the
transmitter.
The transmitter’s POWER/CHG indicator lights
up green.
3 Select the radio frequency with the
CHANNEL selector switch.
12
CHANNEL
3
4 Put on the headphones.
When you put on the headphones, the
headphone’s power turns on automatically.
The POWER indicator on the right housing glows
red.
Be sure to put the right housing R on your right
ear and the left housing L on your left ear.
Wear the headphones vertically on your head so
that auto power on function is properly activated.
5 Set the channel to that of the transmitter
with the selector (or button) on the right
housing of the headphones.
A MDR-RF840RK
Select the channel to that of the transmitter with
the TUNING selector on the right housing of the
headphones.
When tuning has completed, turn up the volume
to a moderate level with the VOLUME control on
the right housing.
R
231
VOLUME
B MDR-RF860RK
Press the TUNING button briefly for automatic
tuning of the headphones. If you do not receive a
clear audio signal, press it again.
When tuning has completed, turn up the volume
to a moderate level with the VOLUME control on
the right housing.
R
TUNING
VOLUME
Sending RF signals from the transmitter
The transmitter starts sending RF signals
automatically when it detects an audio signal from the
connected equipment.
If it does not detect an audio signal for more than
about 4 minutes, the transmitter will stop sending RF
signals, and the POWER/CHG indicator will turn off.
When the transmitter receives an audio signal again, it
starts sending the RF signals, and the POWER/CHG
indicator will light up green again.
If the audio signal is very weak, the transmitter does
not send RF signals. If the transmitter is connected to a
headphone jack, make sure the volume of the
equipment connected is set to 5 - 6 or higher.
You may not hear the beginning of the sound from the
headphones until the transmitter starts sending the RF
signals after detecting an audio signal.
MDR-RF840RK
MDR-RF860RK
PUSH
button
The headphones automatically turn off
when they are taken off
– Auto power on/off function
Do not pull up the self-adjusting band when not in
use, as this will consume the battery power.
Notes
•If hiss is heard, move closer to the transmitter.
•You may hear some noise when you disconnect the
AC power adaptor from the transmitter before turn
off the headphones.
Noise Reduction process (MDR-RF860RK
only)
The transmitter unit compresses the audio signal and
converts it to RF signal. The headphones unit converts
the received RF signal to an audio signal and
decompresses it.
This process reduces noise picked up during
transmission.
input signal
output signal
decompression
compression
dynamic range
Transmitter unit Headphones unit
RF transmission
noise level (low)
1
2 34
5
1 The transmitter unit compresses the audio signals
dynamic range, then converts it to RF signal.
2 Noise may occur due to long distance
transmission, etc.
3 The headphones unit converts the RF signal to an
audio signal.
4 Noise may occur during conversion.
5 Decompression of the audio signals dynamic range
reduces the noise level and improves the
S/N (signal-to-noise) ratio.
The effective areas of
the transmitter
The optimum distance is up to approximately 100 m
without the system picking up some interference.
However, the distance may vary depending on the
surroundings and environment. If the system picks up
some noise within the above mentioned distance,
reduce the distance between the transmitter unit and
the headphones, or select another channel.
Notes
•When you use the headphones inside the effective
areas of the transmitter, the transmitter can be
placed in any direction from the listener.
•Even within the signal reception area, there are some
spots (dead spots) where the RF signal cannot be
received. This characteristics is inherent to RF
signals, and does not indicate malfunction. By
slightly moving the transmitter, location of the dead
spot can be changed.
Replacing the ear pads
The ear pads are replaceable. If the ear pads become
dirty or worn out, replace them as illustrated below.
The ear pad is not commercially available. You can
order replacements from the store where you
purchased this system, or at your nearest Sony dealer.
1 Remove the old ear pad by pulling it out of
the groove on the housing.
2 Place the new ear pad on the driver unit.
Hang the edge of the ear pad on one side of the
driver unit’s groove edge, then turn the edge of
ear pad around the driver unit as illustrated
below.
When the ear pad is securely inserted into the
groove, adjust the ear pad to the vertical position.
Charging point
MDR-RF840RK MDR-RF860RK
Self-
adjusting
band
Rechargeable
battery
LR
Transmitter
Lines of magnetic
force
Headphones
12
CHANNEL
DC IN 12V
INPUT
3
BRAL
Transmitter
To INPUT B
jack
Connecting cord
(supplied)
To LINE OUT or
REC OUT jacks
Right
channel (red)
Left channel
(white)
Stereo system,
VCR, etc.
N Additional information
Precautions
•
If the transmitter is not to be used for a long period of
time, disconnect the AC power adaptor from the AC
outlet by holding the plug. Do not pull on the cord.
•Do not leave the wireless stereo headphone system
in a location subject to direct sunlight, heat or
moisture.
Notes on headphones
To reduce the risk of hearing damage
•Avoid using headphones at high volume. Hearing
experts advise against continuous, loud and
extended play. If you experience a ringing in your
ears, reduce the volume or discontinue use.
•Excessive sound pressure from headphones can
cause hearing loss.
Caring for others
Keep the volume at a moderate level. This will allow
you to hear outside sounds and to be considerate to
the people around you.
If you have any questions or problems concerning the
system that are not covered in this manual, please
consult your nearest Sony dealer.
Be sure to bring the headphones and the transmitter to
the Sony dealer when requiring repair work.
Troubleshooting
No sound/Muffled sound
, Check the connection of the audio/video
equipment or the AC power adaptor.
, Check that the audio/video equipment is
turned on.
, Turn up the volume on the connected audio/
video equipment, if the transmitter is
connected to the headphones jack.
, Change the radio frequency with the
CHANNEL selector switch on the transmitter,
then set to the same radio frequency with the
TUNING selector (or TUNING button) on the
right housing of the headphones.
, The mute function is activated.
•Use the headphones near the transmitter.
, The headphones’ POWER indicator light turns
off, dims, flashes, or sound becomes distorted
or noisy.
•Charge the rechargeable battery if it is weak,
or replace alkaline batteries with new ones. If
the POWER indicator is still off after charging
the battery, take the headphones to a Sony
dealer.
Distortion
, If the transmitter is connected to the
headphones jack, turn down the volume on the
connected audio/video equipment.
, Change the radio frequency with the
CHANNEL selector switch on the transmitter,
then set to the same radio frequency with the
TUNING selector (or TUNING button) on the
right housing of the headphones.
, The headphones’ POWER indicator light turns
off, dims, flashes, or sound becomes distorted
or noisy.
•Charge the rechargeable battery if it is weak,
or replace alkaline batteries with new ones. If
the POWER indicator is still off after charging
the battery, take the headphones to a Sony
dealer.
Loud background noise
, Move closer to the transmitter. As you move
away from the transmitter, more noise is likely
to be heard.
, If the transmitter is connected to the
headphones jack, turn up the volume of the
connected audio/video equipment.
, Change the radio frequency with the
CHANNEL selector switch on the transmitter,
then set to the same radio frequency with the
TUNING selector (or TUNING button) on the
right housing of the headphones.
, The headphones’ POWER indicator light turns
off, dims, flashes, or sound becomes distorted
or noisy.
•Charge the rechargeable battery if it is weak,
or replace alkaline batteries with new ones. If
the POWER indicator is still off after charging
the battery, take the headphones to a Sony
dealer.
LR
Transmitter
Headphones
POWER/CHG
indicator
12
CHANNEL
DC IN 12V
RALINPUT
3
B
Transmitter
AC power adaptor
(supplied)
To an AC
outlet
To DC IN
12V jack
Polarity of the plug
Transmitter
Headphones
VOLUME control TUNING
button
VOLUME control TUNING
selector
12
CHANNEL
DC IN 12V
RALINPUT
3
B
Transmitter
AC power adaptor
(supplied)
To an AC
outlet
To DC IN
12V jack
12
CHANNEL
DC IN 12V
INPUT
3
BRAL
Transmitter
To INPUT A
jacks
Connecting cord
(supplied)
Unimatch plug
adaptor
(supplied)
Right
channel (red)
Left channel
(white)
WALKMAN*,
TV, etc.
To headphones
jack (Stereo
mini jack)
To headphones
jack (Stereo
phone jack)
Specifications
General
Carrier frequency
863.52 MHz, 864.02 MHz, 864.52 MHz
Channel Ch1, Ch2, Ch3
Modulation FM stereo
Frequency response
MDR-RF840R: 20 – 20,000 Hz
MDR-RF860R: 10 – 22,000 Hz
Transmitter TMR-RF840R, RF860R
Power source DC 12 V: supplied AC power adaptor
Audio input Phono jacks, stereo mini jack
Dimensions Approx. 216 × 105 × 96 mm
(8
5
/
8
× 4
1
/
4
× 3
7
/
8
in) (w/h/d)
Mass Approx. 220 g (7.77 oz)
Rated power consumption
3 W
Headphones MDR-RF840R, RF860R
Power source Supplied rechargeable nickel-metal
hydride battery BP-HP550-11 or
commercially available (size AAA) dry
batteries
Mass Approx. 300 g (10.59 oz) incl. Battery
Design and specifications are subject to change
without notice.