8
Audio Controls
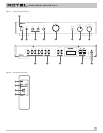
Volume Control
6
17
As with all normal volume controls turn the control knob
6
clockwise
to increase the volume, or
counterclockwise
to
decrease the volume. Or press the remote control volume button
17
next to the ▲ symbol to turn the volume up; press the button
next to the ▼ symbol to turn the volume down.
Tone On/Off Switch
5
When the switch is in the Off position the tone control circuits are
bypassed to ensure the purest possible sound. Leave the switch in
the Off position unless you want to use the tone controls. Turn the
switch to the On position if you want to adjust the tone controls.
Bass and Treble Controls
4
When the Tone Switch is in the On position, turning the Bass and
Treble controls adjusts the tone balance of the sound. Turn the
controls
clockwise
to increase the bass or treble output. Turn the
controls
counterclockwise
to decrease the bass or treble output.
A properly set up high-performance audio system produces the
most natural sound with little or no adjustment of the tone
controls. Use these controls sparingly. Be particularly careful
when turning the controls up (clockwise). This increases the
power output in the bass or treble range, increasing the load on
the amplifier and speakers.
Input “Function” Selector
9
16
The setting of the Function Selector controls which of the input
signals goes to the main outputs and onto the power amplifier –
or, more simply, which source is heard. Turn the knob on the front
panel control
9
to the source you want to use, or press the
corresponding button
16
on the RR-C91 remote The signal from
the selected source also goes to the Tape Outputs.
Tape Monitor Switch
8
When the Tape Monitor switch is in the Source position you hear
the sound source that is selected by the Function Selector.
Turning the switch to the Tape position lets you listen to a
previously recorded tape, or monitor the sound from the tape
recorder while you are recording.
Mute Control
18
(remote only)
To temporarily mute the sound of the system press the Mute
Button on the RR-C91 remote. Press the button again to return the
sound volume to the original level. The LED in the volume control
will flash when the unit is muted.
Phones Output
3
The Phones output allows you to connect headphones for private
listening. This output accommodates standard stereo phone (1/4”)
plugs. If your headphones have another type of plug, such as a
1/8” mini-plug, you will need an adapter plug. Contact your
authorized Rotel dealer, to get the correct adapter plug.
Note: Plugging in a set of headphones does not cut off the signal
to the outputs. In most instances you should turn off the power
amplifier when listening to headphones.
Recording
Set the Function Selector switch
9
to the component you want
to use for the signal source. If you have a three-head cassette
recorder, a three-head reel-to-reel tape recorder or a DAT
recorder that allows simultaneous “read and write” operation you
can monitor your recording by setting the Tape Monitor switch
8
to the “Tape” position. When not monitoring a recording, or
listening to a previously recorded tape, set the Tape Monitor
switch
8
to the “Source” position.
Optional Phono Board Card
In order to use an analog phono turntable with the RC-972 you
must install the optional MM or MC phono board card. These plug
in boards convert the Aux 1 input to a phono input. They can be
installed by your authorized Rotel dealer, or you can install them
yourself. If you plan to install them yourself, follow the supplied
instructions very carefully.
Failure to precisely follow the
instructions can result in damage to the RC-972 or personal injury.
If you are not sure you have the knowledge and skills to properly
install the preamp boards, have the installation done by your
dealer.
STEREO CONTROL AMPLIFIER RC-972


