


Portable Cassette
Tape Recorder
14-1117
Powering the Recorder
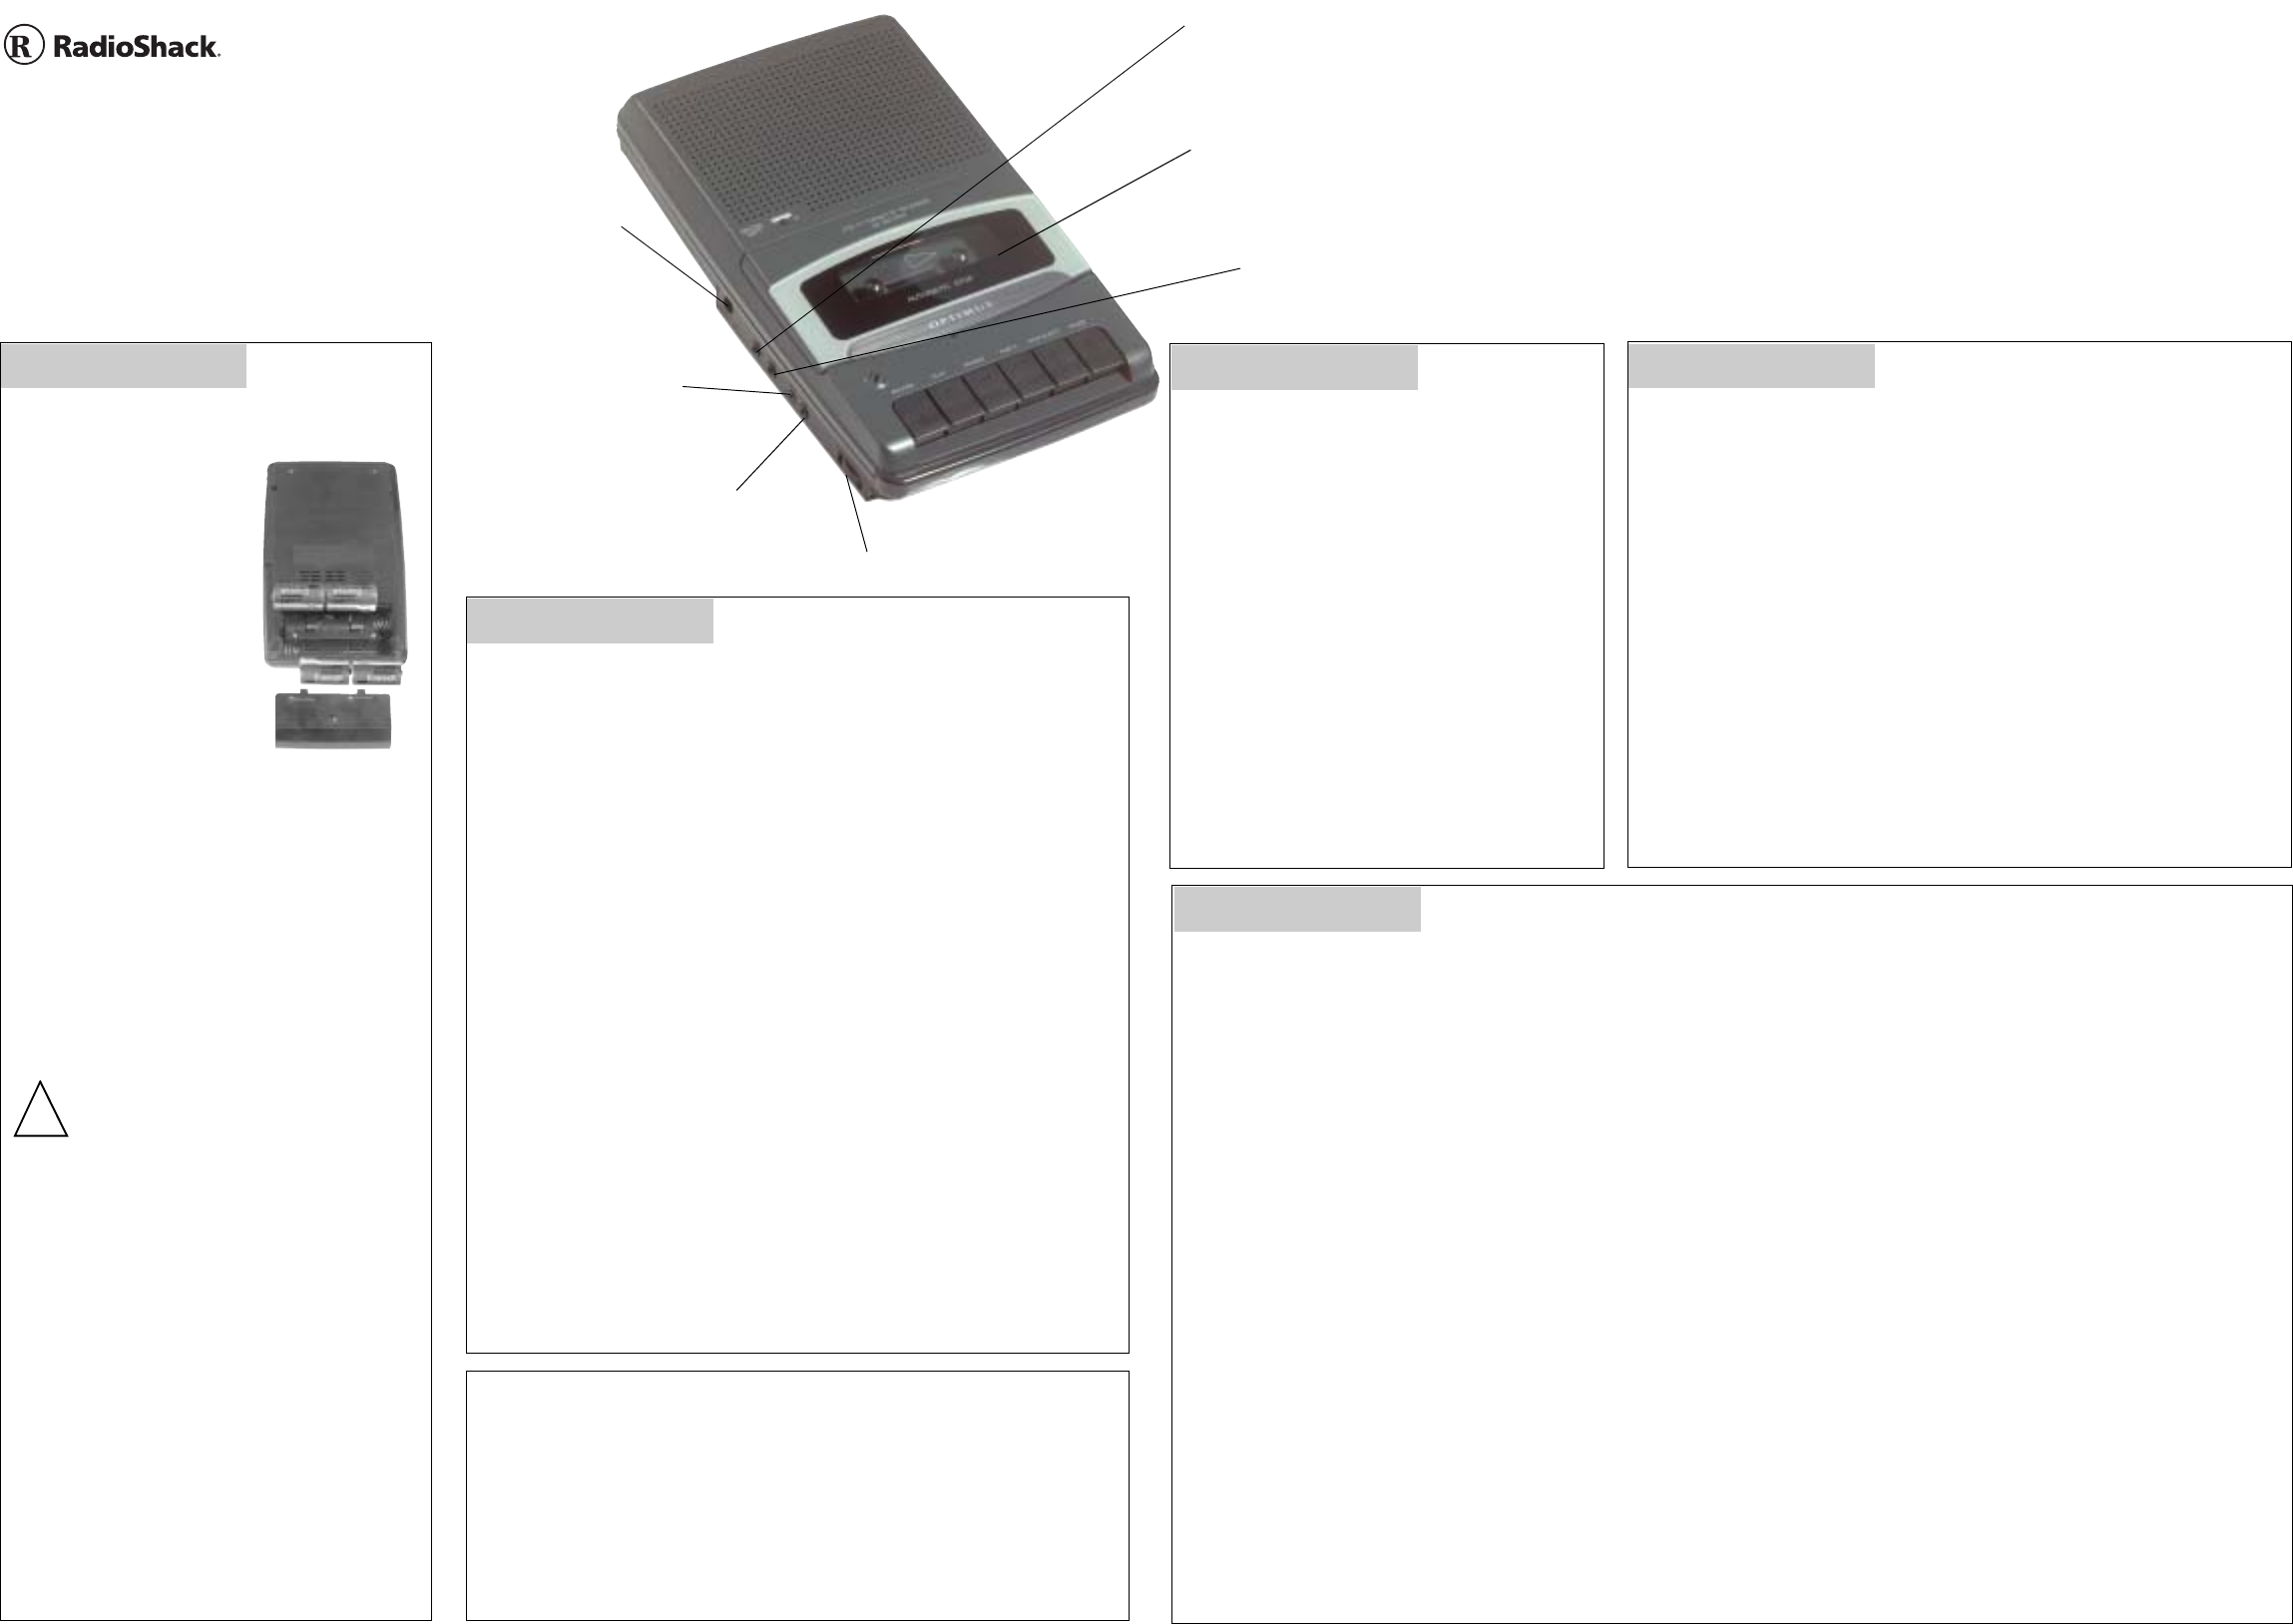
Installing Batteries
1. Press down on the
battery compartment
cover and slide it in
the direction of the
arrows to remove it.
2. Insert four size C
batteries as indicated
by the polarity
symbols marked
inside.
3. Replace the cover.
Using AC or DC Power
You can power the recorder using a 6V,
300mA AC adapter or a 12V power source
(such as your vehicle’s cigarette-lighter
socket), and a size M Adaptaplug™ adapter
(none supplied). Both are available at your
local RadioShack store.
Caution: You must use a Class 2
power source that supplies 6V DC and
delivers 300mA. Its center tip must be
set to negative and its plug must fit the
recorder's DC 6V jack. Using an adapter that
does not meet these specifications could
damage the recorder or the adapter.
1. Set the adapter’s voltage switch to 6V.
2. Attach the Adaptaplug to the adapter’s
cord with the tip set to negative.
3. Insert the adapter’s barrel plug into the
recorder’s DC 6V jack. This disconnects
the batteries.
4. Plug the other end of the adapter into a
standard AC outlet or a DC power source.
!
Step One
Loading a Cassette
1. Remove any slack from the cassette tape
by turning one of the hubs with a pencil.
The tape might become tangled in the
record/playback mechanism if you do not
remove excess slack.
2. Press STOP/EJECT to open the cassette
compartment door.
3. Insert the tape with its open edge outward
toward the controls, and the desired side
facing up.
4. Close the door.
Step Three
Ô BATTERY NOTES Ô
• Dispose of old batteries promptly and properly.
• Do not burn or bury batteries.
• Use fresh batteries of the required size and recommended type.
• Do not mix old and new batteries, different types of batteries (standard, alkaline, or
rechargeable), or rechargeable batteries of different capacities.
• If you do not plan to use the recorder for a month or more, remove the batteries.
Batteries can leak chemicals that can damage electronic parts.
Connecting Earphones
Use the supplied earphone for private listening. Insert the earphone’s
plug into the recorder’s EAR jack. Connecting the earphone automatically
disconnects the built-in speaker.
Listening Safely
• Set the volume to the lowest setting before you begin listening. After
you begin listening, adjust the volume to a comfortable level.
• Do not listen at extremely high volume levels. Extended high-volume
listening can lead to permanent hearing loss.
• Once you set the volume, do not increase it. Over time, your ears
adapt to the volume level, so a volume level that does not cause
discomfort might still damage your hearing.
Traffic Safety
• Do not wear earphones while operating a motor vehicle or riding a
bicycle. This can create a traffic hazard and could be illegal in some
areas.
• Even though some earphones let you hear some outside sounds
when listening at normal volume levels, they still can present a traffic
hazard.
Step Two
Recording
Using the Built-In Microphone
1. Load a cassette tape in the compartment.
2. Place the recorder as close as possible to the recording
source (within 2-3 feet, if possible).
3. Press RECORD. Both PLAY and RECORD automatically
remain pressed down, and the RECORD/BATT LED lights
while recording.
4. Press PAUSE at any time to temporarily stop recording. To
resume recording, press PAUSE again.
5. Press STOP/EJECT to stop recording.
Using an External Microphone
You can connect an external 1/8-inch plug to the recorder.
Depending on the type of microphone you use, this is handy
when you want to record only an individual’s voice or exclude
other sounds in the surrounding area. Your local Radioshack
store carries a wide variety of microphones.
Step Five
1. Load a cassette tape in the compartment.
2. Connect an external microphone.
If the external microphone has a 1/8-inch plug, insert it
into the recorder’s MIC jack.
If the external microphone has two plugs and an On/Off
switch, this means you can remotely control the recorder
from your microphone. Insert the microphone’s 1/8-inch
plug into the recorder’s MIC jack, and the smaller plug into
the REM jack.
3. Press RECORD. Both PLAY and RECORD automatically
remain pressed down.
4. If you are using an external microphone with an On/Off
switch, set the switch to ON.
5. Speak into the microphone.
6. Press STOP/EJECT to stop recording.
Playing a Cassette
1. Load a cassette tape in the compartment.
2. Rotate VOLUME to MIN for low sound.
3. Press PLAY. The tape begins to play.
4. Adjust VOLUME to the desired listening level.
5. To stop playback before the tape reaches the end, press
STOP/EJECT. Otherwise, the tape will automatically stop playing
once it reaches the end.
6. Press STOP/EJECT again to open the cassette compartment door
and remove the cassette.
Step Four
Cassette tape compartment
MIN-VOLUME-MAX — Adjust
playback volume to the desired
listening level.
DC 6V — Connect
an adapter and use
AC or DC power.
MIC — Connect an external
microphone, if desired.
REM — Connect an external
microphone here if the
microphone has remote
control capability.
EAR — Connect the supplied
earphone here for private listening.
AUX — Connect an external audio
source so that you can record from it.