AM/FM
Shower Radio
with LCD Alarm Clock
12-896
Battery Installation
This shower radio requires two AA batteries (not
supplied) for power, and one LR44 button-cell
battery (supplied) for clock functions.
1. Loosen the screw, and remove the battery
compartment cover.
2. Remove the insulation strip from the button-cell
battery to start the clock function.
3. Insert two AA batteries according to the polarity
markings (+ / -).
4. Replace the cover, and secure the screw.
To replace the button-cell battery, remove the AA
batteries, use a flat screwdriver to remove the old
LR44 button-cell, then insert a new one according to
the polarities (+/ -) marked inside, and reinstall the
AA batteries.
LR44 battery
compartment
Rear
View
MODE
SET
Screw
Cover
Frequency Range............................. AM 530 – 1700KHz
............................................................ FM 88 – 108MHz
Output Power....................................................... 180mW
Speaker ............................................................... 4 Ohm
Weight 12.20 Oz. (350 g.)
Specifications are typical. Individual units may vary. Specifications are
subject to change and improvement without notice.
AM/FM radio • LR44 battery (installed) •
Neck strap (attached) •
This document
©2003. RadioShack Corporation. 12-896
All Rights Reserved. Printed in the Philippines
RadioShack and RadioShack.com are 07A03
trademarks used by RadioShack Corporation.
This product is warranted by RadioShack against manufacturing defects in material and workmanship
under normal use for one (1) year from the date of purchase from RadioShack company-owned stores
and authorized RadioShack franchisees and dealers. EXCEPT AS PROVIDED HEREIN, RadioShack
MAKES NO EXPRESS WARRANTIES AND ANY IMPLIED WARRANTIES, INCLUDING THOSE OF
MERCHANTABILITY AND FITNESS FOR A PARTICULAR PURPOSE, ARE LIMITED IN DURATION TO
THE DURATION OF THE WRITTEN LIMITED WARRANTIES CONTAINED HEREIN. EXCEPT AS
PROVIDED HEREIN, RadioShack SHALL HAVE NO LIABILITY OR RESPONSIBILITY TO CUSTOMER
OR ANY OTHER PERSON OR ENTITY WITH RESPECT TO ANY LIABILITY, LOSS OR DAMAGE
CAUSED DIRECTLY OR INDIRECTLY BY USE OR PERFORMANCE OF THE PRODUCT OR ARISING
OUT OF ANY BREACH OF THIS WARRANTY, INCLUDING, BUT NOT LIMITED TO, ANY DAMAGES
RESULTING FROM INCONVENIENCE, LOSS OF TIME, DATA, PROPERTY, REVENUE, OR PROFIT
OR ANY INDIRECT, SPECIAL, INCIDENTAL, OR CONSEQUENTIAL DAMAGES, EVEN IF RadioShack
HAS BEEN ADVISED OF THE POSSIBILITY OF SUCH DAMAGES.
Some states do not allow limitations on how long an implied warranty lasts or the exclusion or limitation of
incidental or consequential damages, so the above limitations or exclusions may not apply to you.
In the event of a product defect during the warranty period, take the product and the RadioShack sales
receipt as proof of purchase date to any RadioShack store. RadioShack will, at its option, unless
otherwise provided by law: (a) correct the defect by product repair without charge for parts and labor; (b)
replace the product with one of the same or similar design; or (c) refund the purchase price. All replaced
parts and products, and products on which a refund is made, become the property of RadioShack. New
or reconditioned parts and products may be used in the performance of warranty service. Repaired or
replaced parts and products are warranted for the remainder of the original warranty period. You will be
charged for repair or replacement of the product made after the expiration of the warranty period.
This warranty does not cover: (a) damage or failure caused by or attributable to acts of God, abuse,
accident, misuse, improper or abnormal usage, failure to follow instructions, improper installation or
maintenance, alteration, lightning or other incidence of excess voltage or current; (b) any repairs other
than those provided by a RadioShack Authorized Service Facility; (c) consumables such as fuses or
batteries; (d) cosmetic damage; (e) transportation, shipping or insurance costs; or (f) costs of product
removal, installation, set-up service adjustment or reinstallation.
This warranty gives you specific legal rights, and you may also have other rights which vary from state to
state
RadioShack Customer Relations, 200 Taylor Street, 6th Floor, Fort Worth, TX 76102
12/99
• Dispose of old batteries promptly and properly.
• Do not burn or bury batteries.
• Use only fresh batteries of the required size and
recommended type.
• Do not mix old and new batteries, different types of
batteries (standard, alkaline, or rechargeable), or
rechargeable batteries of different capacities.
• If you do not plan to use the radio for several weeks,
remove the batteries. Batteries can leak chemicals that can
damage electronic parts.
This device complies with Part 15 of the FCC Rules. Operation is subject to the following
two conditions: (1) this device may not cause harmful interference, and (2) this device
must accept any interference received, including interference that may cause undesired
operation.
The radio is water resistant, but not waterproof.
Do not hang it where water can wash over it. Use
and store the radio only in room temperature
environments. Handle the radio carefully; do not
drop it. Keep the radio away from dust and dirt, and
wipe it with a damp cloth occasionally to keep it
looking new.
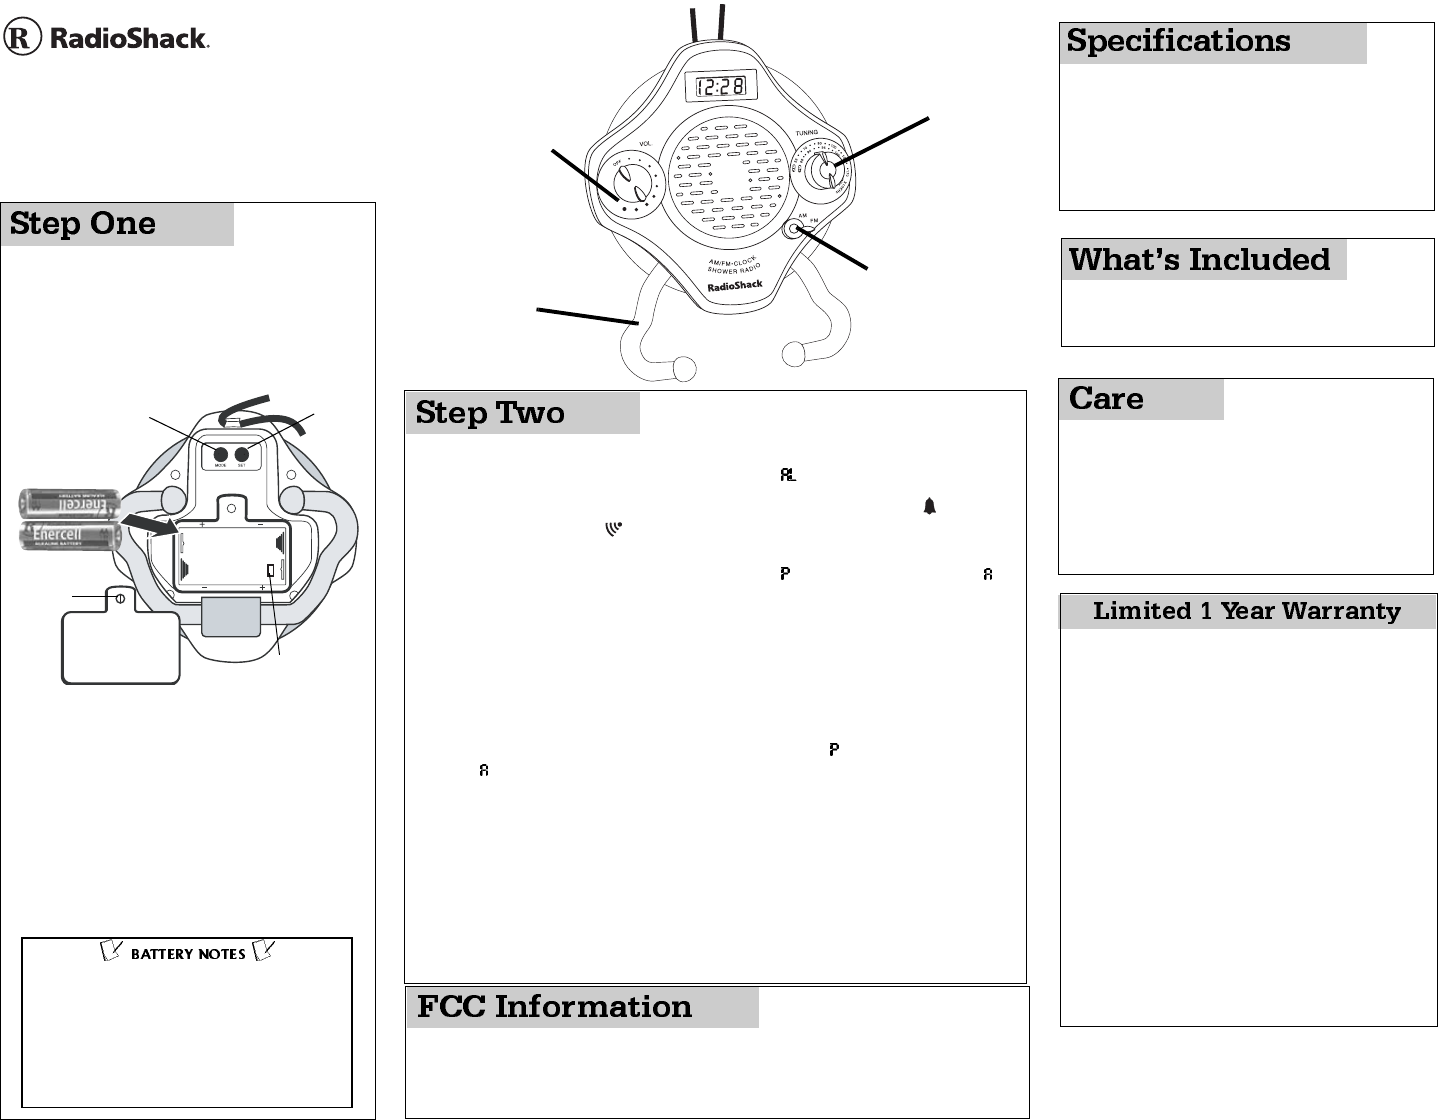
Hanger —
Rotate this into
position to hold
clothes or
towels.
VOL. OFF —
Rotate to turn
the radio on or
off, and to
adjust sound
levels.
TUNING —
Rotate to select
the station you
want to hear.
AM FM — Set
this switch to
select the
band you want
to hear.
Setting the Alarm, Date, and Time
1. Press SET. The current alarm time flashes, and appears.
2. Repeatedly press MODE to enable or disable the alarm and chime. appears
when the chime is on. appears when the alarm is on.
3. Press SET. The hour digits for alarm flash. Repeatedly press MODE to adjust the
hour. The alarm hour appears in 12-hour mode,
appears for a PM hour and
appears for a AM hour.
4. Press SET again. The minute digits for alarmflash. Repeatedly press MODE to
adjust the minute. The alarm time is now set. Press SET to confirm.
5. Press SET four times to set the date. The month digits appear. Repeatedly press
MODE to set the month.
6. Press SET again. The day digits appear. Repeatedly press MODE to set the day.
7. Press SET again to confirm and set the time of day. Press MODE to adjust the
hour. In this mode, the clock appears in 12-hour mode,
appears for a PM hour
and
appears for a AM hour. If you want to use 24-hour mode, repeatedly press
MODE to select the desired mode.
8. Press SET again. The current minute digits appear. Repeatedly press MODE to
adjust the minute.
9. Press SET again to confirm the setting and return to the time of day. Press MODE
to start the clock function.
If you enabled the alarm and chime, at the alarm time a tone will sound repeatedly for
approximately one minute. If you have only enabled the chime, a tone will sound once
at the top of each hour (for example, 11:00, 12:00, etc.).
To display the alarm time, date, or seconds, repeatedly press MODE.


