


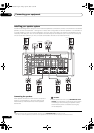

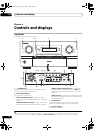


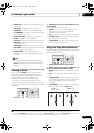

Controls and displays
04
34
En
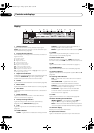
VIDEO PARAMETER – Use to access the Video
options (page 98).
HOME MENU – Use to access the HOME MENU
(pages 43, 51, 53 and 55).
RETURN – Press to confirm and exit the current
menu screen (also use to return to the previous menu
with DVDs or to select closed captioning with DTV).
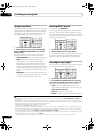
9
///
(
TUNE
/
ST
) /
ENTER
Use the arrow buttons when setting up your surround
sound system (see page 43) and the Audio or Video
options (page 96 or 98). Also used to control DVD menus/
options and for deck 1 of a double cassette deck player.
Use TUNE / to find radio frequencies and use ST /
to find preset stations (page 42).
10 Component control buttons
The main buttons (, , etc.) are used to control a
component after you have selected it using the input
source buttons.
The controls above these buttons can be accessed after
you have selected the corresponding input source button
(for example DVD, DVR 1 or TV). These buttons also
function as described below.
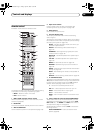
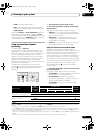
Press TUNER first to access:
MPX – Switches between stereo and mono reception
of FM broadcasts. If the signal is weak, then
switching to mono will improve the sound quality
(page 41). NOISE CUT MODE 1 to 2 can be selected
when receiving AM broadcasts.
Set the operation selector switch to RCV first to access:
STATUS – Press to check selected receiver settings
(page 100).
PHASE CTRL – Press to switch on/off Phase Control
or Full Band Phase Control (page 12).
CH LEVEL – Press repeatedly to select a channel,
then use / to adjust the level (page 58).
11 Receiver controls
AUTO/DIRECT – Press to select Auto Surround
(page 35) or Stream Direct (page 38) listening.
STEREO/A.L.C. – Switches between the stereo
playback mode (page 37) and the Front Stage
Surround Advance mode (page 37).
STANDARD – Press for Standard decoding and to
switch between the various 2 Pro Logic IIx and
Neo:6 options (page 35).
ADV SURR – Use to switch between the various
surround modes (page 36).
THX – Press to select a Home THX listening mode
(page 36).
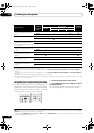
12 Number buttons and other receiver/component
controls
Use the number buttons to directly select a radio
frequency (page 41) or the tracks on a CD, DVD, etc.
ENTER can be used to enter commands for TV or DTV.
After set the remote control operation switch to RCV:
SIGNAL SEL – Use to select an input signal (page 38).
SLEEP – Use to put the receiver in sleep mode and
select the amount of time before sleep (page 99).
DIMMER – Dims or brightens the display (page 99).
SR+ – Switches the SR+ mode on/off (page 71).
SBch – Use to select the surround/virtual back
channel mode (page 39).
MCACC – Press to switch between MCACC presets
(page 38).
A.ATT – Attenuates (lowers) the level of an analog
input signal to prevent distortion (page 99).
GENRE – Automatically selects the most appropriate
Advanced Surround mode for the genre of the source
currently being played back (this feature is available
only when a Pioneer DVD recorder supporting HDMI
Control is connected to this receiver via HDMI)
(page 40).
SC-07 only: HDMI OUT – Switch the HDMI output
terminal (page 100).
Press TUNER first to access:
D.ACCESS – After pressing, you can access a radio
station directly using the number buttons (page 41).
CLASS – Switches between the three banks (classes)
of radio station presets (page 42).
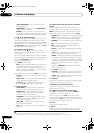
13
SOURCE
Press to turn on/off other components connected to the
receiver (see page 102 for more on this).
14 Remote control illumination button
Press to turn on/off the illumination of some of the
buttons and the LCD light.
1
15 Remote control operation selector switch
Set to RCV to operate the receiver, TV or SOURCE to
operate the TV or the source device.
When this switch is set to RCV, the receiver can be
controlled (used to select the white commands above the
number buttons (A.ATT, etc.). Also use this switch to set
up surround sound (pages 10 and 43).
16
VOL +/–
Use to set the listening volume.
17
MUTE
Mutes the sound or restores the sound if it has been
muted (adjusting the volume also restores the sound).
Note
1 • They also light when buttons are operated or the remote control operation selector switch is switched.
• Press and hold in the remote control illumination button for 5 seconds to enable/disable the illumination function.
SC07-05.book Page 34 Friday, April 25, 2008 11:59 AM