


Chapter Two • CLD-V2600 / 2400 Level I & III
2-6 TP 117 v. 2.0 • 12/93 CLD-V2600 / 2400 Level I & III User’s Manual
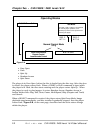
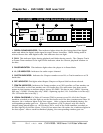
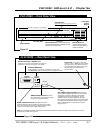
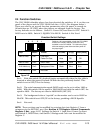
1. INTERFACE CONNECTOR RS-232C (D-SUB 15 pin): This provides a serial interface
connection to a computer or controller. (See Appendix C of this Manual for cable
descriptions, or Pioneer Product Information Bulletin #6.)
2. FUNCTION SWITCHES: Switch 1 sets Load Start /Power On Start ON or OFF. Switch 2
sets Baud Rate to 1200 or 4800. Switch 3 sets the Squelch on the monitor to Black or Blue.
Switch 4 is not used. The factory default sets all switches OFF (in the UP position): Load
Start /Power On Start is OFF; Baud Rate is 4800; Squelch is set to Blue. If the function
switch settings are changed, initialize the player by turning the power OFF and ON again.
3. AUDIO OUT TERMINALS (RCA Jacks): These terminals output the audio signals from
LaserDiscs or Compact Discs. Connect them to the Audio IN jacks on the back of a video
monitor. Or connect them to the LD or AUX input terminals of your stereo amplifier. Do not
connect them to your amplifier PHONO input. (Two Audio cables are supplied with the player.)
4. S-VIDEO OUT TERMINAL: The player can be connected via this connector to an AV
monitor or television equipped with an S-VIDEO INPUT terminal. The Audio connections
from Audio OUT on the player to Audio IN on the monitor must also be made.
5. VIDEO OUT TERMINAL (RCA Jack): This terminal outputs an NTSC video signal and is
used for connecting the player to a color video or TV monitor that has a video input jack.
(A video cable is supplied with the player.)
6. CHANNEL SELECTOR (CH 3 / CH 4): This switch changes the channel of the internal RF
converter. Set this to the channel that is not used for TV broadcasts in your area.
7. VHF OUT TERMINAL (75 Ω F-type jack): Connect this terminal to the VHF antenna
terminal of your TV set. (An Antenna Cable is supplied with the player.)
8. ANTENNA TERMINAL (75 Ω F-type jack): Connect the coaxial cable (75Ω) from the VHF TV
antenna to this terminal. (An adapter to connect the coaxial cable is supplied with the player.)
9. SAFETY POWER CORD: This is a 3-line power cord with a 3-pronged power plug. Insert
the power plug into a wall outlet (120V, 50/60 Hz). Make sure the wall outlet has a ground
terminal. Do not defeat the ground plug by using an inappropriate connector.
1
4
3
5
6
7
8
2
9
CLD-V2600 — Rear Panel View
Figure 2-E