


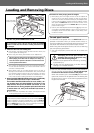


19
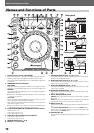
Before Operating (Names and Functions of Parts)Advanced Operations
7 To return to a loop (Reloop)
During playback after leaving a loop, press the RELOOP/EXIT
button.
¶ Playback will return to the loop-in point of the previously set loop, and
loop play will resume.
¶ In the case of MP3 playback, reloop cannot be performed to a folder
different from the one currently selected.
¶ Reloop cannot be performed when the RELOOP/EXIT button is not
lighted.
To perform hot cue
Up to three hot-cue points (A, B, C, including loop data) can be set in
advance. In this way, playback can be started from either of those points
instantly.
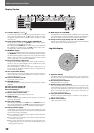
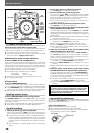
7 Setting hot-cue points
1. Press he HOT CUE REC MODE button so that HOT CUE A,
B, C buttons are lighted red.
2. During playback or pause, press the desired button (A, B,
C) at the point you wish to set as a hot cue in that button.
¶ The pressed button will flash red for 2 seconds, and the position
and playback header data at that point will be recorded. When the
button is pressed during loop playback, the data for the currently
playing loop will be recorded. The playback direction is not recorded.
¶ While data is being recorded, it is not possible to record data to
other HOT CUE buttons, input cue points, or perform search or
scratch.
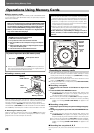
¶ When a memory card is loaded, the newly stored hot cue points
will automatically be backed up to the memory card. ☞ P. 20
¶ If hot cue points are stored while performing scratch, the play-
back may temporarily stop.
7 Beginning hot cue
1. Press the HOT CUE REC MODE button so that the HOT
CUE A, B, C buttons’ indicators are lighted either green
or orange.
¶ Buttons containing hot cue points will light green.
¶ Buttons containing loop data will light orange.
¶ Buttons containing no hot cue points will remain unlighted.
2. During playback, pause, or cue standby, press the button
(A, B, or C) in which the desired start point has been set.
¶ Playback will start instantly based on the data set in the button.
¶ When loop data has been recorded to a HOT CUE button, loop
play will start instantly.
¶ Loop data recorded in a HOT CUE button produces a loop inde-
pendent from any loops set with the LOOP IN/REALTIME CUE
and LOOP OUT buttons; the RELOOP/EXIT button can be used
to cancel the loop, and LOOP OUT (OUT ADJUST) button can be
used to edit the loop-out point, and those edited modifications are
directly applied to the data recorded in the HOT CUE button.
¶ In the case of MP3 playback, hot cue playback cannot be per-
formed on any loop that overlaps multiple folders.
¶ When inserting a CD or memory card, it is possible to restore the
hot cue points previously recorded to the memory card (☞ P. 21).
Reverse play
Set the DIRECTION FWD/REV switch to the [REV] position.
The [REV] indicator will light and playback will begin in the reverse direc-
tion.
¶ Playback acceleration/deceleration produced with jog dial rotation will
operate in reverse.
¶ During reverse playback, it is not possible to create new loops or to
edit loop-out points.
¶ If track search or loop play are performed, the audio memory status
indicator (jog dial display) will flash for 1 to 2 seconds, and scratch/
reverse operations may be temporarily disabled.
¶ In the case of MP3, reverse play that overlaps multiple folders is not
possible.
¶ During MP3 play, reverse playback may not occur immediately with
some tracks.
About fader start play
When the accessory control cord is used to connect this unit’s CON-
TROL jack to the corresponding CONTROL jack on a Pioneer DJ mixer,
moving the mixer’s channel fader causes the CUE standby on the CD
player to be released, thus instantly starting playback. The mixer’s cross
fader can also be used to control fader start on the player. Also, when
the fader lever is returned to its original position, the player can be made
to return to its cue point (back cue). For details regarding connection,
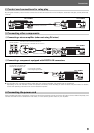
☞ P. 8.
Relay play using two players
When the accessory control cord is used to connect the CONTROL jacks
of this player and another Pioneer CDJ series CD player, the two players
can be made to perform automatic relay play (☞ P. 9).
¶ Set the two players’ auto cue function to ON (the [A.CUE] indicator
lights in the display).
¶ Set your audio mixer’s fader control to its center position.
1. Begin playback on the first player.
2. When the currently playing track finishes, the second
player automatically begins playback.
3. The first player then pauses at the beginning of the its
next track in the CUE standby mode.
¶ This process is repeated automatically, alternating playback on both
players.
¶ By exchanging the disc on the waiting player and cueing it to a
desired track, you can play a continuing series of desired tracks
from different discs.
¶ By setting a cue point on the waiting player, it is possible to start
from playback from a specifically desired point on a track ☞ P. 15
“Cue point settings”.
Note:
¶ Relay play may not occur properly if both players’ audio out-
put connectors are not connected to the same audio mixer.
¶ If the power is disconnected to the currently operating player,
the waiting player may start playback in some cases.
¶ Since the control cords require different connections, it is
not possible to combine fader start and relay play simulta-
neously.