


5 Touch Start todisplay the data transfer
mode.
# Follow theon-screen instructions tofinish updat-
ing theBluetooth software.
Displaying the Bluetooth
system version
If this unit failsto operate properly, you may
need to consultyour dealer for repair. In such
cases, you maybe asked to specify the system
version. Perform the followingprocedure to
check the versionon this unit.
1 Turn the source off.
Refer to Turning the source ON/OFFon page 8.
2 Press the home buttonto switch to the
home display.
3 Touch the systemkey to open thesystem
menu.
4 Touch Bluetooth Version Informationto
display to theversion of the Bluetooth mod-
ule of thisunit.
Setting the rear view
camera (back up camera)
CAUTION
Pioneer recommends theuse of a camera
which outputs mirror-reversed images.Oth-
erwise, the screenimage will appear re-
versed.
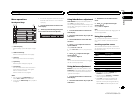
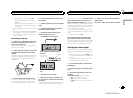
This unit featuresa function that automatically
switches to the rear viewcamera video (R.C IN)
when a rear view camerais installed on your car
and the shift leveris moved to the REVERSE
(R) position.(For more details, consultyour
dealer.)
You can also switchthe rear view image by
pressing the touchkey.
For detailsrefer to Using the rear view on page
10.
! After you set upthe rear view camera setting,
move the shift leverto REVERSE (R) and
confirm that the rear viewcamera video is
shown on thedisplay.
! Changethis setting if thedisplay switches to
the rear view camera videoby error while you
are driving forward.
! To stop watchingthe rear view camera video
and return tothe source display,press and
hold MUTE.
! Touch the RearViewsource icon to display
the rear view camera imagewhile driving.
Touch the sourceicon again to turn therear
view camera off. For details, refer toSelecting
a source on page8.
1 Press the home buttonto switch to the
home display.
2 Touch the systemkey to open thesystem
menu.
3 Touch Camera Polarityon the system
menu to selectthe appropriate setting.
! Battery– When thepolarity ofthe connected
lead ispositive whilethe shift leveris in RE-
VERSE (R)position
! Ground– Whenthe polarity ofthe connected
lead isnegative whilethe shift leveris in RE-
VERSE (R)position
! Off– Whena rear view camerais notcon-
nected tothis unit
! Therear view keysetting also turnsoff onthe
home displayscreen.
Auto EQ (auto-equalizing)
The auto-equalizer automatically measuresthe
car’s interior acoustic characteristics,and then
creates an auto-equalizer curve based on thatin-
formation.
! To perform this function, dedicated micro-
phone (e.g. CD-MC20) isrequired.
WARNING
As a loud tone(noise) may be emittedfrom the
speakers when measuringthe car’s interior
acoustic characteristics, neverperform auto EQ
while driving.
CAUTION
! Thoroughlycheck the conditionsbefore per-
forming auto EQas the speakers may be
damaged if these functionsare per formed
when:
— The speakersare incorrectlyconnected. (For
example, whena rearspeaker is connected
as asubwoofer output.)
— A speakeris connectedto a poweramp deliv-
ering outputhigher thanthe speaker’s maxi-
mum inputpower capability.
! Ifthe microphone is placedin an unsuitable
position the measurementtone may become
loud and measurementmay take a long
time, resulting inbattery drainage. Be sure
to place themicrophone in the specified lo-
cation.
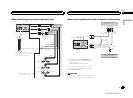
Before operating the auto EQ
function
! Carry out auto EQ inas quiet a place aspos-
sible, with thecar engine and air condition-
ing switched off. Also cutpower to car
phones or portabletelephones in the car, or
remove them fromthe car before carrying
out auto EQ.Sounds other thanthe measure-
ment tone (surroundingsounds, engine
sound, telephones ringingetc.) may prevent
correct measurement of thecar interior
acoustic characteristics.
! Besure to carry out autoEQ using the op-
tional microphone. Usinganother micro-
phone may preventmeasurement, or result
in incorrect measurementof the car interior
acoustic characteristics.
! Inorder to perform auto EQ,the front speak-
er must beconnected.
! Whenthis unit isconnected to a power amp
with input levelcontrol, auto EQ may not be
possible if the poweramp’s input level is set
below the standardlevel.
! Whenthis unit isconnected to a power amp
with an LPF, turnthis LPF off beforeperform-
ing auto EQ. Alsoset the cut-off frequency
for the built-inLPF of an activesubwoofer to
the highest frequency.
! Thedistance has beencalculated by com-
puter to be theoptimum delay to giveaccu-
rate results forthe circumstances, so please
continue to usethis value.
— The reflected sound withinthe car is
strong and delaysoccur.
— The LPFon active subwoofers or external
amps delay thelower sounds.
! AutoEQ changes theaudio settings as fol-
lows:
— The fader/balance settings returnto the
center position. (Referto Using fader/bal-
ance adjustment on page33.)
System settings
40
Section
System settings
En
20
<CRD4703-B/N>40