


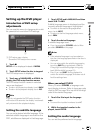

Switching the warning tone
If the front panel is not detached from the
head unit within five seconds of turning off the
ignition, a warning tone will sound. You can
turn off the warning tone.
% Touch D. WARN on the initial menu to
turn warning tone on.
# To turn warning tone off, touch D. WARN
again.
Switching the auxiliary setting
It is possible to use auxiliary equipment with
this unit. Activate the auxiliary setting when
using auxiliary equipment connected to this
unit.
% Touch AUX on the initial menu to turn
auxiliary setting on.
# To turn auxiliary setting off, touch AUX again.
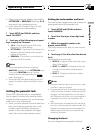
Setting the rear output and
subwoofer controller
This unit’s rear output (rear speaker leads out-
put and RCA rear output) can be used for full-
range speaker (FULL) or subwoofer (SUB. W)
connection. If you switch the rear output set-
ting to SUB. W, you can connect a rear speak-
er lead directly to a subwoofer without using
an auxiliary amp.
Initially, the unit is set for rear full-range speak-
er connection (FULL). When rear output is
connected to full range speakers (when FULL
is selected), you can connect the RCA sub-
woofer output to a subwoofer. In this case, you
can select whether to use the subwoofer con-
troller’s (low pass filter, phase) built-in SUB.W
or the auxiliary FULL.
! When the multi-channel processor (e.g.,
DEQ-P8000) is connected to this unit, you
cannot operate this function.
1 Touch NEXT on the initial menu.
2 Touch REARSP.
3 Touch a or b to switch the rear output
setting.
Touch a to select full-range speaker and FULL
appears in the display. Touch b to select sub-
woofer and SUB. W appears in the display.
# When no subwoofer is connected to the rear
output, select FULL.
# When a subwoofer is connected to the rear
output, set for subwoofer SUB. W.
# When the rear output setting is SUB. W, you
cannot change the subwoofer controller.
4 Touch c or d to switch the subwoofer
output or non fading output.
Touch c to select subwoofer output and
SUB.W appears in the display. Touch d to se-
lect non fading output and FULL appears in
the display.
Notes
! Even if you change this setting, there is no
output unless you turn the nonfading output
(refer to Using nonfading output on page 33)
or subwoofer output (refer to Using subwoofer
output on page 32) in the audio menu on.
! If you change the subwoofer controller, sub-
woofer output and nonfading output in the
audio menu return to the factory settings.
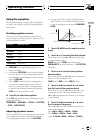
Correcting distorted sound
You can minimize distortion that may be
caused by the equalizer curve settings.
Setting an equalizer level high can cause dis-
tortion. If high sound is crippled or distorted,
try switching to LOW. Normally, leave the set-
ting at HIGH to ensure quality sound.
! Only when the multi-channel processor
(e.g., DEQ-P8000) is connected to this unit,
you can operate this function.
Operating this unit
En
39
Section
03
Operating this unit